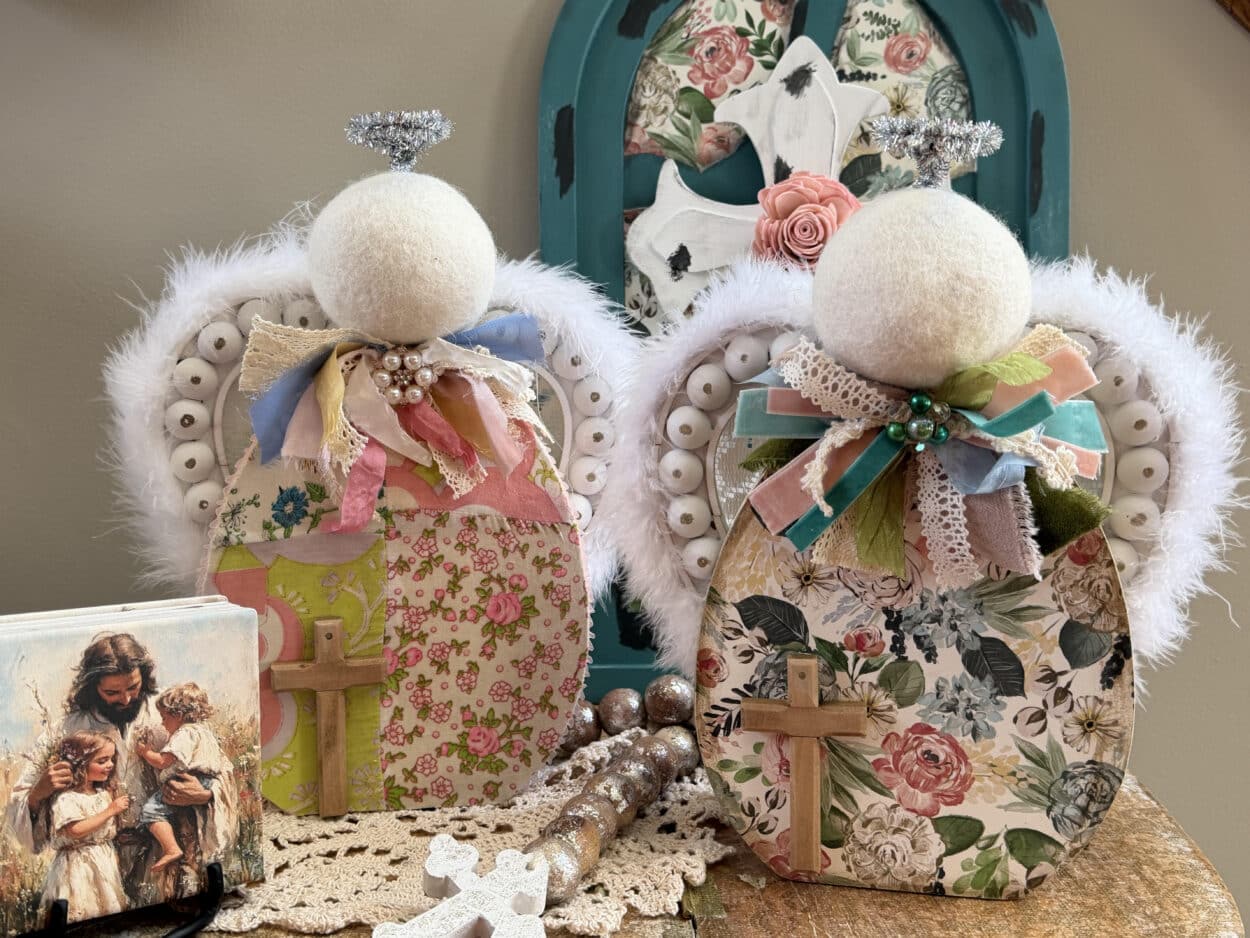
I originally saw a photo of an angel on Pinterest that looked like they used the wooden egg and wooden heart with beaded edge from Dollar Tree. I just loved this idea and I wanted to make the angel but make her my own. For the first angel, I used scrapbook paper, but then I thought about making it a remembrance angel for a loved one who has passed. For my remembrance angel I used clothing pieces from my grandma and I love it; every time I look at it, I think of my grandmother.
Materials I Used
Unfinished wood egg-shaped shelf sitter from Dollar Tree
White wood heart shape with beaded edge, Dollar Tree
Wool Dryer Ball for head
Piece of lace to cover the heart
Scrapbook paper or fabric to cover egg
Silver Tinsel pipecleaner
Ribbon to cover the sides of the egg (optional)
White boa ribbon trim, Walmart
3″x2″ wood cross (optional)
4 tumbeling blocks, Dollar Tree
Drill along with 1/18 and 5/32 drill bits
1.5″ piece of a .187 dowel
2 #6×1″ flat phillips wood screws
Phillips screwdriver
Scissors
Hammer
Awl tool
Use craft paint that matches your paper or fabric choice
Paintbrushes
Mod Podge
Gluegun and gluesticks
Gorilla Clear Grip Adhesive
Sandpaper
Bow of your choice
Preparing the heart
Remove the hanger from the back of the heart. Using a drill and a 1/18 drill bit drill a hole in the bead where the ends meet at the top center. Next drill a hole in the bead where the two ends meet at the bottom (see photos below).
Lay the heart down so the back faces up, then apply mod podge to the back of the heart. Lay the lace over the back of the heart pressing the lace down. Lift up a small section of the lace at a time, trim off the excess lace so it is just inside theedge of the heart working your way around the heart.
Apply a generous amount of mod podge onto the lace working it into the lace. Do not pod modge the lace in the center of the heart. Set aside to dry.
Preparing The Egg
If you are using scrapbook paper to cover the egg paint the entire outer edge all the way around. I used a cream color paint.
If you use a light-colored fabric, color the entire egg front and back so the wood does not show through the fabric.
If you are using scrapbook paper to cover the egg, apply Mod Podge to one side of the egg place the scrapbook paper down, and rub the paper onto the egg. Use sandpaper to sand off excess paper. Repeat these steps on the other side of the egg.
If you are using fabric place the egg on top of the fabric trace with a pencil, and then cut it out. Mod Podge one side of the egg then place your fabric down. Apply a generous amount of Mod Podge to the top of the fabric working it into the material.Repeat these steps to the other side of the egg.
If you like, you can rub antiquing wax around the egg.
Using a drill and a 5/32 drill bit drill a hole into the top of the egg about a 1/4″ in from the edge.
Attaching The Heart
Hold the heart to the back of the egg placing it where you think the wings look good. Holding the heart in place, place the egg down (front of egg facing down).
Screw down the bottom of the heart using the hole you drilled earlier.
Check to ensure the wings are positioned as you want them then screw the top part onto the egg.
Insert the 1.5″ piece of dowel into the drilled hole at the top of the egg. The dowel should fit tightly, you may need to use a hammer to tap the dowel down into the hole.
Place the wood dryer ball ontop of the dowel and push down slightly so the dowel leaves an indent in the dryer ball.
Using an awl tool, make a hole in the dryer ball then test fit it onto the dowel.
Add gorilla clear grip adhesive to the down and glue on the dryer ball.
To make the halo fold a silver tinsel pipecleaner in half and twist it together. Bend one end of the pipecleaner into a circle about 1″ from the other end, and twist the end around.
Bend the circle part of the pipecleaner over and hold the halo ontop of the head to see where you would like the halo. Then, use the awl tool make a hole in the head.
Place the halo into the hole to ensure it fits the head. Add clear grip adhesive to the dowel then glue on the head.
To add the bow, apply hot glue to its back and then glue it at the neck. I made a messy bow by cutting ribbon pieces, layering them and zip-tying them together. I then added an old earring to the center of the bow.
If you want to add ribbon to the angel’s sides, apply hot glue to the back of the ribbon and attach it to the angel’s side, starting at the head. To attach the boa ribbon start by applying hot glue to the side of the heart at the head, and then glue down the boa ribbon. Continue adding hot glue and the boa ribbon all around the heart.
Next add hot glue starting at the top screw of the wings and glue on the boa ribbon. Work your way around the back of the heart.until you reach where you started.
I also glued a wooden cross to the angel’s front by adding clear grip adhesive to the back of the cross and attaching it to the angel.
Adding The Blocks
To make the angel sturdy, add blocks to the back of the angel. Add gorilla clear adhesive to one of the tumbling blocks, then place a second block on top. Repeat these steps for the other two blocks. Wait about 10 minutes then paint the blocks with your choice of color craft paint.
Add the adhesive to one side of both sets of blocks and attach them to the bottom back of the angel. Let it set for at least 20 minutes before standing the up the angel.
Your angel is now complete! I hope you enjoy making the angel and make a few remembrance angels.