Home Decor, Thrifty Makeovers
DIY Vintage Platter Wreath
Jul
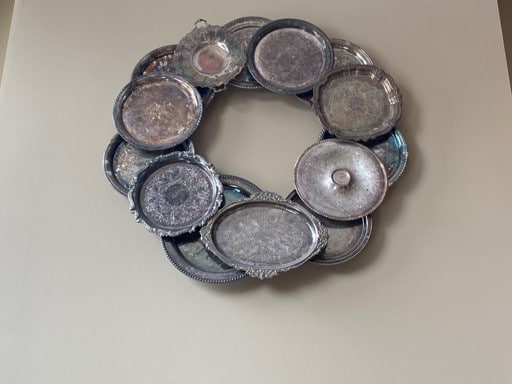
If you love vintage silver pieces you are going to love this vintage platter wreath. I seen a photo on line of this wreath and I knew I had to make one. I searched Pinterest to see if anyone has made one and posted directions. I did find a few but everyone was using hot glue to attach the platters together and there was no way hot glue was going to hold these heavy platters together. I did not want them to be falling off the wall so I decided to try epoxy but that did not work after letting them dry for a day I lifted up the wreath and the platters were falling off so back to the drawing board. I finally decided I was going to screw them together and this turned out to be the answer for me and no worrying about them falling off. I have this wreath hanging over my fireplace and I just love it I get so many compliments on it.
Materials You Will Need
-
24” Wood Circle Ring
-
12 Large Silver Platters
-
2 D Ring Hanger
-
Steel Center Punch
-
#6 ¾” Wood Screws
-
#6 ½” Sheet Metal Screws
-
Hammer
-
Drill, Small Drill Bit and Screw Bit
-
Piece of Scrap Wood
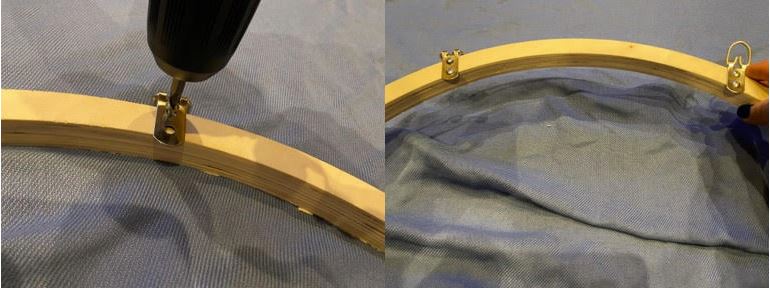
Attach D-Ring Hangers
I bought my 24” wood circle ring but you can surely cut out your own. The first thing you are going to want to do is attach 2 D-Ring hangers to the back of your circle ring. It is much easier to attach them before you attach your platters.
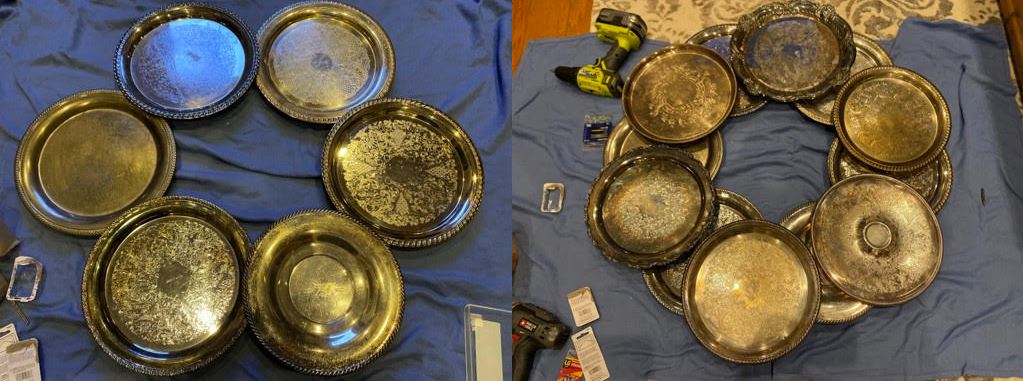
Preset The Platters
Before you attach the platters you are going to want to set your first 6 platters around the circle ring. Set them so the center of the platter is on the wood of the circle ring. Depending on the shapes and sizes of your platters you may need to overlap the them a little to get them all to fit around. Once you have the first row set you are going to start placing your second row. Place one platter in the middle of two platter of the first row. You want the top outside of the platter to hang a little higher then the two platters beneath it. Continue placing your second row of platters. If everything look good to you remove the second layer of platters. Take the platters off in order so you will now how they go back on. Leave your first row of platters on the circle ring.
Attaching The First Row Of Platters
Using the steel center punch and hammer make a indent in the center of one platter this will stop your drill bit from sliding around. Next drill a hole in the center of the platter then using a #6 ¾” wood crew screw the platter to the wood circle ring. You are going to need to keep fixing the platters to make sure they are still in place because they are going to move around as you attach platter. Next make a indent in the second platter, drill a hole, and screw the platter to the circle ring. You are going to repeat these steps to each platter until they are all attached. Make sure you check the placement of each platter before you screw it down.

Attaching The Second Row
Now that you have the first row of platters attached place your second row of platters back on top of the first row. Make sure you have them set the way you wanted them. Look at your first platter to see where it is touching the two platters underneath. You may have to look under the platter to see exactly where they are touching. Now hold your finger or mark with a pencil on the top platter where they are touching. Remove the platter and place on a piece of scrap wood. Make a indent where you are going to drill for the screw. Drill a hole then place the plater back in its place on the wreath make sure you have the hole where they are touching. Take your drill and drill a hole in the bottom platter through the hole you just made in the top platter. Screw the two platters together using a #6 ½” sheet metal screw. Repeat these steps to the other five platters. Making sure you check the placement of each platter before checking to see where they are touching. Once you have all six platters attached pick up your wreath and see if any of the platters slide down. If any of the platters seem to be sliding down you will need to add a second screw. Check again to see on the other side of the platter where the two are touching then drill a hole through both. Be careful drilling so that your drill bit doesn’t slide go slow at first. I though I had taken photo’s of each step but I am not finding them so I went back and took some screen shots from the video.

I hope you love this wreath as much as I do and decide to make one to hang in your home.