Home Decor, Thrifty Makeovers
How To Give Your Staircase An Easy Update
Jul
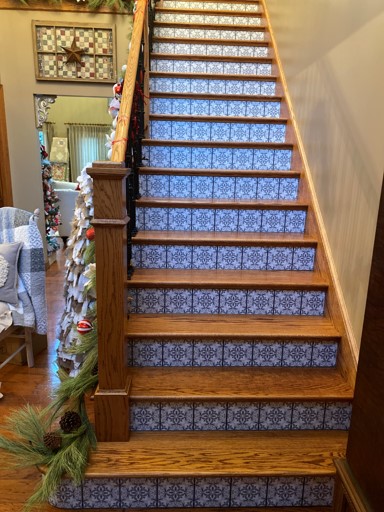
I have always wanted to give my staircase an update. I just love the look of the tile on the risers but I did not want something so permanent. I don’t know about you but I am always wanting to change things so I wanted something that I change out for my staircase just in case I get tired of it lol. I just love peel and stick wallpaper I have used it in my craft room and behind my coffee bar. When I was searching the peel and stick wallpaper online I came across peel and stick stair risers needless to say I was so excited. I only found one company that had different heights and lengths, I didn’t want to have to cut the height so I ordered them from Amazon and they were perfect all I needed to do was trim the length a little. If you check my recommended products page you can see which company I ordered from. I do receive a small commission if you order them from my link.
Materials You Will Need
- Enough Peel and Stick Stair Risers To Do Your Staircase (Amazon)
- NuWallpaper Application Kit
- Pencil
- Measuring Tape
- Ruler
- Something to Trim Your Risers On
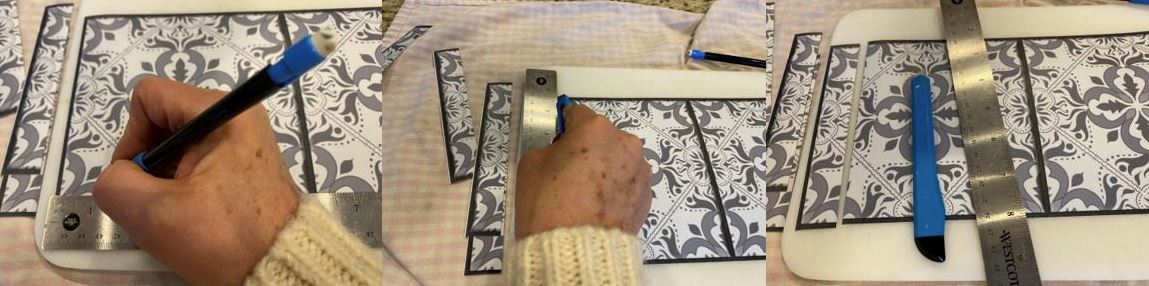
How To Measure And Trim
Measure your first riser on your staircase, I started from the top of the stairs. Depending on what pattern peel and stick risers you are doing will matter how you cut each one. My risers are a tile look and each one measures 48” in length and most of my risers measure 46” so I needed to trim 2” off. Using a ruler I marked an inch in from each side and marked the top and bottom of the peel and stick riser then I drew a straight line down. I did this to both sides of the riser then using the utility knife I trimmed each side. I did one riser at a time. I needed to make sure my grout lines all lined up as I did each stair riser so when I cam to a post that was up against the riser of my stair after an error I learned I needed to cut 1” off on the right side which was my wall side then place the peel and stick riser against the stair riser and see how much I needed to cut of the left side. If you are doing maybe a horizon wood pattern you could probably just cut one side of the peel and stick riser to make it fit. I am not going to lie it took my about 3 hours to do my 15 risers but in the end it was so worth the time.
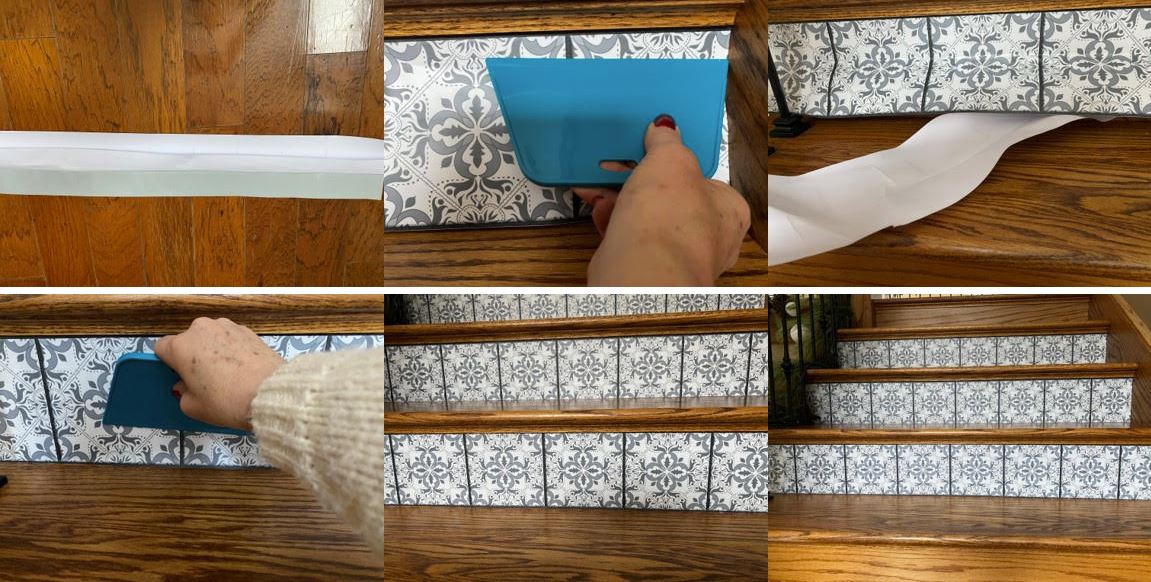
Applying The Peel And Stick Risers
You don’t want to peel of all the backing paper at once it is easier to work with if you peel the backing paper starting at the top and peeling down just about half way all the way across. Next line up one end of the riser to your stair riser then work your way across smoothing out the paper and pushing out the bubbles with your smoothing tool as you go. Make sure you are straight. If you start to get any wrinkles this more then likely means you are not straight so just peel the riser back and apply again. Once you have attached the riser all the way across start peeling off the backing paper about a ¼ of the way at a time and then smoothing it out as you go. If you have any bubbles that you are having a hard time getting out use a sharp pin and poke the bubble then run the smoothing tool over it this should get out the bubble. Continue working one riser at a time until you have them all finished. It takes a while but you will be happy with the results.
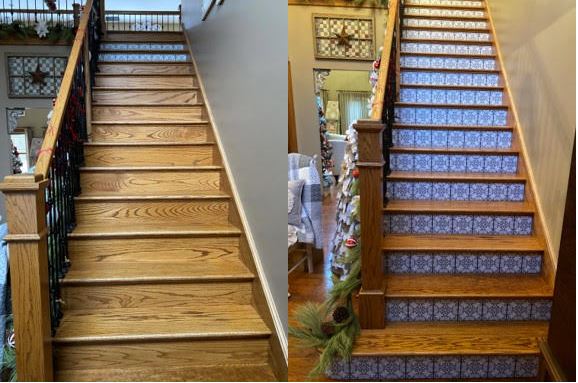
I hope you give this update a try you won’t believe what a change it will make to your staircase and your room. Here is a before and after photo of my staircase. Let me know what you think. Remember it doesn’t have to be permanent you can just peel it off without ruining your stairs.
This looks great! I’ve been looking at ones that have a waterfall pattern. Maybe I’ll actually try this