Fall, Halloween, Home Decor, Thanksgiving, Thrifty Makeovers
DIY Bundt Pan Pumpkin
Jul
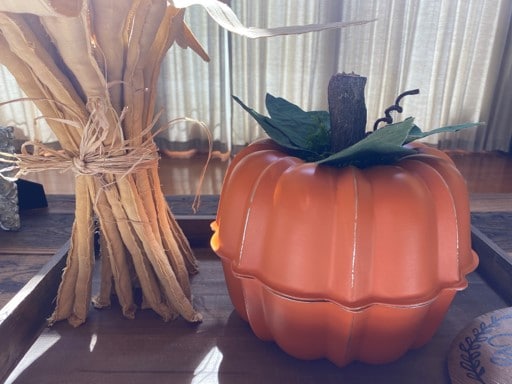
If you are like me and love to go to the thrift stores and yard sales one item you need to look for is bundt pans, I saw the idea of making a pumpkin out of bundt pans on Pinterest and I just love decorating for Fall so I thought I would give it a try.I am just loving how thispumpkin turned out and it was one of the easier projects I have done, needless to say I am on the search for more bundt pans to make more of these adorable pumpkins. If you would like to make the cornstalk in the photo go to my blog for DIY Cornstalk.
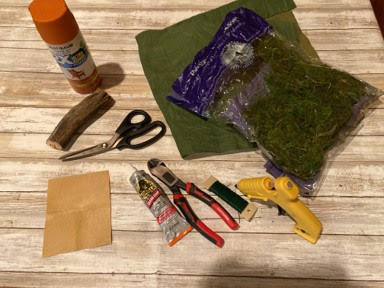
Here is a list of what you will need:
- Pumpkin Leaf Pattern
- 2 Bundt Pans (They need to fit together)
- Green Fabric
- Preserved Floral Moss
- Green Floral Wire
- Grapevine Wire
- Wire Cutters
- Orange Spray Paint
- Sandpaper
- Tree Stem
- Gorilla Clear Grip Glue
- Hot Glue Gun and Glue Sticks
- Scissors

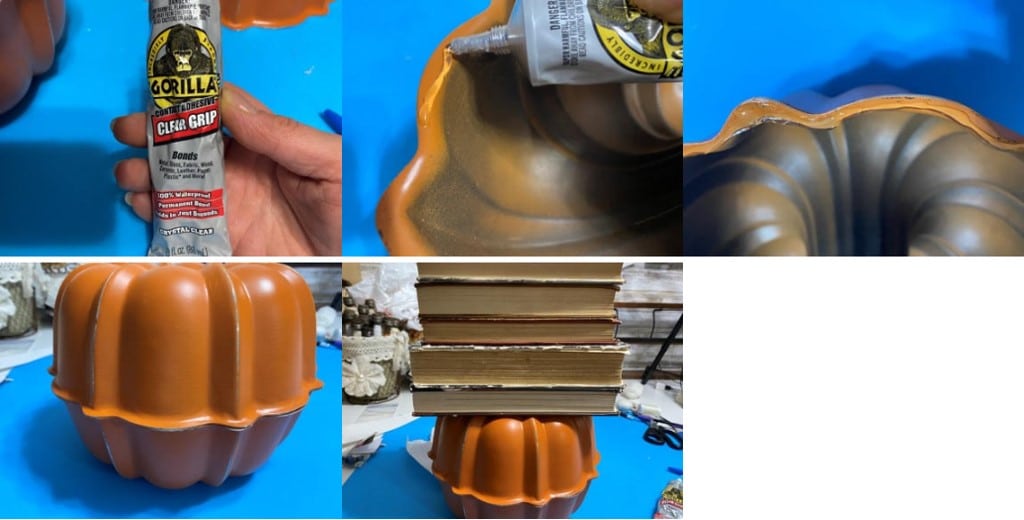
Painting And Sanding The Bundt Pans
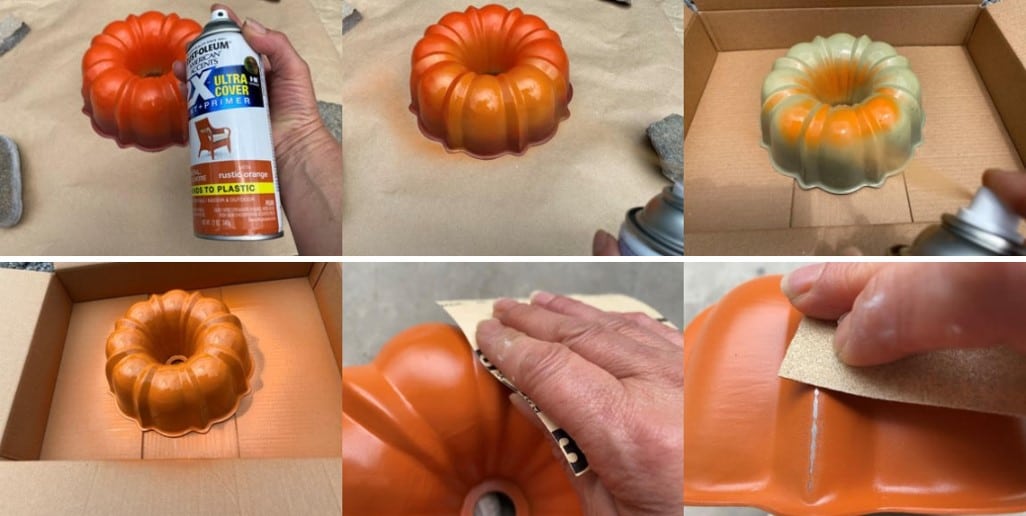
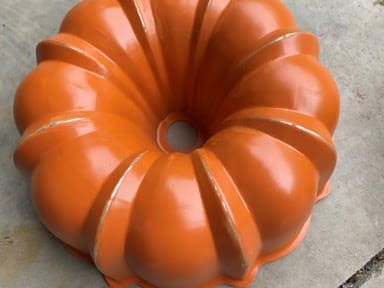
The first thing you need to do is wash your bundt pans to make sure they are clean, next in a well ventilated area spray paint your bundt pans, I used Rust-Oleum spray paint in the color rustic orange and it took two coats. After you have given the bundt pans two coats of paint and they have dried using a piece of fine grit sandpaper sand off the paint on the raised edges until the silver of the pan shows through.
Gluing The Bundt Pans Together
Now that you have your bundt pans painted and sanded it is time to glue them together, apply a line of gorilla clear grip glue all around the bottom edge of one bundt pan then place the second bundt pan on top, matching up the edges of both bundt pans, next place something heavy on top of the bundt pans to apply pressure to help them glue tightly together, I used a stack of books on top while, let set overnight. You can use any glue you would like but I really like the clear grip gorilla glue because it does grip within a few minutes but you still need to let it cure overnight.
Making The Leaves
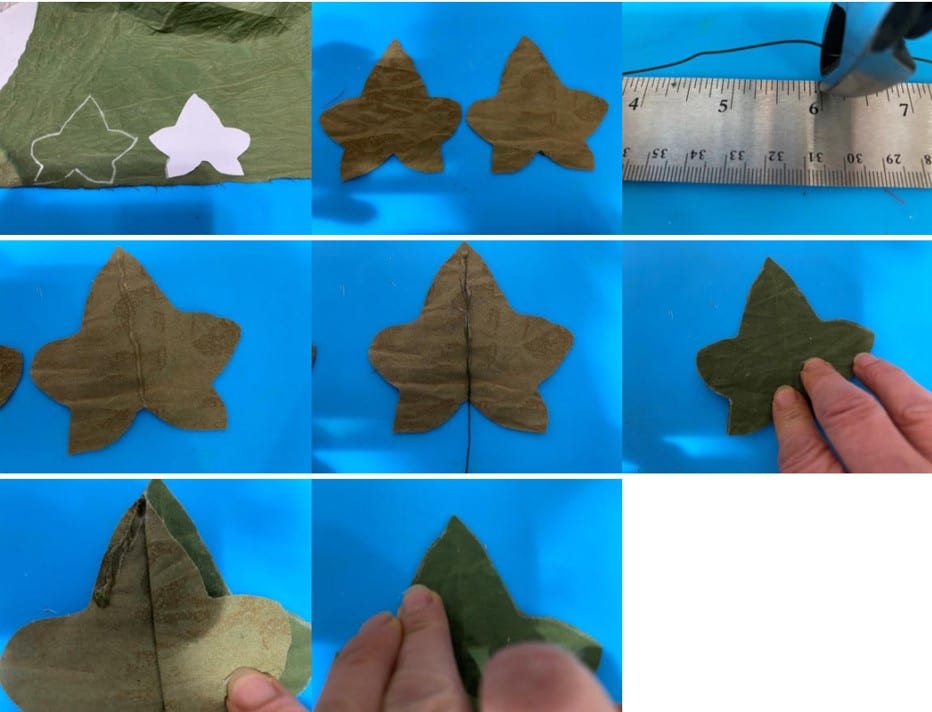
The first thing you will need to do is print and cut out the pumpkin leaf pattern, once you have your pattern you can either make the leaves out of green fabric or I like to color muslin fabric with paint and my coffee stain mixture, I just feel it gives it a more realistic look, if you would like to see how I color fabric you can go to my blog on How to coffee stain and color fabric. The first step is to lay your pattern onto a double layer of fabric and trace and cut out, this will give you two leaves which are going to make one leaf, you need to do this three more times. Next cut four 6 inch pieces of green floral wire then take one leaf and add a line off hot glue in the middle of the leaf from the top to the bottom, lay your 6 inch piece of wire on the line of glue and place another leaf on top gluing the two leaves together. The next step is to finish gluing the sides of the leaves together, fold over one side of the top leaf and add a small line of hot glue just inside the edge of the leaf then glue the to sides together, you can apply the glue down the whole side of the leaf at once or a little at a time, repeat this step to the other side of the leaf. You will need to repeat these steps to the other 6 leaf pieces making 3 more leaves.
Finishing The Pumpkin
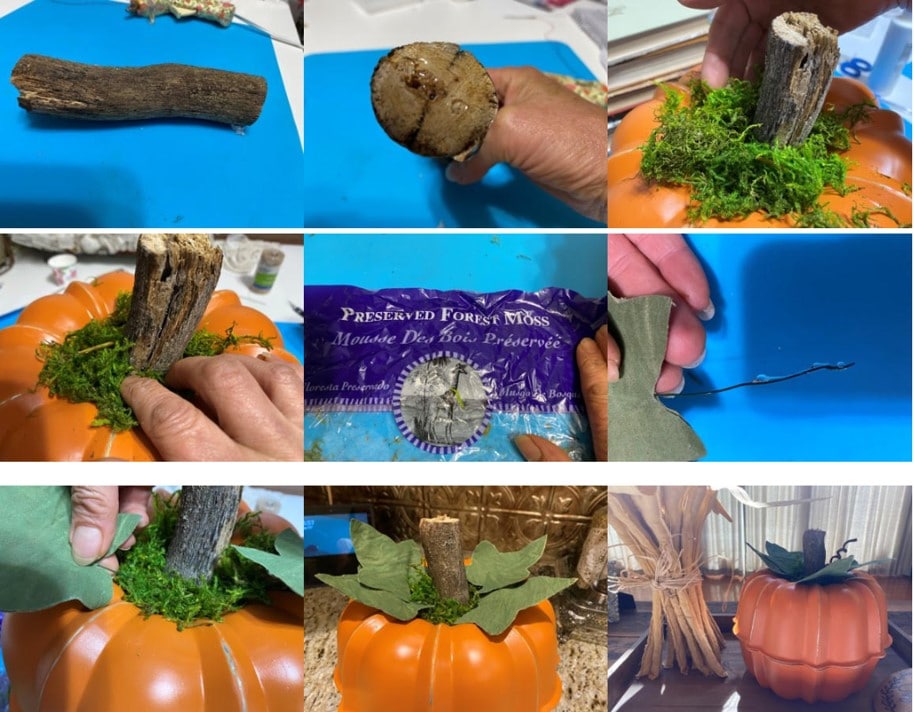
Once you have let the glue dry overnight and you have made your leaves it is time to put everything together. For the stem I went outside and cut a piece of tree limb, make sure it is thick enough, it doesn’t need to fill the whole hole but you want it to be thick enough so it doesn’t look lost on the pumpkin. Once you have your stem add some hot glue to the bottom of the stem then glue your stem to the pumpkin, next add some hot glue around the stem and add the floral moss. To add the leaves add some hot glue to the bottom of the wire and stick down into the floral moss repeat this step to the other 3 leaves. After I was finished I decided I wanted to add something to look like it was just pulled from the vine so I cut a 12 inch piece of grapevine wire curled it around a pencil added some hot glue to the bottom of the wire and glued it into the moss.
I hoped you enjoyed this weeks Thrifty Thursday project and I hope I inspired you to go and look for some bundt pans to make a pumpkin.
Love, Love, Love this Bundt pan pumpkin…… You are very talented Sherry…. Love your crafts….
It took a whole lot of time and patience to be able to find all supplies in our area to be able to even make … But so so worth it – I’ve made these and so happy with the end results!
Strongly suggesting others to give this one a try – Such a sweet easy Fall craft with AMAZING end results! Appreciating you sharing, thank you Sherry! x