Fall, Home Decor, Thanksgiving
DIY Cornucopia
Aug
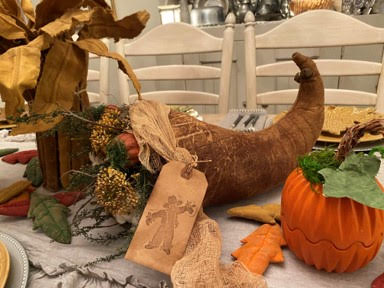
If you are like me and love to set you table for the season’s you are going to want to make this cornucopia.The cornucopia willbe a beautiful addition to your fall table setting it is very simple to make and you can fill it with the fall items that will go with your table setting.Just think how pretty this would be on your table for Thanksgiving not only is it beautiful but it smells awesome also.
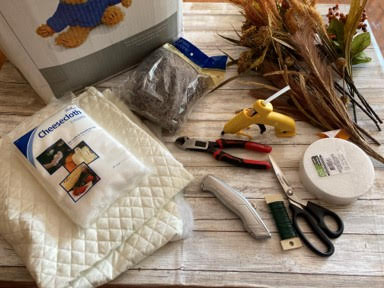
Here is a list of what you will need:
- Quilted Fabric about a ½ yard (Joann’s or Hobby Lobby)
- Cheesecloth
- Coffee Stain Mixture (Recipe Below)
- 2pc – 4.8 in x 0.75 in Styrofoam Circles (Dollar Tree)
- Spanish Moss (Dollar Tree)
- Polyester Fiberfill (Hobby Lobby)
- Fillers of your choice such as Pumpkins, Twigs, Sweet Annie and Flower Stems
- Hot Glue Gun and Glue Sticks
- Floral Wire
- Wire Cutters
- Scissors
- Pencil
- Sponge Paintbrush
- Utility Knife
- Rusty Bells
- Safety Pincs
Coffee Stain Mixture Recipe:
- 2 Cups Water
- ½ Cup Instant Coffee
- 2 Tablespoons Vanilla
- 2 Teaspoons Ground Cinnamon
- 1 Teaspoon Ground Nutmeg
- 1 Teaspoon Ground Cloves
You can add any spices you would like to this recipe, heat the water on the stove then add all the ingredients simmer for a few minutes so the spices can blend in with the coffee, remove from stove and let cool.
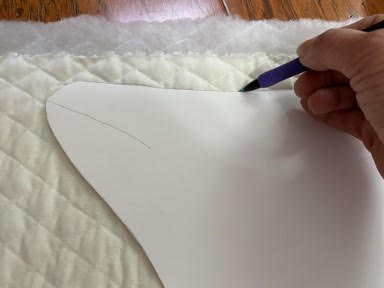
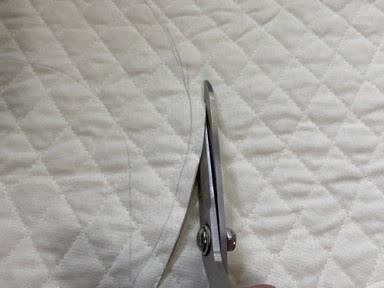
Print Out Pattern
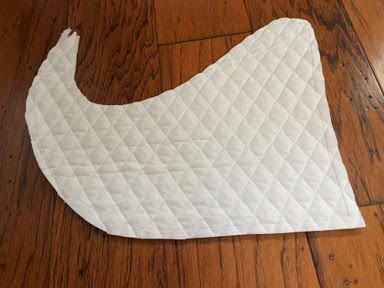
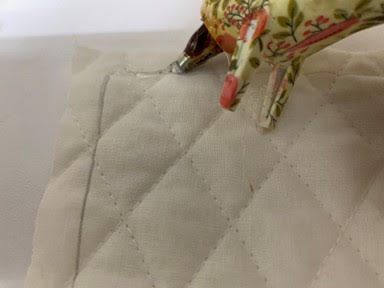
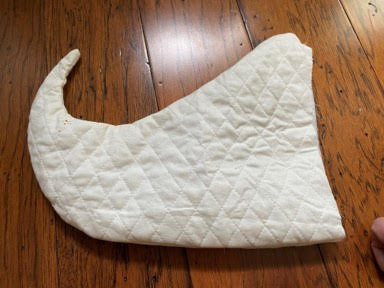
The first thing you will need to do is print out the pattern from the PDF file. Once you have your pattern printed and cut out, trace and cut out your cornucopia pattern onto a double layer of quilted fabric, I purchased mine from Joann’s, using a 50% off coupon of course, you can also use a old coverlet I made one of the cornucopia’s out of a Maltese coverlet I had, it turned out beautiful I think it is my favorite. When cutting out your cornucopia make sure to leave about a ¼” extra of fabric from your trace line all around the cornucopia. The solid line is your sew/glue line and the open stitch line shows how far you are to sew/glue.
Sewing or Gluing The Cornucopia
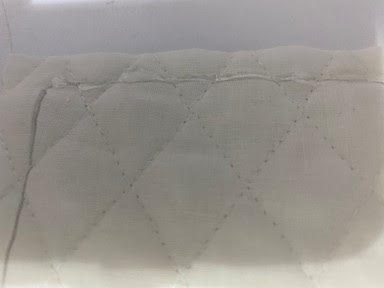
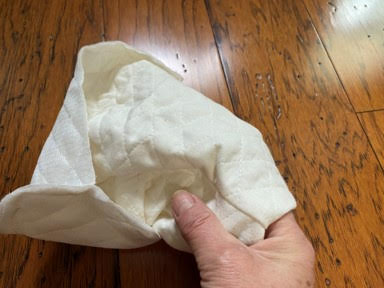
I prefer sewing the cornucopia but I know some people do not sew so you can also hot glue your two pieces together. If you are sewing the cornucopia starting at the right bottom of the cornucopia sew on your trace line around the cornucopia until you reach the top where the curve is you are going to sew around the curve and down about 1” do not sew the center closed this is where you are going to fill your cornucopia, you can see where you are to sew by reading the pattern. If you are gluing your pieces together start at the right bottom place a small line of hot glue on your trace line then place your second piece on top gluing them together continue adding hot glue and gluing the two pieces together until you reach the top curved part, add hot glue around the curve and down about 1” and glue together, do not glue the straight opening closed this is where you are going to fill your cornucopia. After you have sewn or glued your cornucopia you can now turn Right Side Out, you may need to use the eraser end of a pencil to push the point end out.

Coffee Staining The Cornucopia
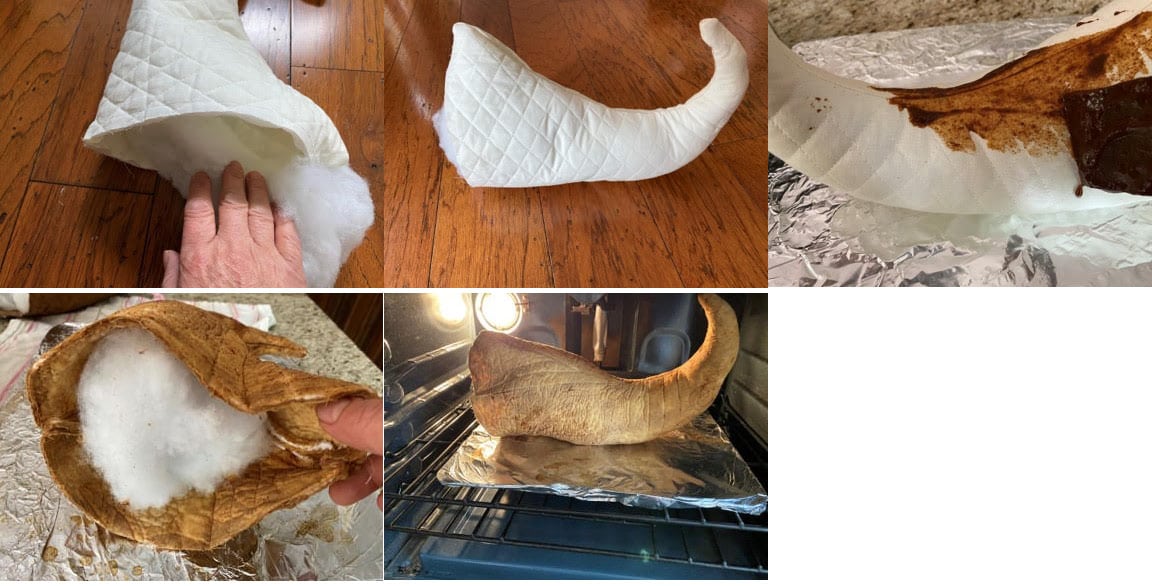
Now that you have the cornucopia made it is time to stuff the cornucopia with the polyester fiberfill, start by filling from the back to the front leave about a ¼ of the cornucopia unfilled at the front you will finish filling it later. Once you have stuffed the cornucopia make the above coffee mixture and using a foam brush cover the whole cornucopia with the coffee stain mixture make sure you also get the slug off the bottom of the coffee mixture this is all your seasonings. If you have sewn the cornucopia you can either place it outside in the sun to dry or if there is no sun you can place on a foil lined cookie sheet and place in a 200 degree oven make sure you check it every 5 or 10 minutes. If you have glued your cornucopia you will have to place it outside in the sun to dry. Once dried you will need to add another coat of the coffee stain mixture and dry then a 3rd coat and dry. You will also want to coffee stain the cheesecloth at this time I coffee stained the whole piece from the package but you only need a 24” long by 12” wide piece for one cornucopia, you can dry in the sun or the oven.
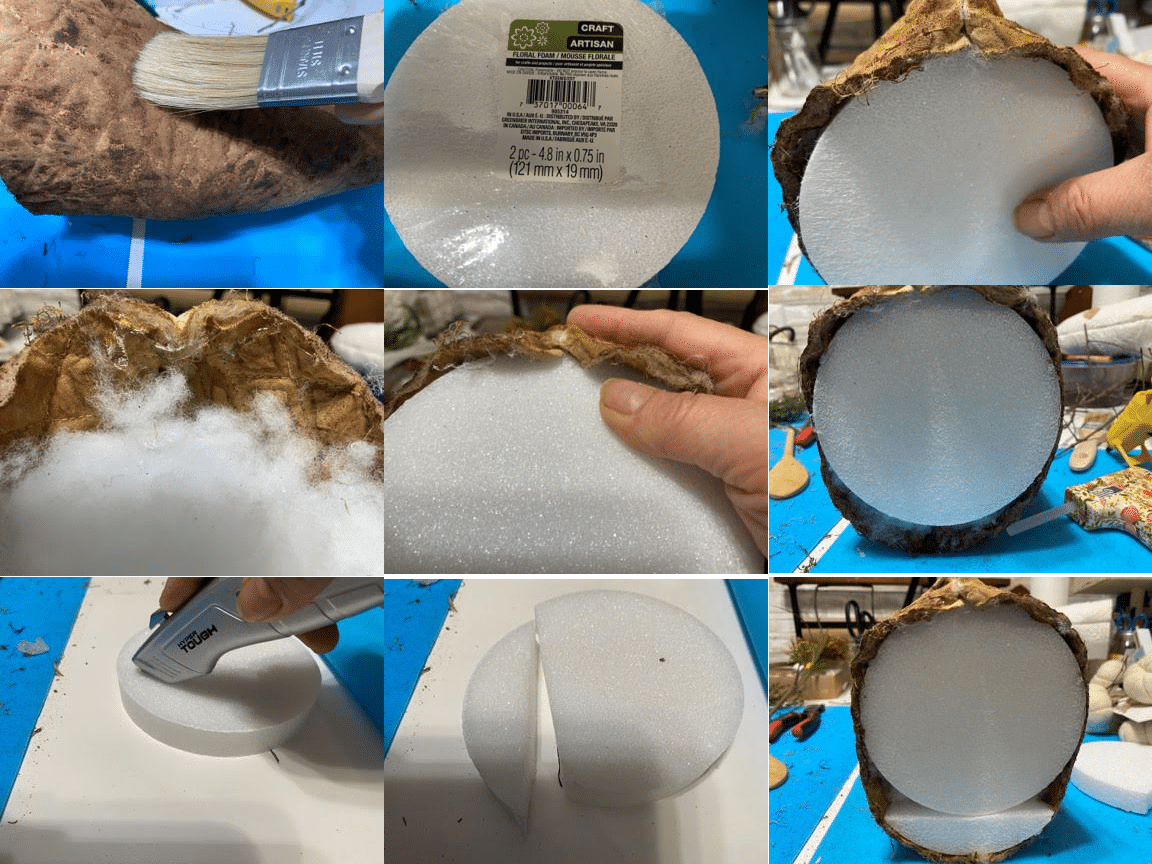
Adding The Styrofoam
Just a suggestion but you might want to take a paintbrush and brush off some of the excess spices on the cornucopia otherwise it gets all over your work surface. To add the Styrofoam first finish filling the cornucopia with the polyester fiberfill leave about a ½ inch or so unfilled so you can add the Styrofoam next take one Styrofoam circle and place in the cornucopia at the top, add some hot glue to the top piece of fabric and glue to the Styrofoam then add glue to each side and glue to the Styrofoam next take the second Styrofoam circle and using the utility knife cut a piece off the bottom make sure it is big enough to finishing filling in the bottom of the cornucopia, it is better to be to big and trim then to be to small. After you have cut your Styrofoam to size place in the bottom of the cornucopia and glue as you did the top piece.
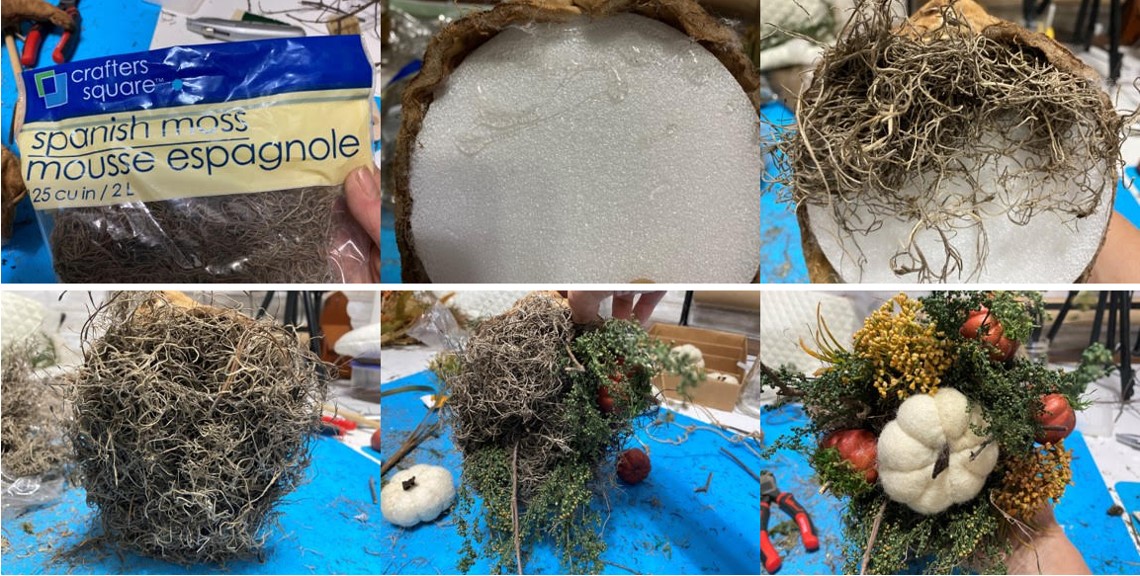
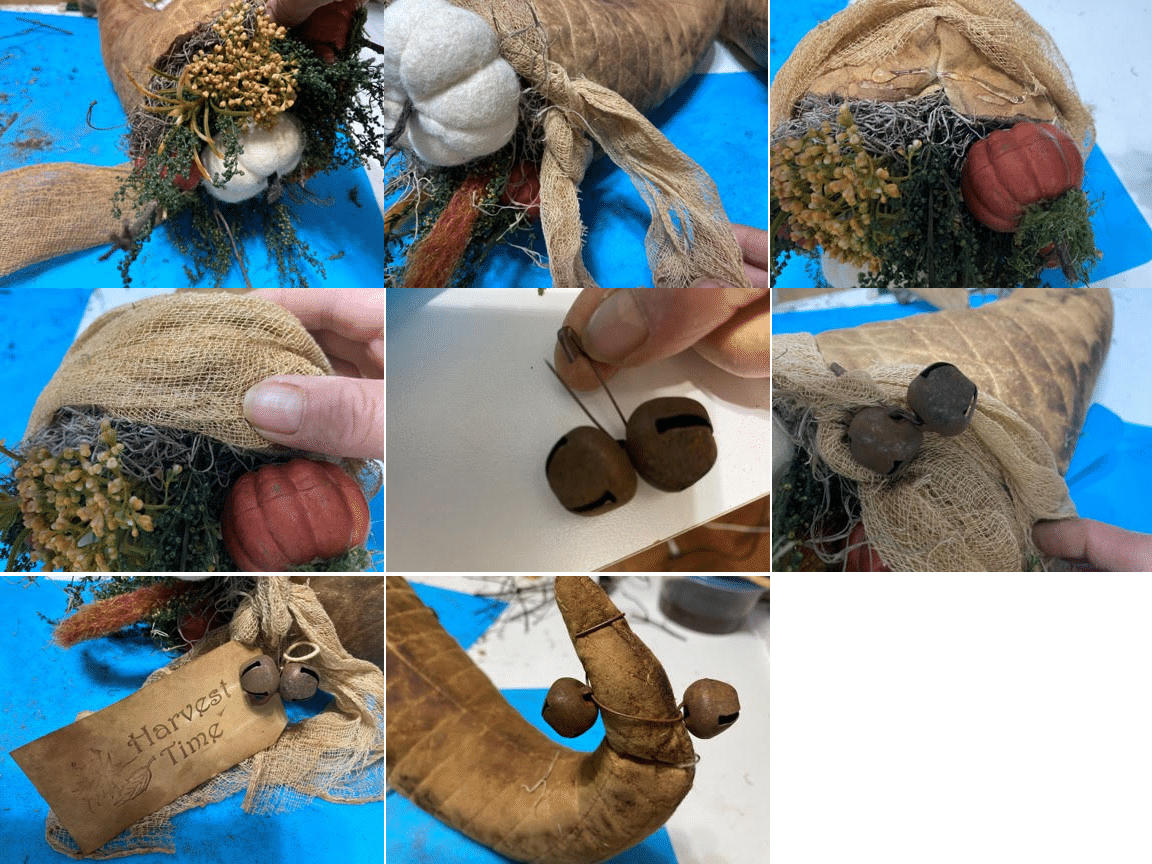
Adding The Decorative Fillers
The first thing you will need to do is cover the Styrofoam with the Spanish moss, to do this just add hot glue to the Styrofoam and cover with Spanish moss continue adding hot glue and moss until all the Styrofoam is covered. After you have covered the Styrofoam with the moss you can start adding the sprigs of your choice, I used some small twigs I cut from the trees we have outside, some sweet Annie I have ordered from Ebay, I just love the smell of it, then I added some fall flowers, pumpkins I got at the dollar and home goods, you can use anything you would like to fill the cornucopia.
The Dollar Tree pumpkins came on a sprig with leaves I removed the pumpkins from the sprig which left a hole for the stem but also some of the color came off the pumpkin so I cut a piece of twig and placed it in the stem hole then I added some hot glue around the twig stem and added some preserved moss around the stem next I cut a 3” piece of floral wire and stuck it into the bottom middle of the pumpkin then added some hot glue around it to hold in place this is so you can stick the pumpkin into the Styrofoam.
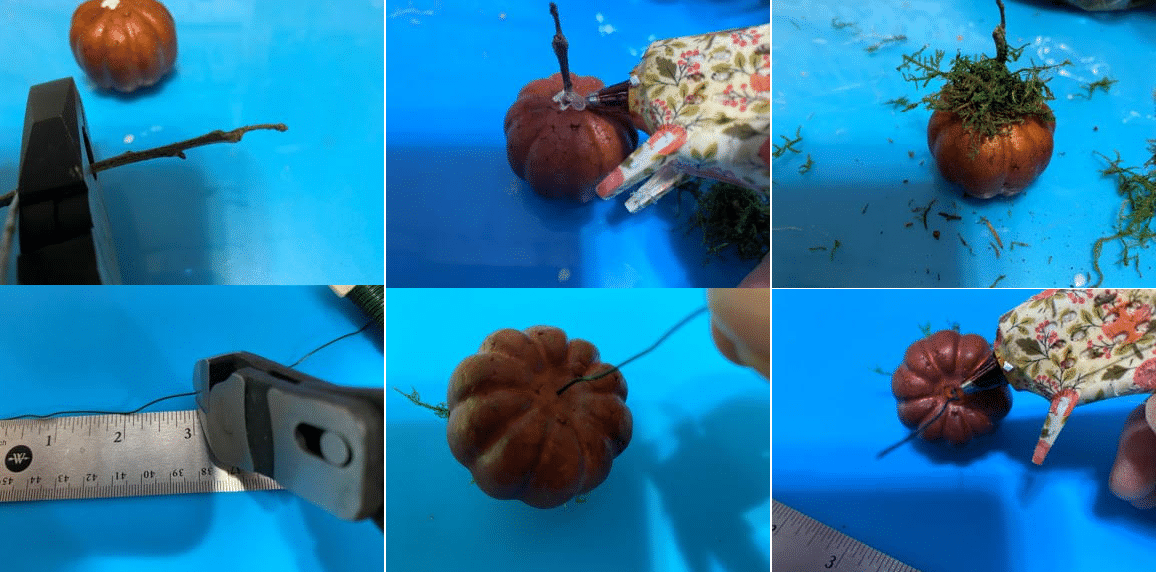
The felt pumpkins I got at Home Goods they were a pumpkin garland so I removed the twin that went through the stems then I cut a 4” piece of floral wire stuck it in the bottom middle of the pumpkin added hot glue around the wire.
The fall bush of flowers I purchased at Joann’s all I did was cut each flower from the bush leaving enough stem so I could insert it into the Styrofoam, on these flowers I was able to push the leaves up to the flower I know some flowers you can not do this but if you can it is a good idea.
Adding The Finishing Touches
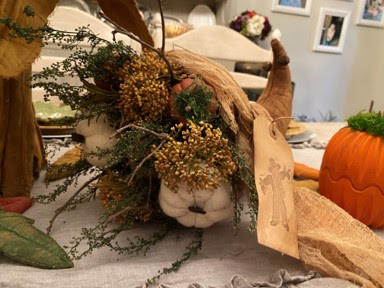
Once you have added all your decorative fillers all that is left to do is add the cheese cloth and rusty bells. First cut your cheesecloth, you will need a piece that measures 24 inches long by 12 inches wide, to add the cheesecloth place your cheesecloth under the cornucopia adjust the cheesecloth so you can tie it at the side of the cornucopia then tie, next add some hot glue under the cheesecloth at the top, bottom and sides of the cornucopia and glue the cheesecloth to the cornucopia this will stop it for sliding around. Next add one or two rusty bells to a safety pin and pin to the cheesecloth where you have tied it, you can also add rusty bells to the other side if you would like. I also used some rusty wire and rusty bells around the end of the cornucopia, they don’t have to be rusty bells if you don’t have them they can be any bells of your choice. The last thing is to add a hang-tag if you would like, I just coffee stain a hang-tag and use a stamper on it then tie to the safety pin.
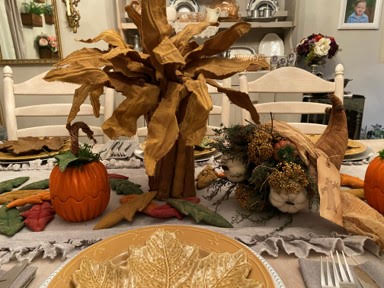
Your cornucopia is ready to be placed on your table, if you have Thanksgiving dinner at your home I guarantee everyone is going to want to know where you got it from and wait until you tell them you made it. I hope you have enjoyed this DIY and give it a try, if you also like the cornstalks and pumpkins in the photo you can find the blogs on my web page.
Just love all of your crafts . You and your sisters are keeping me busy. 😊
I love this Cornucopia, I’ll finish mine tomorrow, I want to add the bells and hang tag.
This cornucopia is adorable I love it and I can’t wait to make it. Sherry you are such a good instructor I enjoy watching all of your programs. Have a great day
I love your craft ideas – esp affordable and easy to follow directions. I made this cornucopia and I love it so much! Thank you Sherry!