Dollar Tree, Home Decor
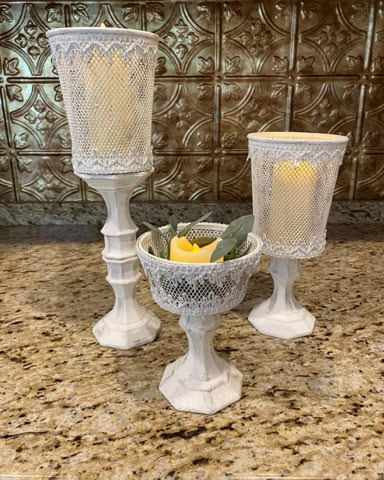
DIY Dollar Tree Urn Candle Holders
Jul
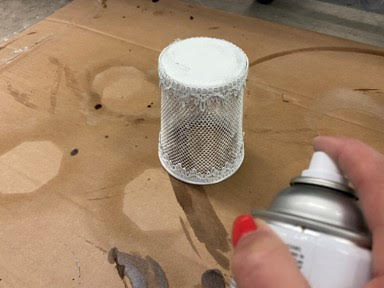
If you have been following The Crafty Decorator you know I am always looking in magazines or stores to see if there is something I like to try and recreate. I saw some beautiful urn candle holders in a magazine that I just fell in love with and I knew I had to try and recreate and I have to say they just came out beautiful. I always keep the glass candle holders from the Dollar Tree on hand they are great to use for crafting for the price. I knew I needed to find something for the top that would resemble the look of the urn’s I saw in the magazine. I was in the Dollar Tree and I went down the office supply isle and my eye caught these metal pencil and clip holders I knew as soon as I seen them that they would be just perfect I bought them and took them home and went to crafting and I was right they were just perfect.
Preparing The Candle Sticks For Paint
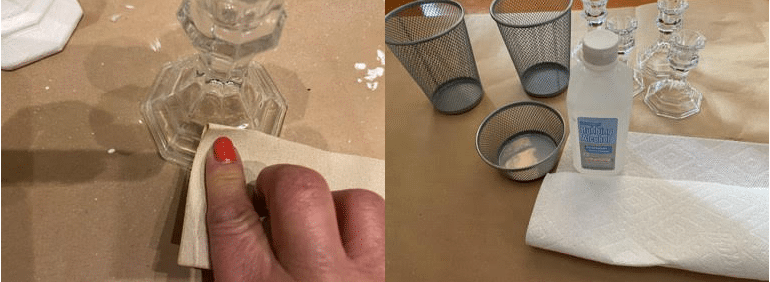
The first thing you will need to do is give the candlesticks a light sanding with fine grit sandpaper. Once you have them sanded clean them with a little rubbing alcohol. I do want to tell you I thought this would help adhere my paint to the glass candlesticks but when I was applying the second coat of paint I did have some areas where the first layer of paint was coming off so I decided to spray the candlesticks with the matt sealer in-between coats. Some of my followers said to apply a coat of mod podge before painting them to stop the paint from coming off. I did not try this but you can certainly give it a try.
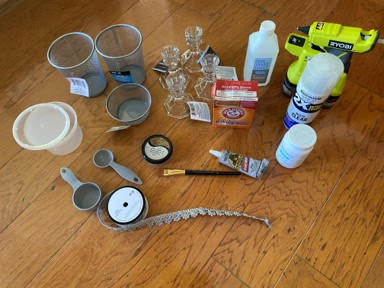
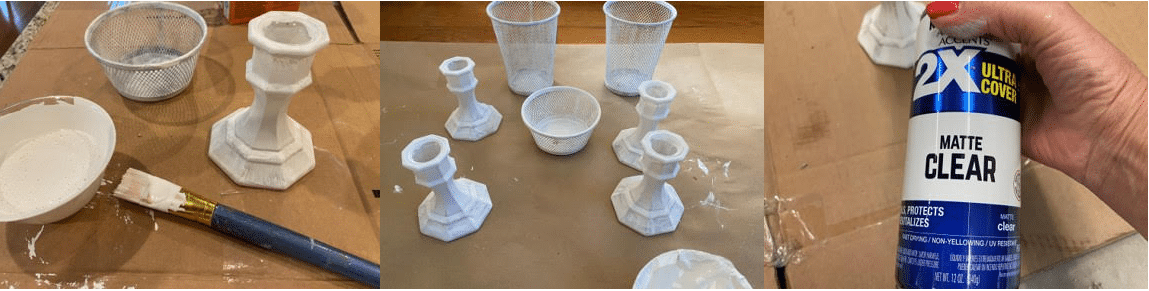
Materials You Will Need
- 4 Glass Candle Holders From The Dollar Tree
- 2 Jumbo Metal Pencil Holders (Dollar Tree)
- 1 Wire Clip Holder (Dollar Tree)
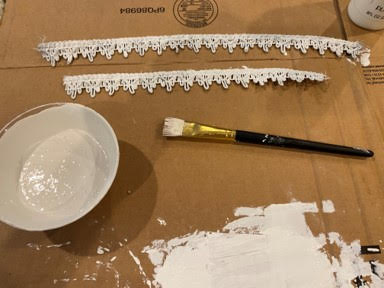
- Metallic Fan Edge Ribbon (Hobby Lobby)
- White Acrylic Craft Paint or White Chalk Paint
- Deco Art Metallic Luster in Silver Spark
- Rustoleum Matt Clear Spray Sealer
- Gorilla Clear Grip Adhesive
- Baking Soda
- Fine Grit Sandpaper
- Rubbing Alcohol
- Paper Towel
- Plastic Bowl To Mix Paint
- ¼ Cup Measuring Cup and 1 Tablespoon
- Paintbrush
- Hot Glue Gun and Glue Sticks
Preparing The Candle Sticks For Paint
The first thing you will need to do is give the candlesticks a light sanding with fine grit sandpaper. Once you have them sanded clean them with a little rubbing alcohol. I do want to tell you I thought this would help adhere my paint to the glass candlesticks but when I was applying the second coat of paint I did have some areas where the first layer of paint was coming off so I decided to spray the candlesticks with the matt sealer in-between coats. Some of my followers said to apply a coat of mod podge before painting them to stop the paint from coming off. I did not try this but you can certainly give it a try.
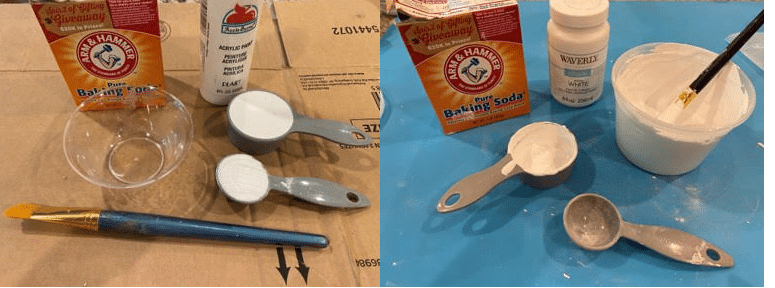
Mixing The Paint
The next step is to make your paint mixture using your white paint and baking soda, this is going to give your paint texture. Start by adding a ¼” of your white paint into the plastic bowl then add 1 tablespoon of the baking soda at a time and mix. I added a total of 3 Tablespoons of baking soda but if you would like your paint to have more texture you can add more baking soda.
Painting The Pieces
Using the paint mixture and a paintbrush paint the 4 candlesticks make sure you also paint the rim on the bottom of the candlesticks. Paint both the entire inside and outside of the two jumbo pencil holders and the clip holder. Let dry then a well ventilated area spray all pieces with the Rustoleum clear matt sealer, let dry. After you pieces are all dry apply a second coat of the paint mixture and let dry
To see how long you are going to need your ribbon pieces take the ribbon and wrap it around the top of the jumbo pencil holder just under the rim then cut were needed next wrap the ribbon around the bottom and cut were needed. Repeat these steps to the clip holder. Now take your six pieces of ribbon and paint the fronts and back with your paint mixture they do not have to be perfect it is ok if some of the silver shows through because we are going to rub a little paint off them after they dry. Let your ribbons dry you may have to let them dry overnight unless you have a niece sunny day you can dry them outside.
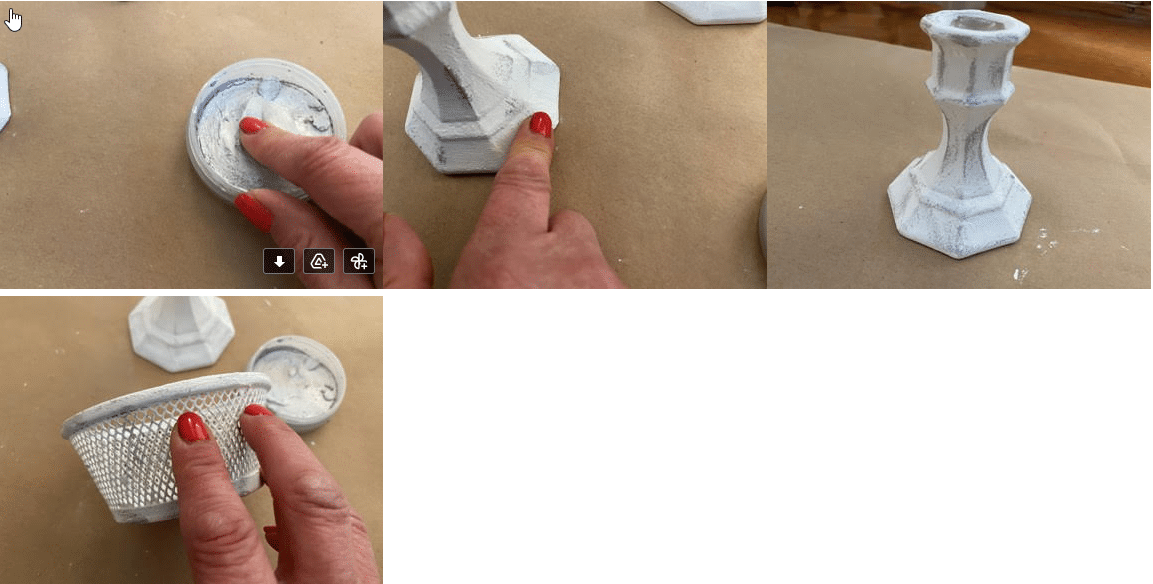
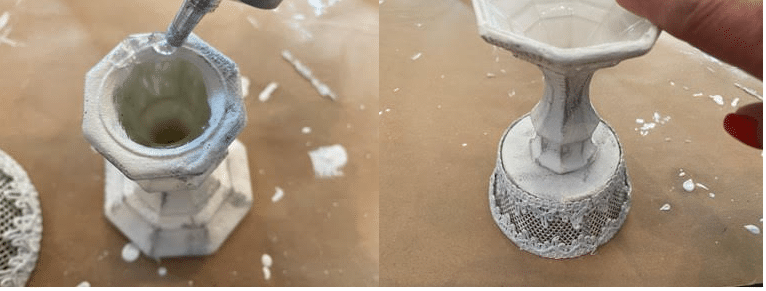
Now that all your candle holder pieces and ribbon are dry it is time to add the Deco Art Metallic Luster. Rub one of your fingers in the metallic luster then rub onto the candlesticks where you would want it to look a little chippy continue to add the luster until you achieve the look you like. Repeat this step to the other 3 candlesticks. Now that you are done with the candlesticks you are going to repeat this step to the 2 jumbo pencil holders and the clip holder. Make sure you apply the metallic luster to the inside as well as the outside. I just rubbed my finger with the luster randomly up and down the screen part then added to the rim and bottom.
Attaching The Ribbon
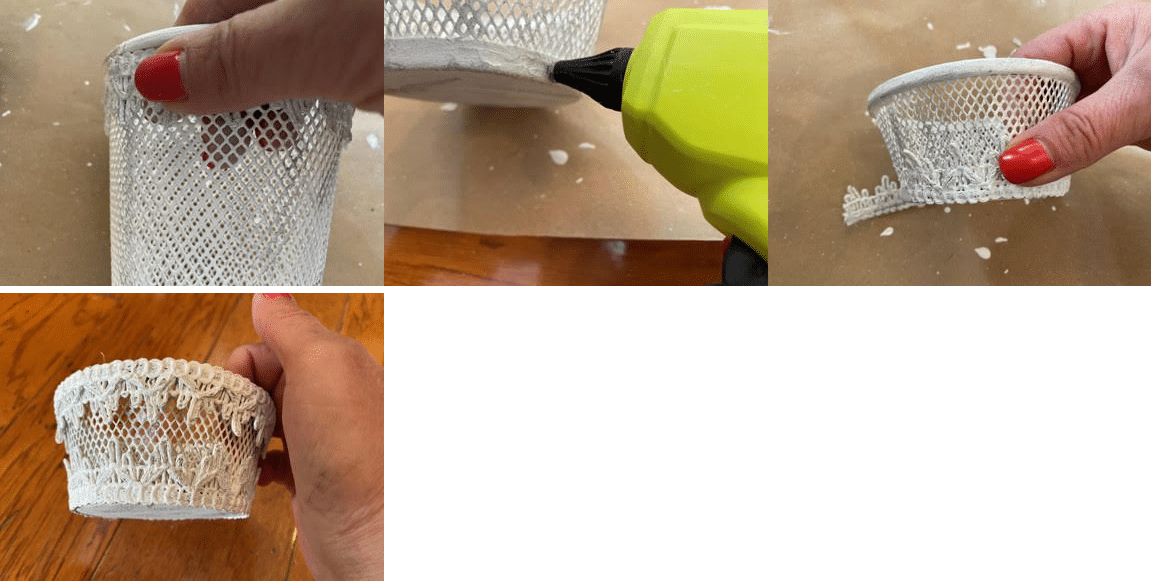
Before attaching the ribbons make sure you know which ribbons go to which holders. Next using your fingers rub some of the paint off the front of the ribbons so some of the silver shows through. Apply a small line of hot under the rim of the Jumbo pencil holder attach the ribbon with the decorative points facing down. Continue to add hot glue and attach the ribbon all the way around the top of the jumbo pencil holder. To attach the bottom ribbon add a small line of hot glue at the base then attach the ribbon with the decorative points facing upwards. Repeat these steps to the other jumbo pencil holder and the clip holder.
After you have attached all your ribbon pieces in a well ventilated area spray all the 4 candlesticks and the holders with Rustoleum matt clear sealer. Let dry.
Creating The Urn Candle Holders
Now for the fun part seeing your urn candle holders come to life. Take one of the candlesticks and apply gorilla clear grip adhesive around the top of the candle stick then attach the candlestick to the bottom middle of the clip holder. Let set for about 10 or 15 minutes before moving. Repeat this step but this time attach the candle holder to the bottom middle of one of the jumbo pencil holders.
Next take another candle holder add gorilla clear grip adhesive around the top of the candle holder then take a second candle holder and glue down the top of the candle holder to the top of the first candle holder. Your are gluing the two tops of the candle holders together. Let set about 15 minutes. Now you are going to add gorilla clear grip adhesive around the top of the candle holder which use to be the bottom. Attach the jumbo pencil holder and let set for about 15 minutes.
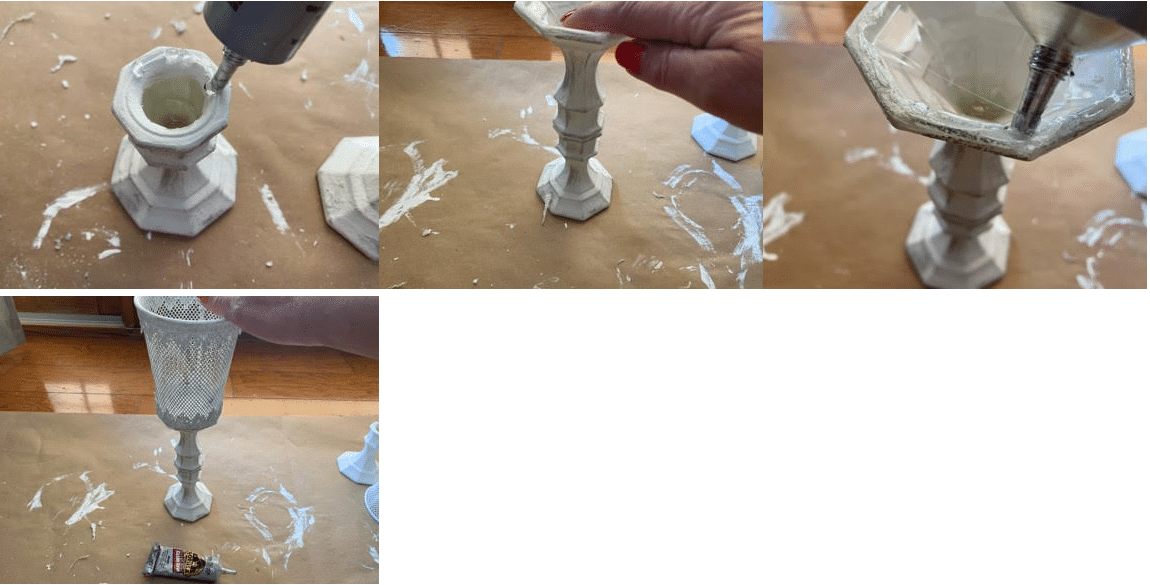
After all your candle urns have set for about 15 minutes you can move them but let them cure overnight.
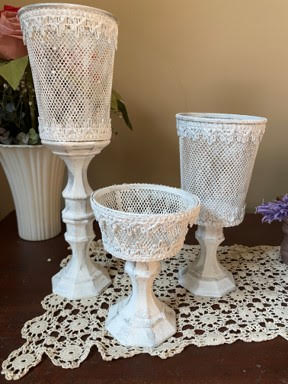
You now have created these beautiful urn candle holders just add your candles and any greens if you would like. I hope you found these fun and simple to create and use them to decorate your home.
This is a great project. You always have such elicot items. I have been wanted to make this one, but I can not find the mess holders. I will keep trying.
Have a great day.
I finally found the mesh pencil holders so I can now make these great items
Love them. I will be making. Thanks for the lovely idea
Thank you so much I am so glad you like them.
love all of it your the best ever hon,I try not missing you when your on you and you Sister are the best.Your friend from Yorktown Indiana SUSIE ROBERTS
I made these and found it took a lot of time in between each step for drying..I used chalk paint and got a really good shabby chic look. I may try spray chalk paint next time. I think it won’t be so thick, but I like how they came out….when this rain in the Northeast stops so I can do them outside I will be able to get them done in one day. Thanks so much for the idea. It is such a pretty set.
I cant wait to make these, I think they are awesome!
Thank you so much
cant wait to make these, I love them
Yay I am so glad you are going to make them
I’m working on the Dollar Tree Urn Candleholders. I see in the list of items needed is a wire clip holder; however, I don’t see you use it in the video. Is it necessary?
it is the shorter paperclip holder
I am working on the Dollar Tree urn candleholders. A wire clip holder is listed in the items needed; however, I don’t see that you used it in the video. Is the wire clip holder necessary?
It is the shorter paperclip holder
Absolutely in love with these, I am making for my Mother for Christmas to put on her fireplace mantle. I can’t wait to finish them and get the out to her. Thank you Sherry for all that you do.
Robin Adkins
I am so glad you like them and are going to make them I am sure your mom is going to love them.