Easter, Home Decor, Spring, Valentines Day
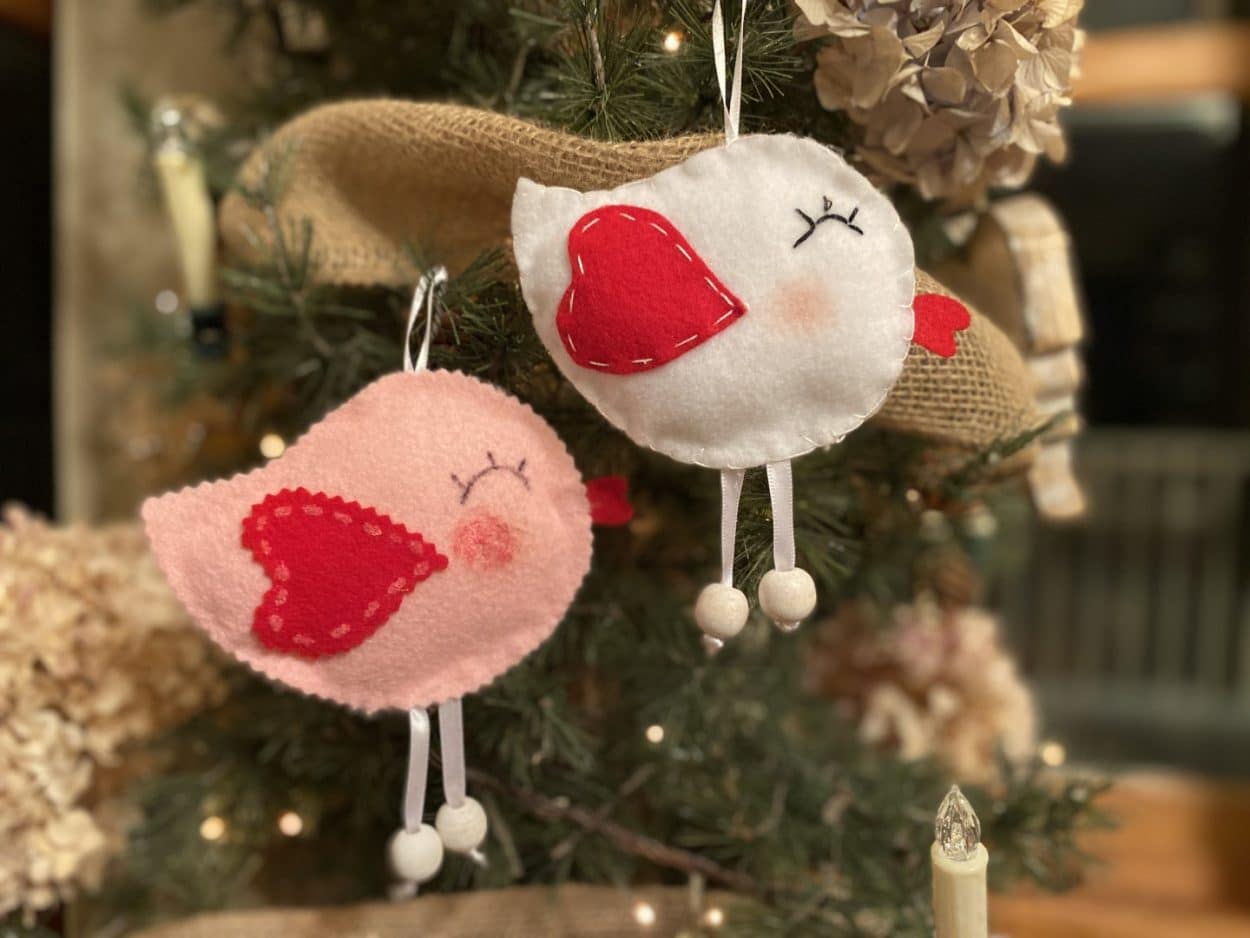
DIY Felt Bird Ornament
Jan
If you follow The Crafty Decorator you know how many wonderful and talented friends we have in our family of crafters. Well one friend sent me a photo of this felt bird and asked if I can show them how to make it. I just thought it was the cutest thing so of course I had to try. I think he just came out adorable and the best part is you can just change his colors to make him for Easter and Spring or any holiday really
Here is a list of what you will need:
- Felt Bird Pattern
- 2 Colors of Felt of Your Choice
- 1/8” Satin Ribbon
- ¼” Satin Ribbon
- #8 DMC Cotton Thread in Black
- #8 DMC Cotton Thread to Match Felt Color of Bird
- Needle
- Pencil
- 2 Small White Wood Beads
- Scissors
- Pinking Shears
- Sewing Pins
- Hot Glue Gun and Glue Sticks
- Polyester Fiberfill
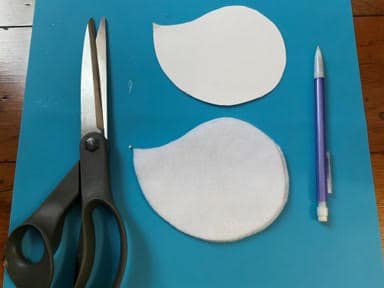
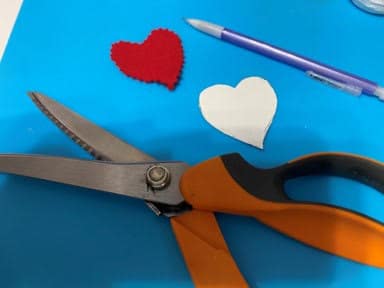
Tracing and Cutting Out The Bird Pieces For Sewing
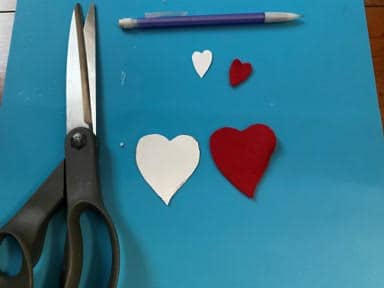
The first thing you will need to do is print and cut out the Felt Bird Pattern. I like to print mine onto cardstock so it will last. After you have your pattern pieces trace the body onto a double layer of felt then cut out on the trace line. I use a pencil to trace my pattern pieces onto the felt. Trace the two hearts on a single layer of felt and cut out on the trace line.
Tracing and Cutting Out the Bird Pieces for Gluing
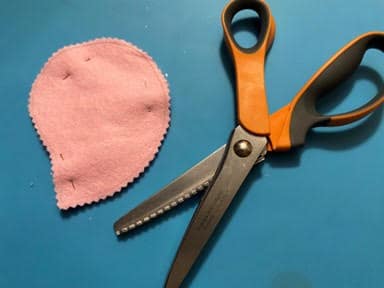
Trace the body onto a double layer of felt. With pinking shears cut out about a ¼” away from the trace line. Pin body pieces together. Trace the two hearts on a single layer of felt. With pinking shears cut out the hearts right at the trace line.
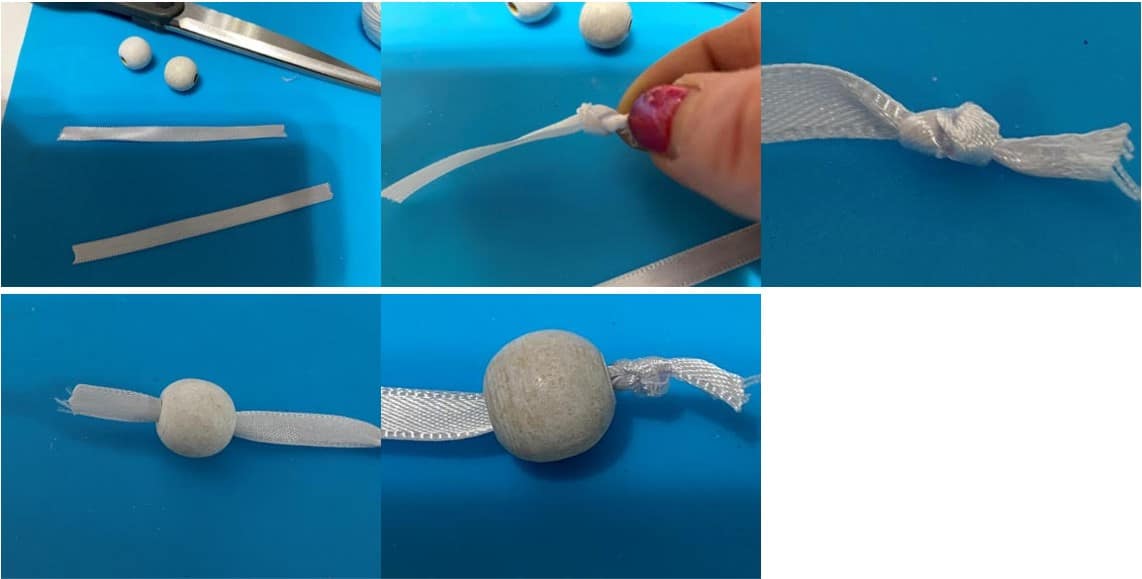
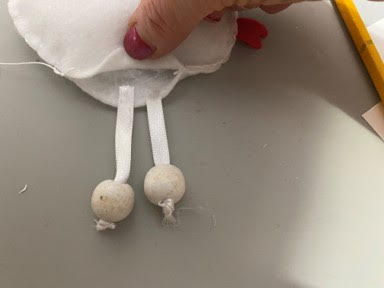
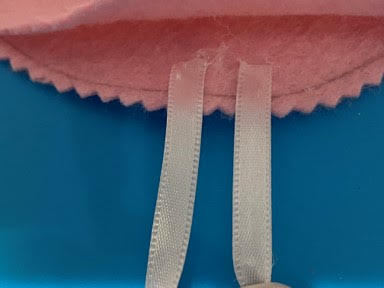
Making the Legs
To make the legs cut two 5” pieces of the ¼” satin ribbon. Tie a double knot at one end of the ribbon. For the wood bead I purchased a box of different white wood beads in the jewelry making department when they were 50 percent off so the box was only $3.50. I used the small beads. Slide the other end of the ribbon through the wood bead down to the knot. Repeat this step with the other piece of ribbon.
Assembling the Bird and Sewing
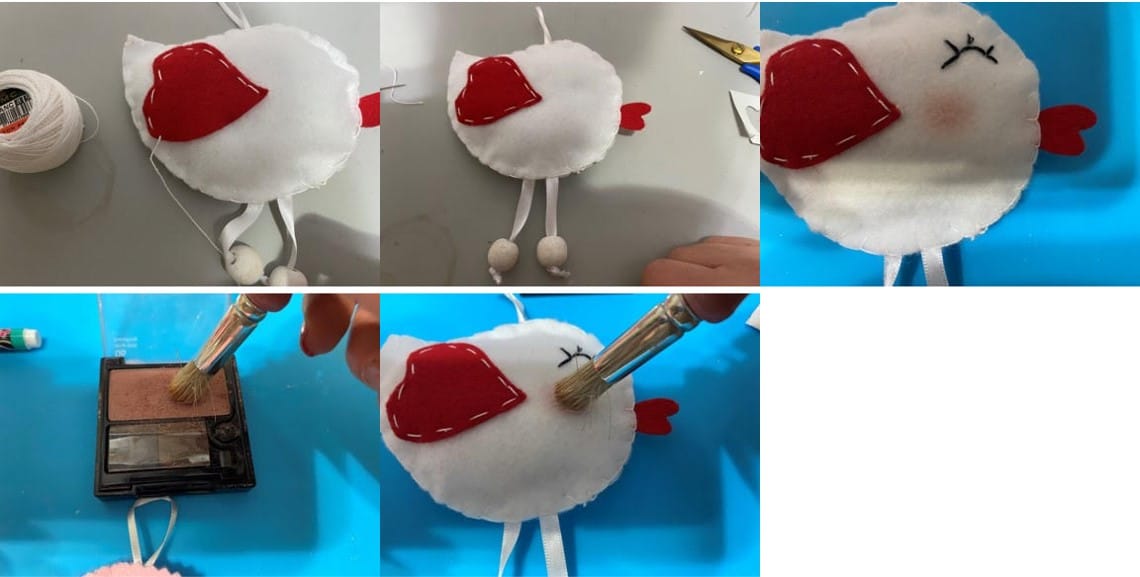
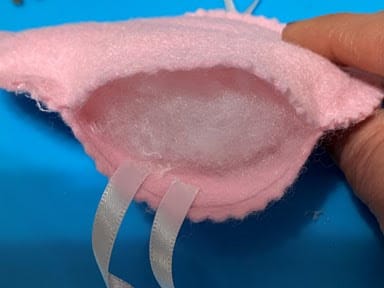
Pin the body pieces together. Place the small heart which is the beak in-between the felt pieces at the front of the bird in the middle. Lift up the top layer and heart add a drop of hot glue on the bottom layer and glue down heart. This will hold the heart in place while you are sewing around the bird. Next cute a 4” piece of the 1/8” satin ribbon fold in half and glue in between the two layers of felt at the top of the bird. Stuff the bird with fiberfill and pin closed. Using the DMC thread start at the bottom right hand side and sew a blanket stitch around the bird until you reach the lower left side. Do not tie off you are going to add the feet in the middle then continue sewing. If you do not know how to do a blanket stitch you can watch videos on YouTube that teach how to do a blanket stitch.
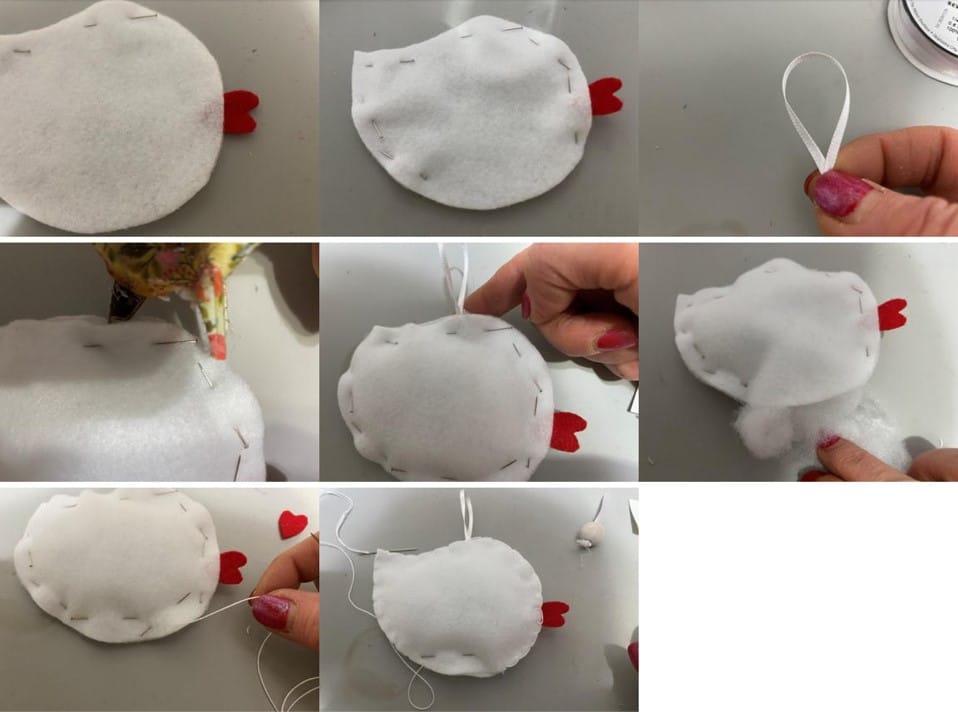
Attaching the Feet
Now that you have sewn around the bird remove the sewing pins. Take the two lets and place in-between the two layers of felt at the bottom middle of the bird. Once you have them in place hot glue one leg at a time to the bottom felt layer of the bird. Once you have the legs glued in place finish sewing the bird closed.
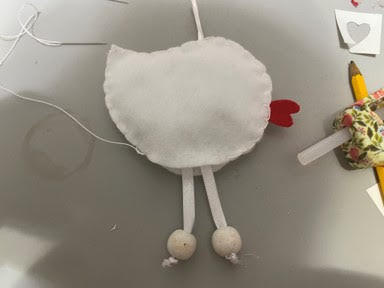
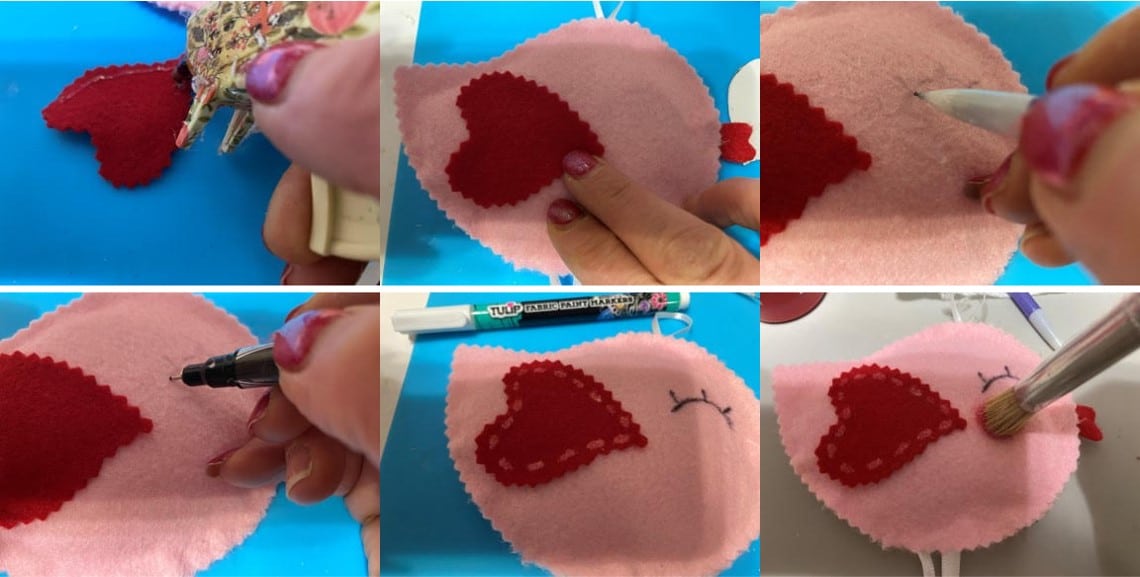
Attaching the Heart and Making The Eye
Lay the heart towards the back of the bird, see photo below. Using the DMC thread sew in place using a regular stitch. For his check I added some blush.
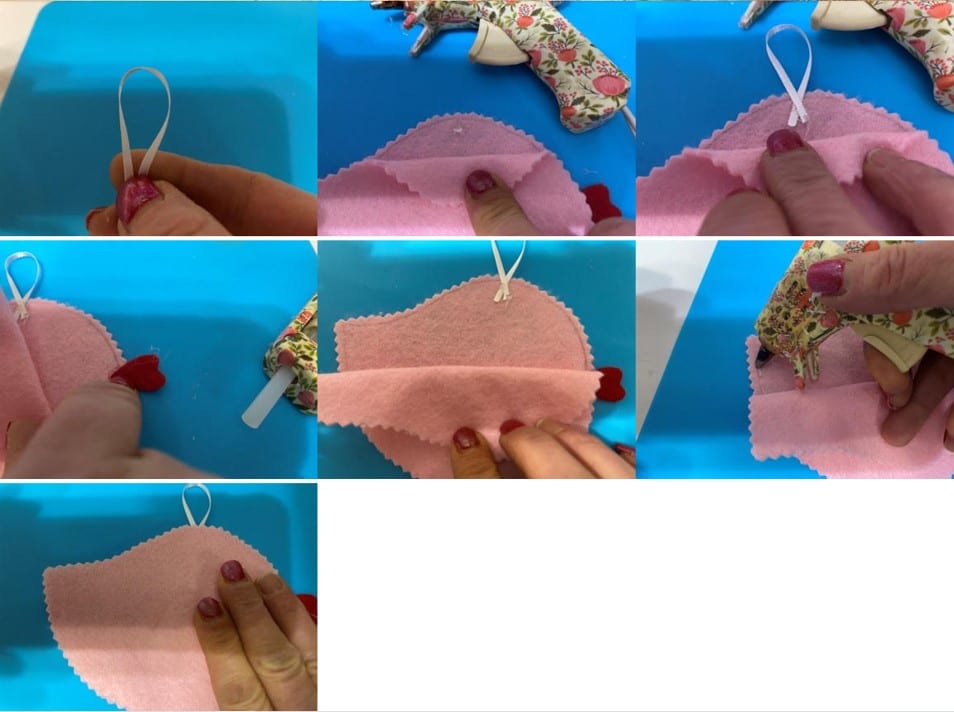
Assembling the Bird By Hot Gluing
Lay down the body piece with the trace line then lay the second piece on top making sure they are lined up. Cut a 4” piece of 1/8” satin ribbon bend in half. Fold back the top layer at the top of the bird add a drop of hot glue at the top middle of the head and glue ribbon in place. Next place the small heart in-between the two layers at the front of the bird, this is his beak. Fold back the top layer add a drop of hot glue under the heart and glue down. Fold down the top layer of felt and a line of hot glue on the trace line and glue down the top layer. Next fold up the bottom layer add hot glue down the sides of the bird, leave the bottom open.
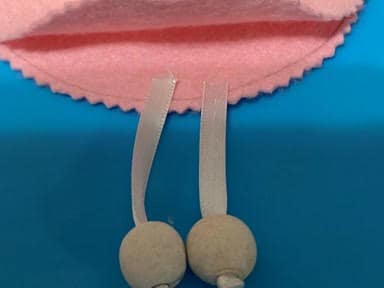
Adding the Feet
Fold up the bottom top layer lay down your legs in the middle. Once you have them where you want them glue each leg in place to the bottom layer of felt. Next stuff the bird with fiberfill. Once you have the bird stuff glue the rest of the bird closed.
Attaching the Heart and Eye
Lay down the heart towards the back of the bird, see photo’s below. Once you have the heart where you want it hot glue the heart in place. To make it look like you stitched it on you can use a white fabric paint marker to draw on stitches like I show in the photo’s below. I forgot to list the fabric paint marker and the black sharpie in the materials you will need. Using a pencil lightly draw the eye in place then using a black sharpie marker draw on the eye. If you want you can add some blush or red paint to his cheek. Using a pencil lightly draw on the eye. Using black DMC thread stitch on the eye.
I hope you enjoyed making the bird. Don’t forget you can make him for different holidays and seasons but making him with different colors of felt.
I enjoy your craft video so much you are awesome. Keep the crafts coming.😉
I CANT SEAM TO GET PATTERN SO I CAN CUT IT OUT.WATCH YOU ALL TIME LOVE YOUR WORK.
It is really a cute and easy craft. I like All your craft I like to do crafts for my family and friends
Thank you for sharing your wonderful ideas, Enjoying everything. Happy New Year 🤗
This is a really cute bird to make as an ornament.
Ty yiu for all your hard work and for always sharing your patterns!
Those lil birds are the sweetest. Thank you for sharing sherry
I love this project. I also love how you have given us step by step directions. Thank you so much.
❤️❤️❤️🕊
Thank you so much love ❤️ Tham hope I can get to the store
This is so adorable thank you for sharing
Oh shoot !! Too cute !!
I really love these little birds. I have a small tree I’m hoping to decorate for Valentines Day (Barb has me hooked—but I don’t have much space).
These cute birds will be perfect. Thanks for sharing ❤️
Sherry…..what kind of pencil do you use for tracing your patterns as I use just a plain pencil and can’t see the outline like we can see when you do it. Thanks for reply
I made the birds and they turned out great! I made Valentines ones and gave them away. But I am also going to make spring colored ones too.