Christmas, Home Decor, Thrifty Makeovers, Winter
DIY Glass Snowmen
Oct
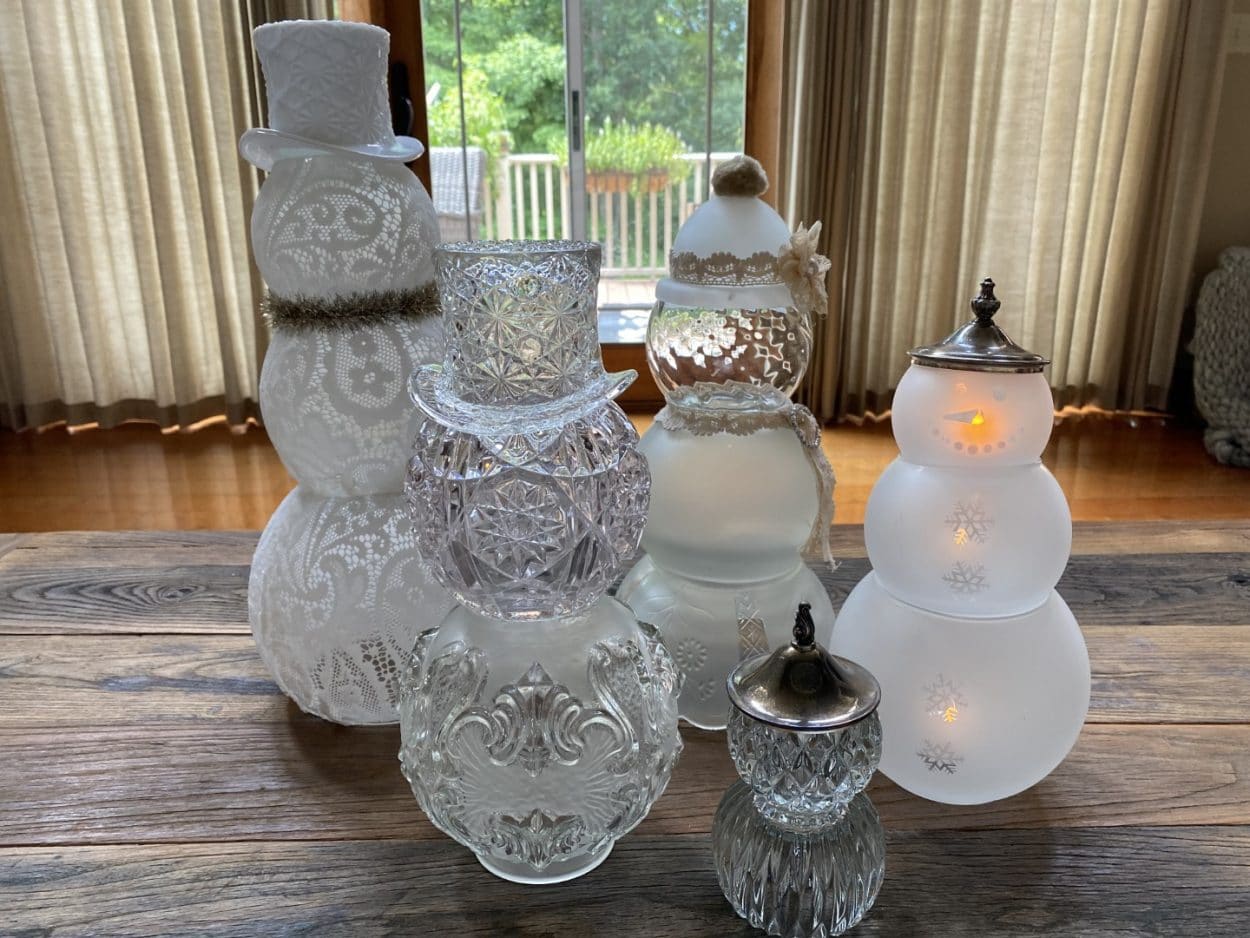
If you have been following The Crafty Decorator you know I do a Thrifty Thursday which means I take a one of my thrifty finds and either show you how you can use it in your home as is or totally transform it and that is what I have done here.These glass snowmen are made from my thrift store glass finds they are made from glass candle holders, glass bowls, and vintage light covers and don’t worry if you can’t find any glass pieces you can buy 3 different glass candle and fish bowls in the Dollar Tree that is what the lace covered snowman is made from.I hope this will inspire you to look at glass items different when you are out thrift shopping or going to yard sales.
Here is a list of what you will need:
- Glass Candle Holders
- Glass Bowls
- Vintage Light Covers
- Vintage Glass Hat
- Gorilla Clear Grip Adhesive
- Mod Podge
- Paint Brush
- Scissors
Snowman #1
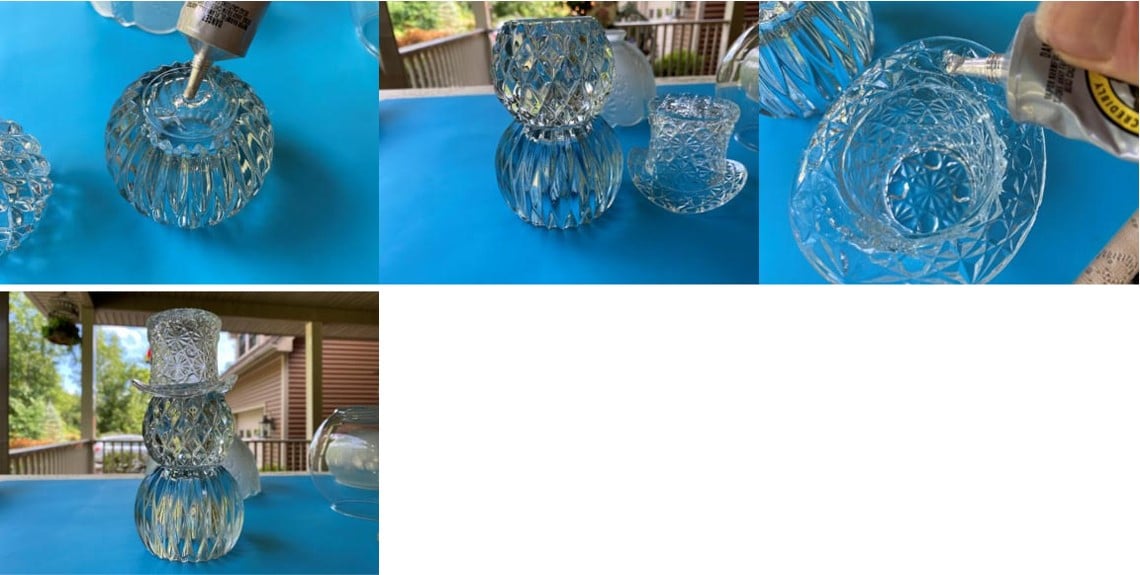
For the little snowman I used two small candle holders that I found at the Goodwill for the body and a vintage silver lid from a sugar bowl for the hat. First place your two body pieces together and see where they are touching so you will know where you are going to place your glue, next add your gorilla clear grip adhesive to the bottom part of your snowman and attach the top of your snowman let dry for about 10 or 15 minutes, the gorilla adhesive tacks up fairly quickly. After your glue has tacked up place your hat on top of your snowman head to see where they are touching then add your adhesive let set about 10 minutes then you will be able to move it without it falling apart, it does take 24 to cure. In the photo’s below you will see I glued a glass hat to the body but as I was working on the other snowmen I knocked it over and broke it so I used the silver lid for the hat.
Snowman #2
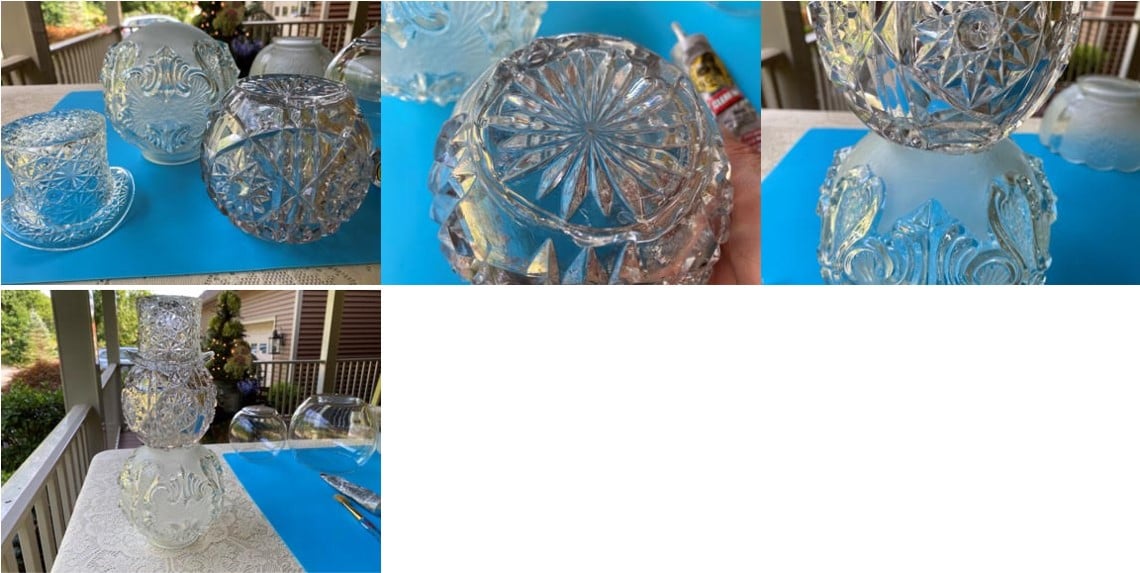
For this snowman I used a vintage light cover, a crystal candle holder and this adorable glass hat I found at goodwill, someone told me it was used back in the day to hold cigarettes.
Place your two snowman body pieces together look to see where you are going to need to add your adhesive, next and your adhesive and glue together let set about 10 or 15 minutes for the adhesive to tack up next see where you need to add the adhesive to the hat and glue on let set about 10 or 15 minutes then you will be able to move your snowman allow the adhesive to cure for 24 hours.
Snowman #3
For snowman #3 I guess I should really say snow girl because after making it I seen a snow girl, I used a glass light shade, light cover, candle holder and I am not sure what the hat actually is but as soon as I seen it in goodwill I immediately seen a snowman hat, I think it might be part of a candle holder. To glue the snow girl together follow the same directions as in the above two snowmen. I decided to give her a scarf, hat trim and a pom pom on top of her hat, I used ribbon, a lace flower and a pom pom you can use what ever you would like for her accessories.

Snowman #4
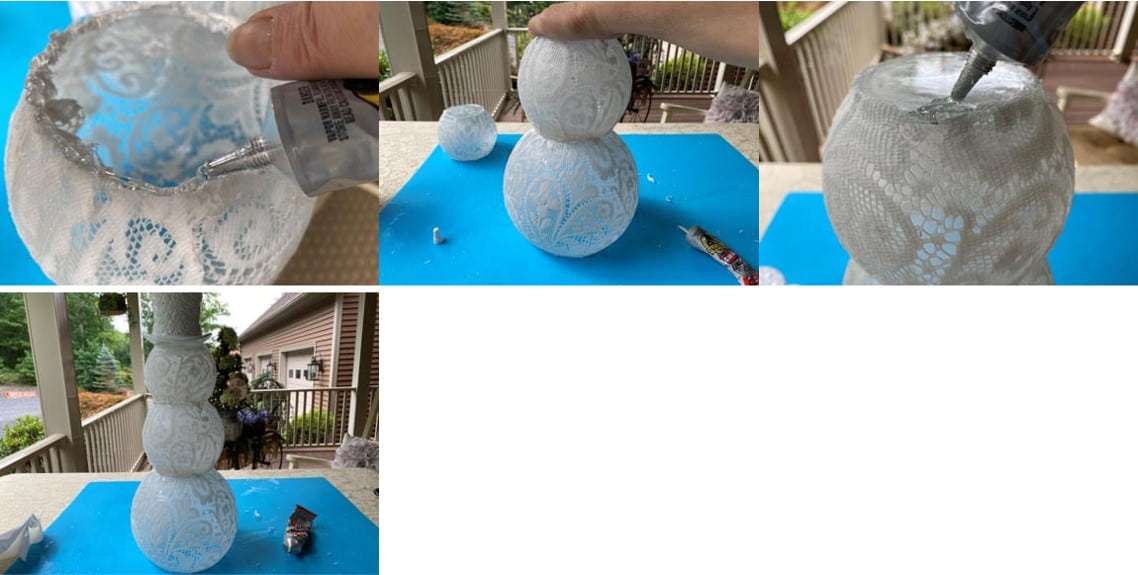
For this snowman I actually used 3 different size glass bowls I purchased from the Dollar Tree I am not sure if they are three different size candle holders or fish bowls lol, I found them in the candle and floral section, I also used another cute glass hat I found at goodwill and the lace curtains are also from goodwill I never pass up lace curtains when I see them for a good price I use them in a lot of my crafts. The first thing I did was cover part of one of the glass bowls with mod podge you want the bottom of the bowl at the top then start at the bottom rim (do not cover the bottom of the bowl) start covering the bowl with your lace keep adding the mod podge to the bowl and adding the lace if your lace starts to pucker up and not lay flat take your scissors and cut a slit in the lace then bring the piece of lace over laying it on top of the other piece of lace (see photo’s below) cover the overlapped lace with mod podge then keep working your way around until you come to where you started. Next cut off your excess lace and mod podge you end down, after you have all your lace on cover all the lace with a coating of mod podge and let dry. Repeat this step to your other two bowls.
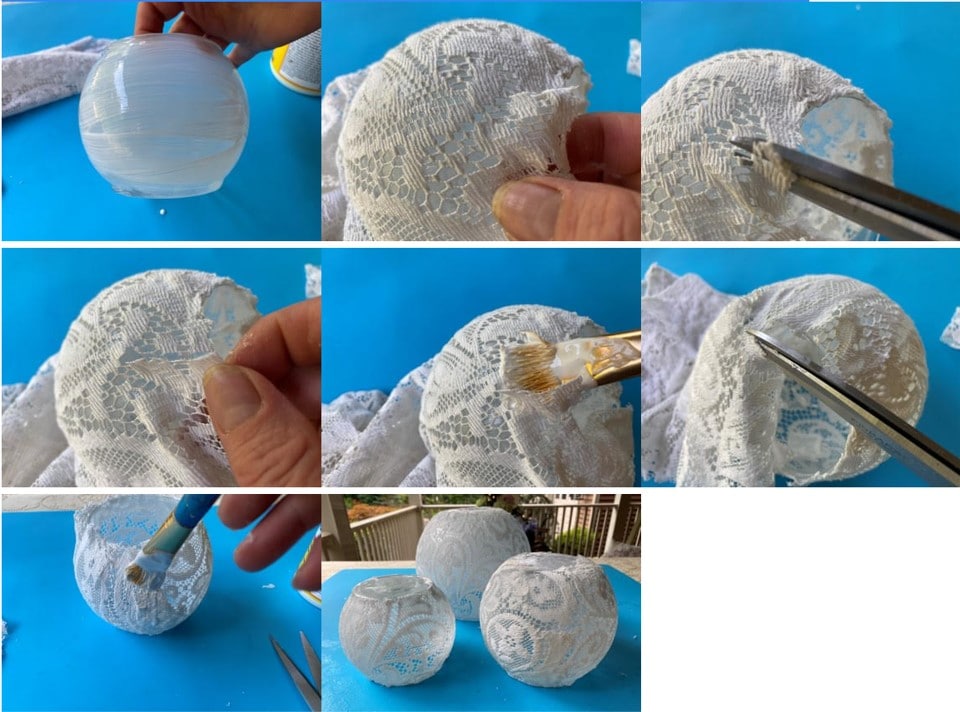
Once all your pieces have dried you can now glue them together follow the directions that I gave in Snowman #1 and #2. Once the adhesive has dried you can add any embellishments you would like.
Snowman #5
For this snowman I was shopping in goodwill and I first found the bottom bowl and I thought how cute this would be for part of my snowman because it had the snowflakes on it then as I was shopping the shelves I found the middle then the head I should have kept looking because there probably was the hat for him also, all I did was add timer tea lights in each bowl and set a silver sugar bowl lid on top for his hat I did not glue him together so I can change out the tea lights when the batteries die.
I think I messed up my first glass snowman. I turned the bottom bowl upside down then glued the open ends to the bottom of previous glass bowl . Only opening I have is the very bottom.
Very cute ideas.
I can’t wait to try and make some of these snowman.
Thanks Sherry!❤️
I really love your glass snowmen!!! They are unique and beautiful.😍❤️👏
I found a crystal hat at Goodwill store. I remembered you did these cute snowmen. I can’t wait to make one. Such a cute idea
I just love these sparkly snowmen ! I lucked out at a neighbors yardsale last weekend. A woman was helping her elderly aunt sell her collections of different items. There were a dozen of the little glass hats for a dollar a piece. All different kinds , clear Fostoria ones , milkglass Fenton ones, along with many beautiful colored ones. Cobalt, aqua etc. I can’t wait to get to crafting as gifts for my sisters and friends !
Oh My you are so lucky they are so hard to find unless you want to pay for them in an antique store
My mouth dropped open when seeing the snowman with the glass hat! What a find. I ex0lained to my husband whoo fishes that the feeling he has when feeling in a Big one is the same feeling I have when thrifting and I find or feel in a Big one like him. Big find on the glass hat. I’m going to make some too. But first I’m checking out my Goodwill. Thanks for sharing!
You are so funny what a good way to explain the feeling we get when finding something amazing at the thrift store.
Sherry, I have made several of these snowmen and just love them!
I am in the process of making a girl one for a Christmas gift for my sister-in-law , I made a boy one last year for her. I just love love love them Thanks for sharing
I can’t wait to try and make some of these snowman.
Thanks Sherry!❤️