Easter, Home Decor, Spring
DIY Lamb
Mar
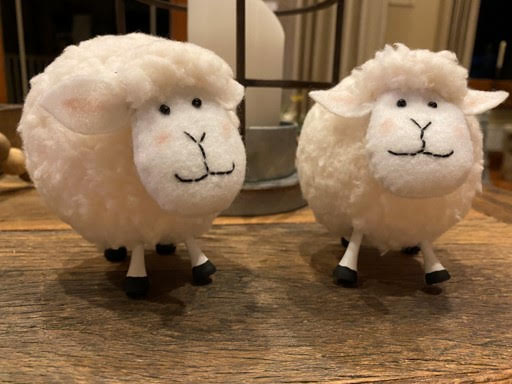
If you have been following The Crafty Decorator you know everyone has been asking for me to make a lamb. I created this adorable little lamb using a plastic baseball from the dollar tree. I think he turned out just adorable. Next on the list is to create a mama sheep to go with these adorable little baby lambs. I hope you think they are as adorable as I do and will give them a try.
Here is a list of what you will need:
- Lamb Pattern
- Plastic Baseballs from the Dollar Tree
- 9” X 9” piece of Luxury Faux Fur Sherpa Fabric
- 4” X 4” piece of white felt
- 4 Golf Tee’s
- 2 Tiny black beads
- Black DMC quilting thread and needle or embroidery thread
- Black thread and needle
- Cream thread
- Pink craft paint or blush
- Paintbrush
- Black craft paint
- Polyester Fiberfill
- Pencil
- Scissors
- Large nail or something you can make a hole in the ball with
- Hot Glue gun and glue sticks
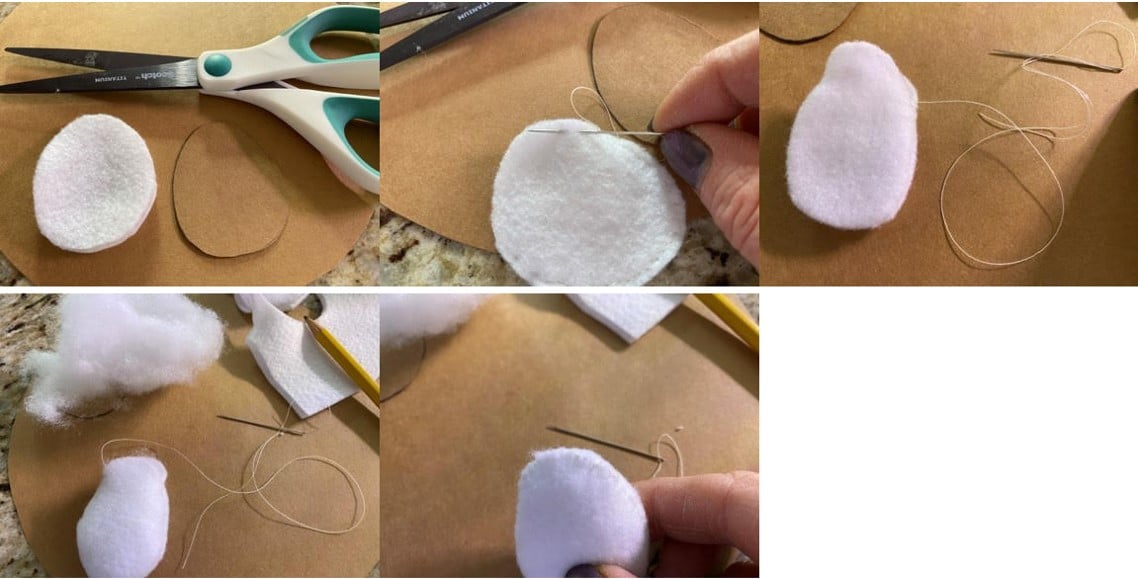
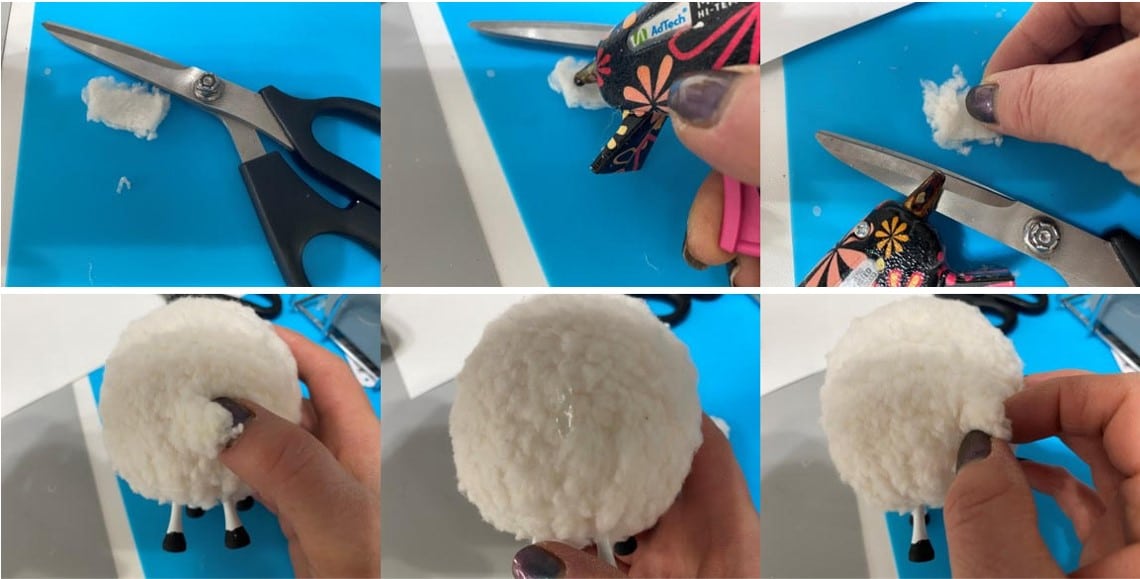
Covering the Ball
The first thing you will need to do is print and cut out the pattern pieces. Trace and cut out the circle on a single layer of the Sherpa fabric. With the back of the fabric facing up place the plastic baseball in the center of the fabric. Using cream thread and a needle do a running stitch around the end of the fabric circle. Lightly pull your thread to tighten the fabric around the ball. Continue doing running stitches around the end of the fabric and pull the fabric closed until the whole ball is covered. You may need to do 3 or 4 running stitches around the ball to get the fabric completely closed around the ball. Knot and cut off excess thread.

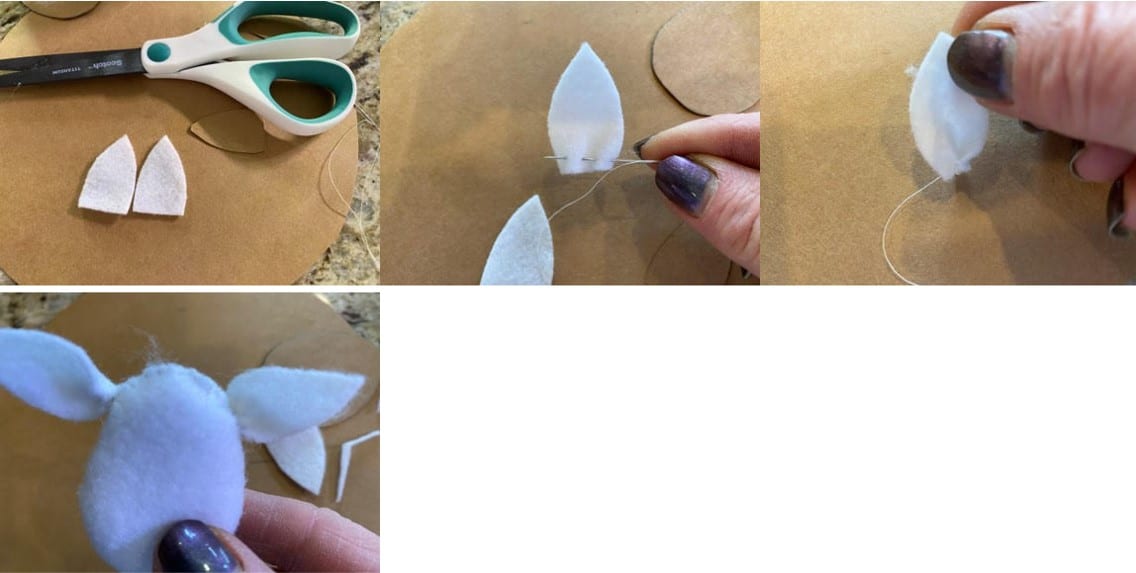
Making the Head and Ears
Trace and cut out the head pattern onto a double layer of white felt. Using cream thread and a needle sew the head closed leaving the top open where indicated on the pattern. With the tread and needle still attached turn the head right side out. Stuff the head with polyfill and sew closed.
Trace and cut out the ear on a double layer of white felt. This will give you two ears. Using cream thread and a needle do about 4 stitches across the bottom of the ear and pull thread so the ear is gathered at the bottom. Sew the ear to the head a little down from the top of the head. See photo’s below. Repeat these steps to the other ear.
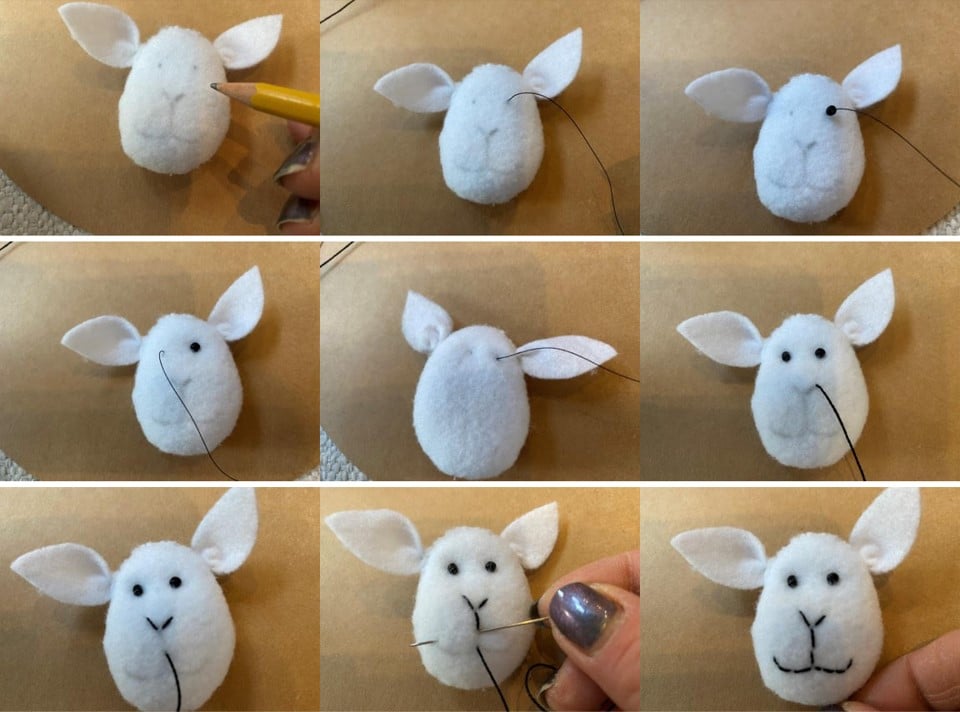
Making the Face
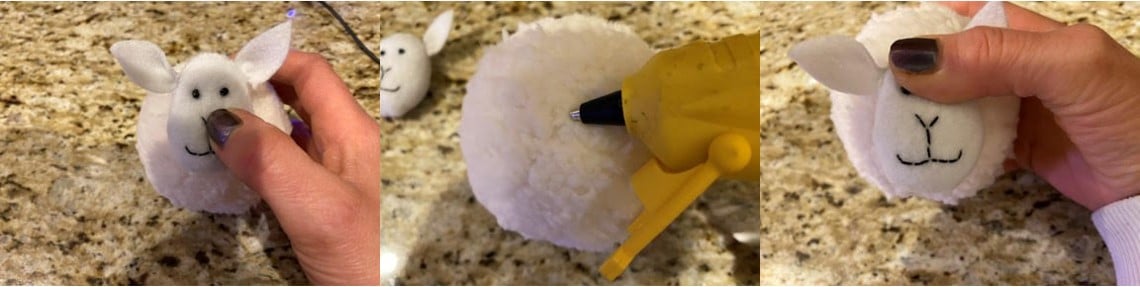
Using a pencil lightly draw on the face according to the pattern. Using black thread and a needle go through the back of the head to the front of one eye, slide on a black bead. Sew on the bead then bring the needle and thread over to the second eye. Slide on a black bead and sew on the bead then bring the needle to the back of the head tie a knot and cut off the excess thread. Next using black DMC quilting thread or embroidery thread bring the needle and thread to the front at the nose. Stitch on the nose and mouth. Bring the needle and thread to the back of the head and tie off. See photo’s below.
Attaching the Head
Hold the head onto the body where you think it should be. Add hot glue behind the top of the head and glue down to the body. You do not want to glue down the bottom of the head.
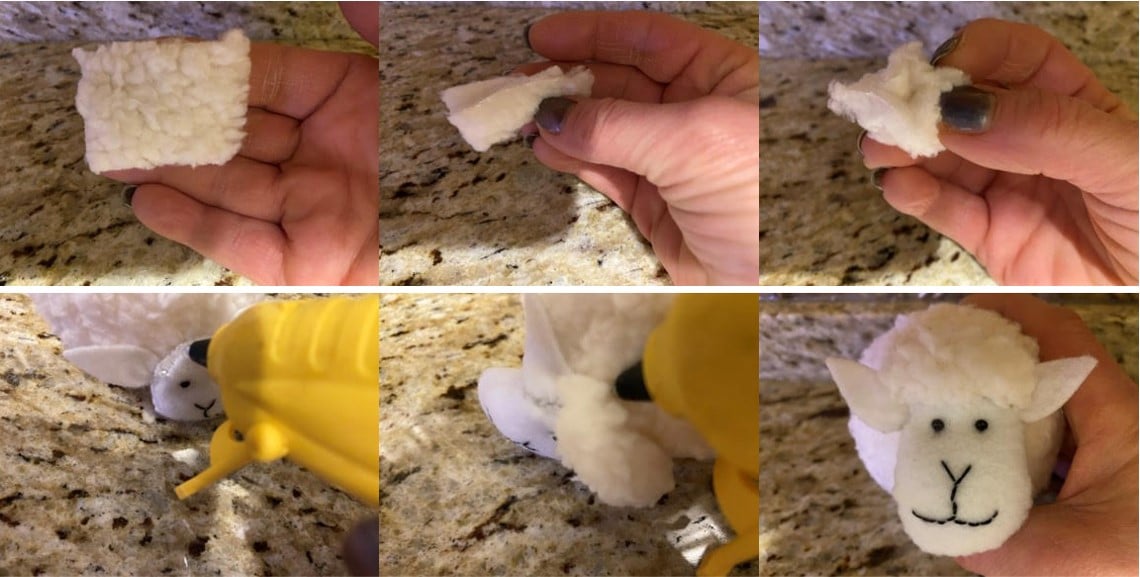
Cut a small square of the Sherpa from your scrap pieces. This will be the lamb’s hair. Place a small line of hot glue across the bottom fold over the top and glue closed. Scrunch up the two sides. Add hot glue to the top of the head and glue on the Sherpa hair. You made need to add a little more hot glue once you have the hair on.
Adding the Legs
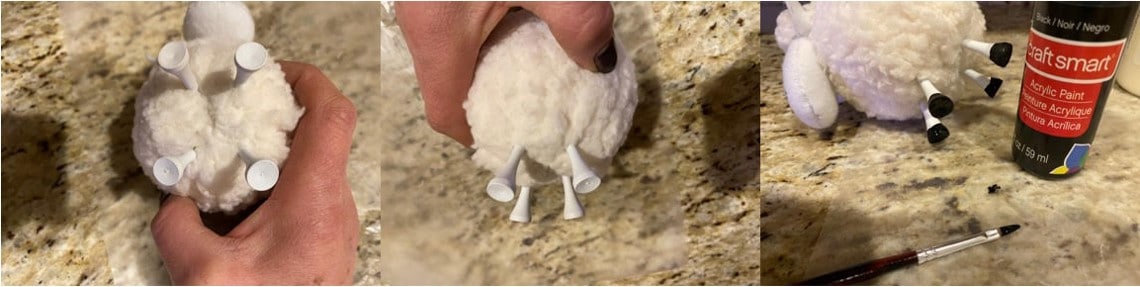
You need to decide where you think the two front legs should go. I used a large nail to make my holes into the body but you can use what ever you would like. Once you have decided where you think the two front legs should go make a hole in the body where each leg is going to go. Insert the two golf tee’s. Next take two more golf tee’s and hold them in the back where you think they should go. Make one hole and insert one golf tee. Hold up the second golf tee to double check where it should go. Make the hole and insert the golf tee. Make sure the lamb is standing correctly. If you need to move one of the tee’s don’t worry you will not see the hole underneath. If the golf tee’s are not tight in the body you can add a small drop of hot glue around the top of the legs to hold them in place. Paint the bottom of the tee’s black to look like the hoof at the bottom of the leg. Let dry.
Finishing Touches
If you are using pink paint dry brush the insides of the two ears and dry brush the cheeks on. Dry brush means dip your brush into the paint then dab on a paper towel you do not want to much paint on your brush. If you are using blush dab your brush in the blush then color the inside of both ears and dab on the cheeks.
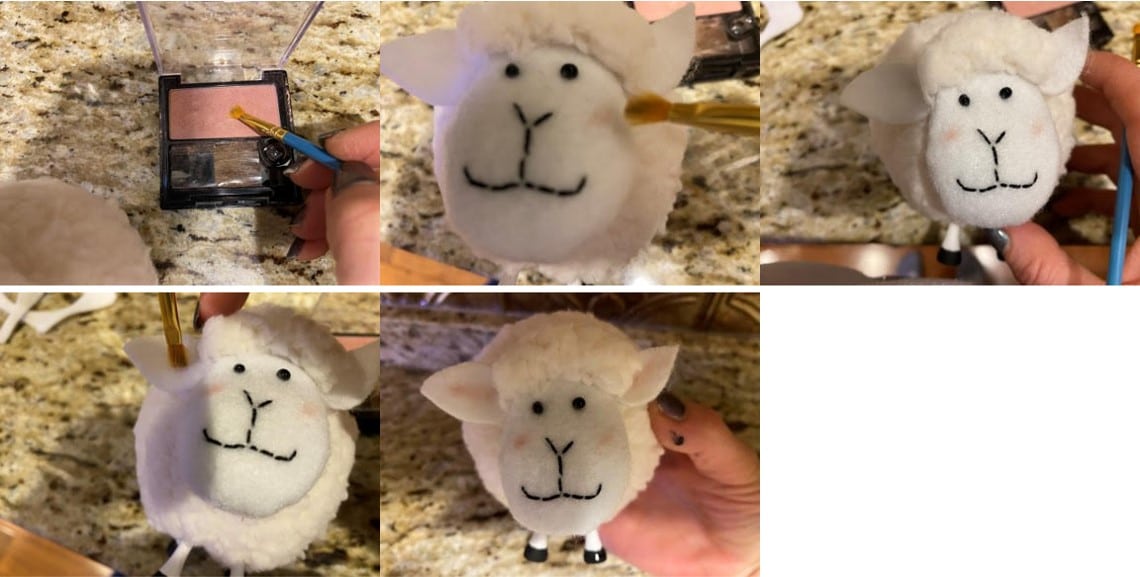
Cut a small piece of the Sherpa from your scrapes. This is going to be the lamb’s tail. Add a small drop of hot glue to one side fold over and glue closed. Hold up the tail to the back of the lamb where you think it should go. Add a dab of hot glue and glue on the tail.
Your little lamb is now finished. I hope you enjoyed making him and use him in your Easter décor. Stay tuned for the Mama sheep.
Love it
I’m going to make the lamb soon just got done the bunny with the loopy yarn
These are so cute and can not wait to make them. YOU my lady are amazing
Thats is the cutest ever, Sherry. Good job!!,
Those are so adorable. Great job.
So cute! The golf tees for legs are inspired. 😊
I can’t wait to try these! I just love lambs.
Love it… So dang cute
love this lamb, my husband gave me 8 gold tees and said don’t use any more. But I know where he keeps them! Have to get the black thread for the face tomorrow but I am making 2 of them.
Sherry can you use the mop pads from dt for the lambs
Can I use the mop pad to make lamb
what is the length of the golf tees?
I just love these lambs . Hope I can make mine as good! Lol I’m trying the cupcake liners now but they aren’t quite the same as yours but they are kinda cute
Just made the lambs so cute and soft thank you Sheri you are very good at what you do
I watched you make the lamb… so precious as all of creations are!
Oh I love Sheep 🐑 Sherry!
I have several and I collect them when ever I find them as I’m a knitter, crocheter, a felter and am learning to spin! 🥰
They are the reason I have the supplies to make using their beautiful wool locks!
🐑🧶💝
I just love this little sheep 🐑 you have created Sherry and can’t wait to try to make one! Can’t wait to see the Momma size one & how you will make it! Love all your crafty ideas, your enthusiasm and sweet personality… your so sweet & talented!
😍💝🥰
I have been watching you.
Your my favorite crafter
So cute! Have to try those, just finishing up my jar lid bunnies. Thanks Sherry for sharing all your ideas!
I just got all my items together, including some black sherpa. can’t wait to make these adorable lambs.
Sherry, these are so dog gone CUTE! I can’t wait to make them!
So cute!
It’s such a cute lamb!
Thank you for sharing the pattern!
Love this Sherry! So cute!
I Love your little sheep and all your crafts Sherry, you’re such a delightful and sweet face to watch. I’m always happy to see you, you have such a kind and loving spirit that draws people to you .. thank you for being you.
SOOO Stinking Cute!! Can’t wait to make for my family
Sherry, I love watching and learning how to make such unique, cute, beautiful crafts. The way you explain the how-to’s is great for us newbies! 🙂 Excited to see the summer projects you will have. Thanks a bunch 🙂
Sherry you are amazing. I thought I was done with Easter but I gotta have these little darling. Thank you!
Hi Sherry! I love the lambs, actually I love everything you make! Thanks for inspiring all of us to get our crafting on!
Love these little lambs… so creative. Love your crafting ideas!
I’m just finishing up my first one with the mop head & balls , it’s messy but it worked , I also painted a small egg from dollar general cream and used it for the face it looks amazing .
I
M in love with these lambs
Happy Easter,
I don’t have a printer, can you please tell me the size of the lamb face and size of the ears please. I have the body made. I cut out a size of a egg shape but it doesn’t look as big. Thank you
what size are the styrofoam balls for the lambs…..sooooo cute!! thanks