Home Decor, Patriotic, Spring
DIY Liberty Bell Bowl Filler
May
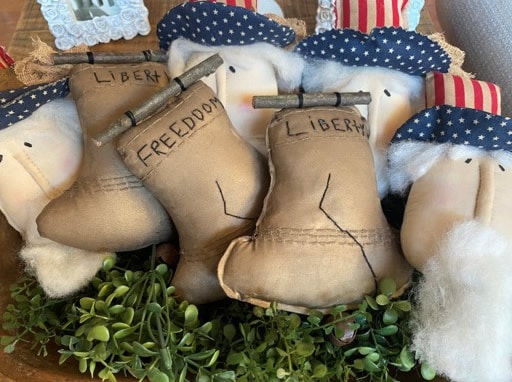
I have been busy making items for Memorial Day and the Fourth of July. I made the Uncle Sam then I wanted a bell and I decided to do the bell to resemble the real bell. I was going to do red white and blue but I didn’t want everything in my dough bowl to blend to together and I think I made a good decision they look great together if I say so myself lol. You can certainly do them in any colors you would like I am giving you the pattern and directions but you make it your own.
Materials You Will Need
- Liberty Bell Pattern
- Muslin Fabric
- Sewing Machine
- Polyester Fiberfill
- Folkart Brushed Metal Paint in the color Brushed Bronze
- Paintbrush
- Sponge Brush
- Pencil
- Cream Thread and Needle
- Quilters No.5 Thread in Cream and Black or Embroidery Thread in Cream and Black
- 20mm Rusty Bell
- 4” Twig from the yard
- Sanding Sponge or Fine Grit Sandpaper
- Scissors
- Hot Glue Gun and Glue Sticks
- Coffee Stain Mixture
Sewing And Stuffing The Bell
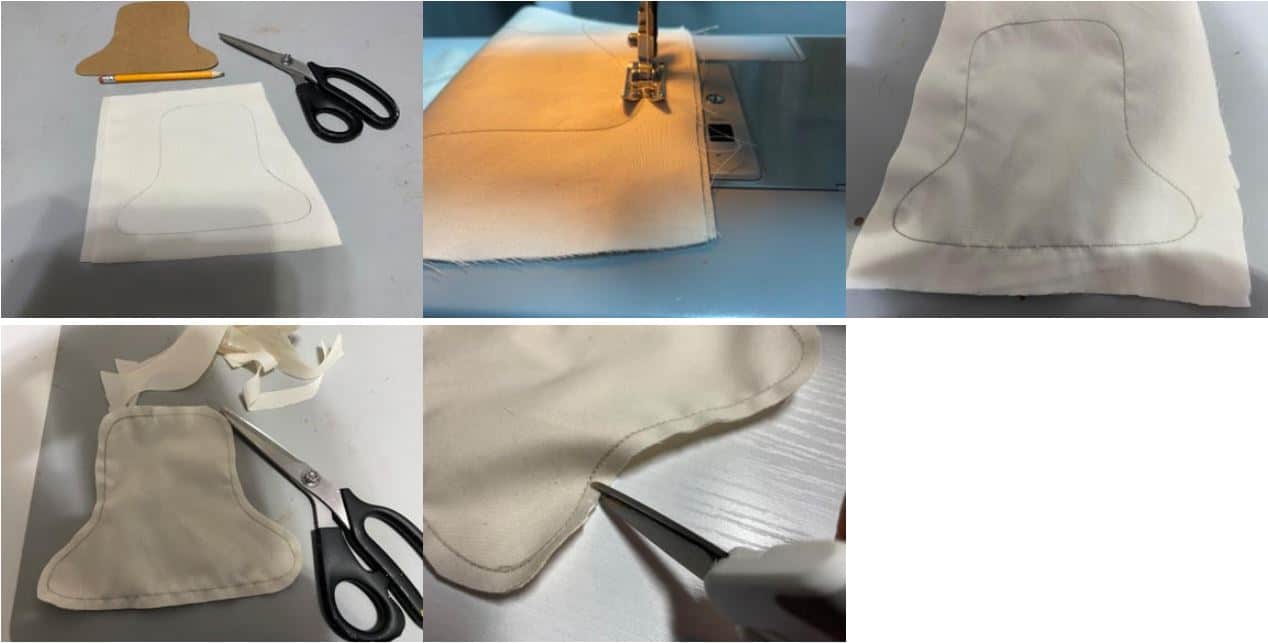
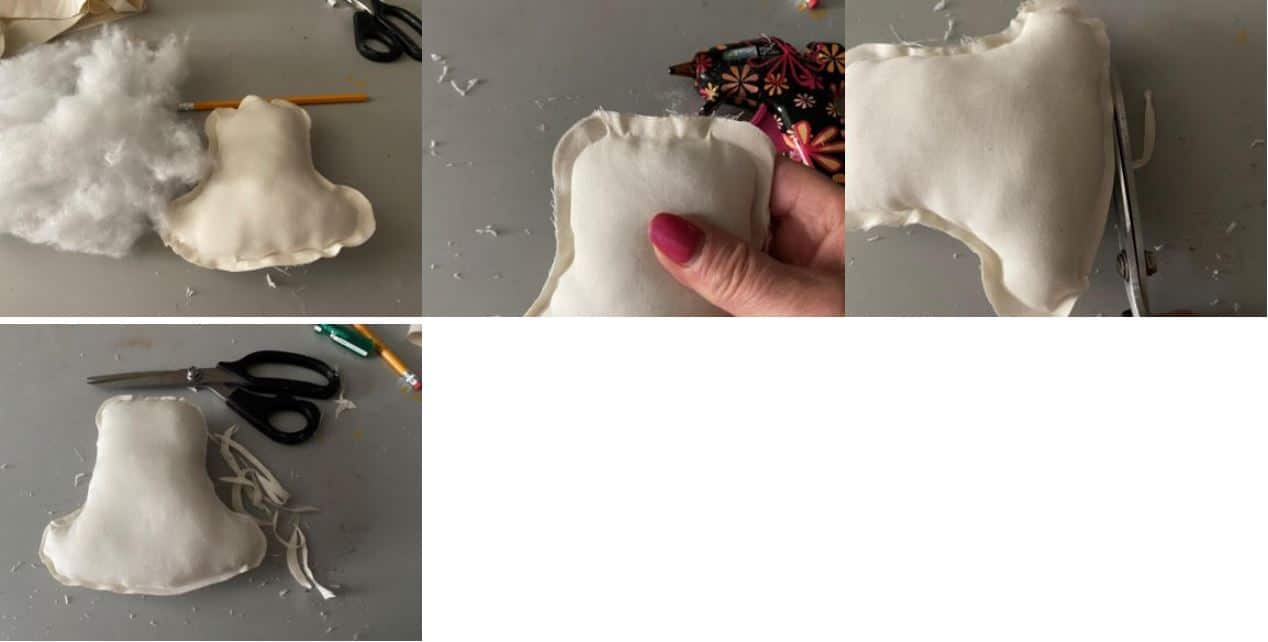
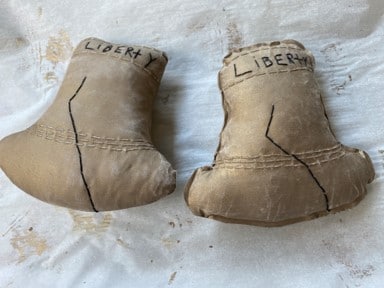
The first thing you will need to do is print and cut out the pattern. Trace the liberty on a double layer of muslin. Sew on your machine using the trace line as the sew line. Leave open at the top where indicated on the pattern. Cut out the bell about a ¼” away from the sew line. Clip around the curves be careful not to cut your stitches. Turn right side out.
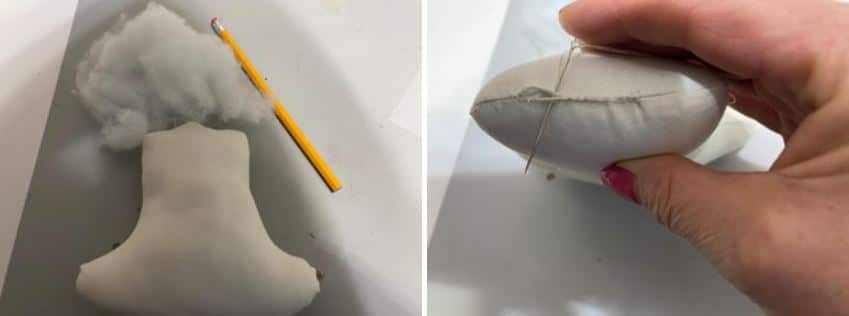
Firmly stuff with polyester fiberfill. I like to use the eraser end of my pencil to push down the stuffing. Using cream thread and a needle sew the opening closed.
How To Glue The Bell
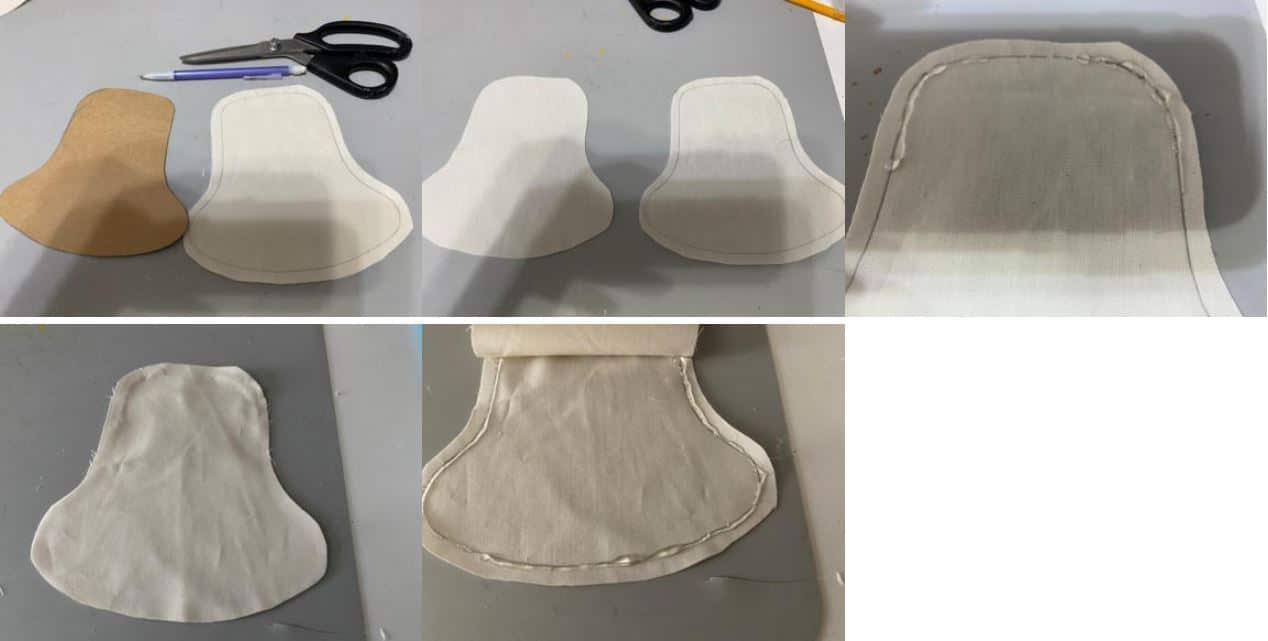
Trace the bell on a double layer of muslin. Cut out about a ¼” from the trace line. Separate the two pieces. With the trace line facing up apply a line of hot glue around the top of the bell on the trace line leaving the middle open where indicated on the pattern. Place the second piece of the bell on top and glue down. Lift up the top layer and continue applying hot glue to the trace line and gluing the top layer down until the whole bell is glued except for the top middle.
Carefully stuff do not push the stuffing in to hard or you will pop open the glue. You want the firmly stuffed but not so stuffed that it breaks open. Once the bell is stuffed add hot glue in the opening and glue closed. Using scissors trim off some of the excess fabric around the bell.
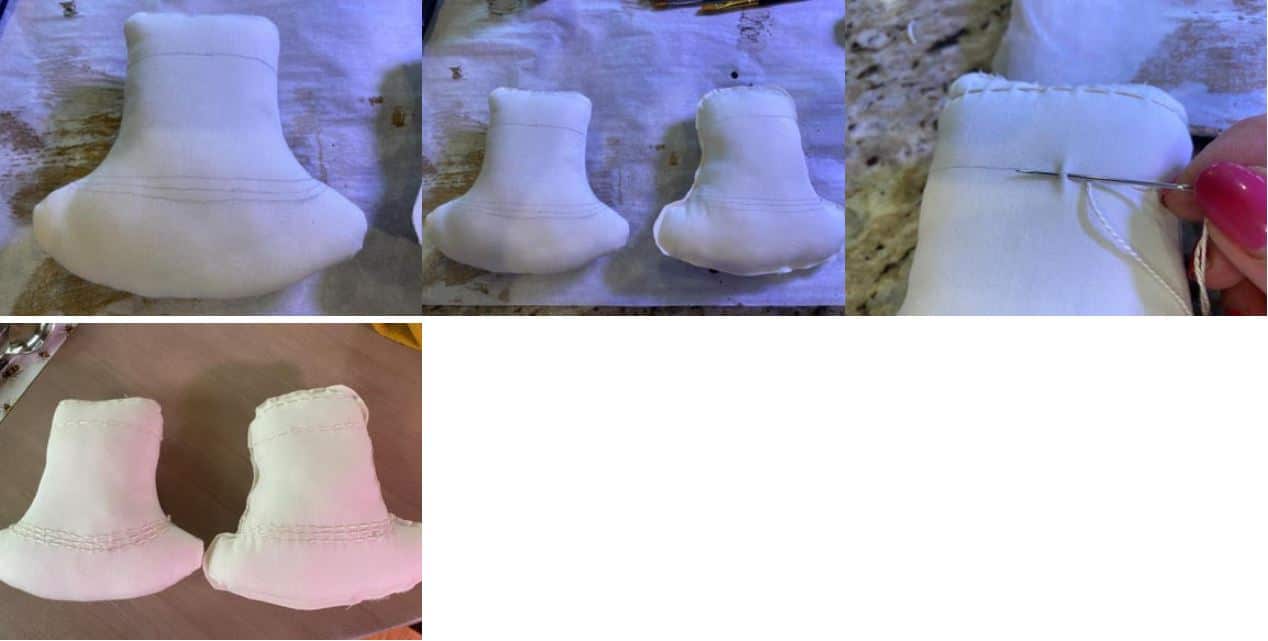
Adding The Detailed Lines
Using a pencil lightly draw the two lines at the top of the bell bringing the lines all the way around the bell. Leave about a 1” between the two lines. Next draw on the three lines towards the bottom of the bell bringing them around the whole bell. Use the pattern as a guide where to place the lines. Using cream quilters thread or embroidery thread stitch on the lines.
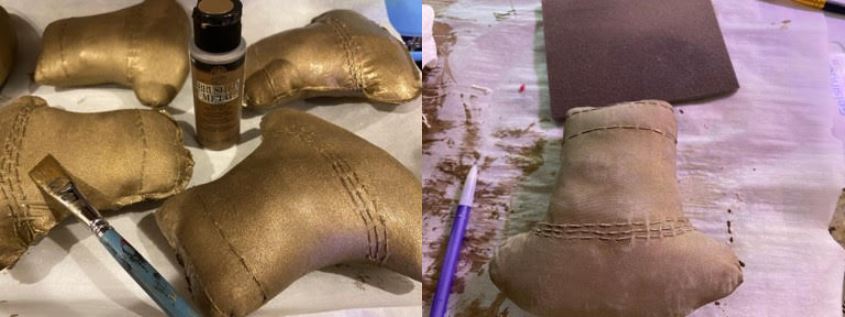
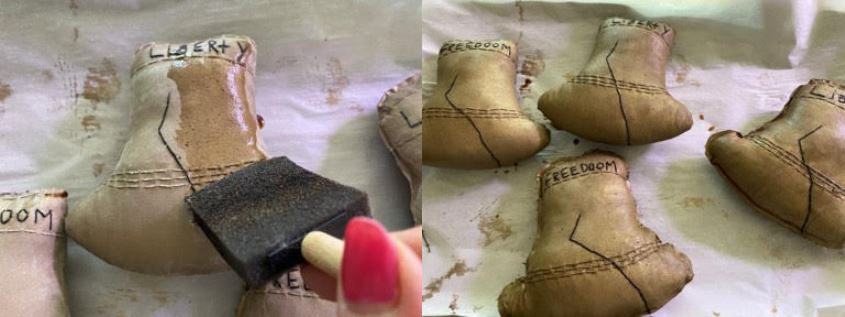
Painting And Sanding The Bell
Paint the entire bell with Folkart brushed metal paint in the color brushed bronze or the color of your choice. Let dry. If you have sewn the bells you can place them on a parchment lined cookie sheet and dry them in a 210 degree oven. Make sure you check them every 4 or 5 minutes they do not take long to dry. If you have glued the bell you will have to let it dry naturally DO NOT put it in the oven. Once your bell has dried sand the entire bell with a sanding sponge or a piece of fine grit sandpaper.
Adding the Word and Crack
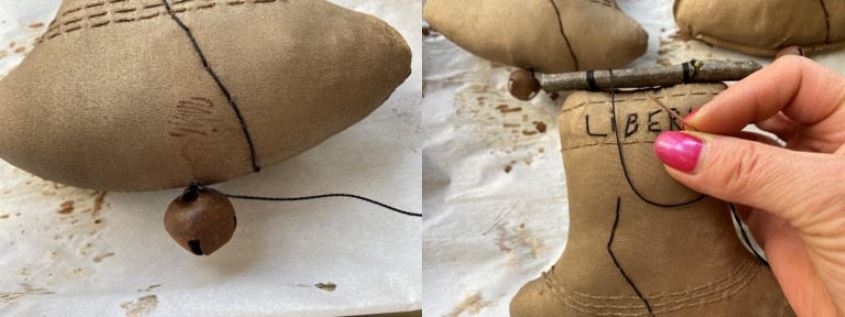
You can add any word you would like at the top of the bell. I used Liberty, Freedom and America. Lightly pencil on the word of your choice in-between the two lines at the top of the bell. Using the pattern as guide lightly pencil on the crack on the bell. Using black quilters thread or embroidery thread and needle stitch on the word. Insert the needle through the back of the bell to the first letter on the front. Stitch on the word then bring the needle and thread to the top of bell knot and tie off.
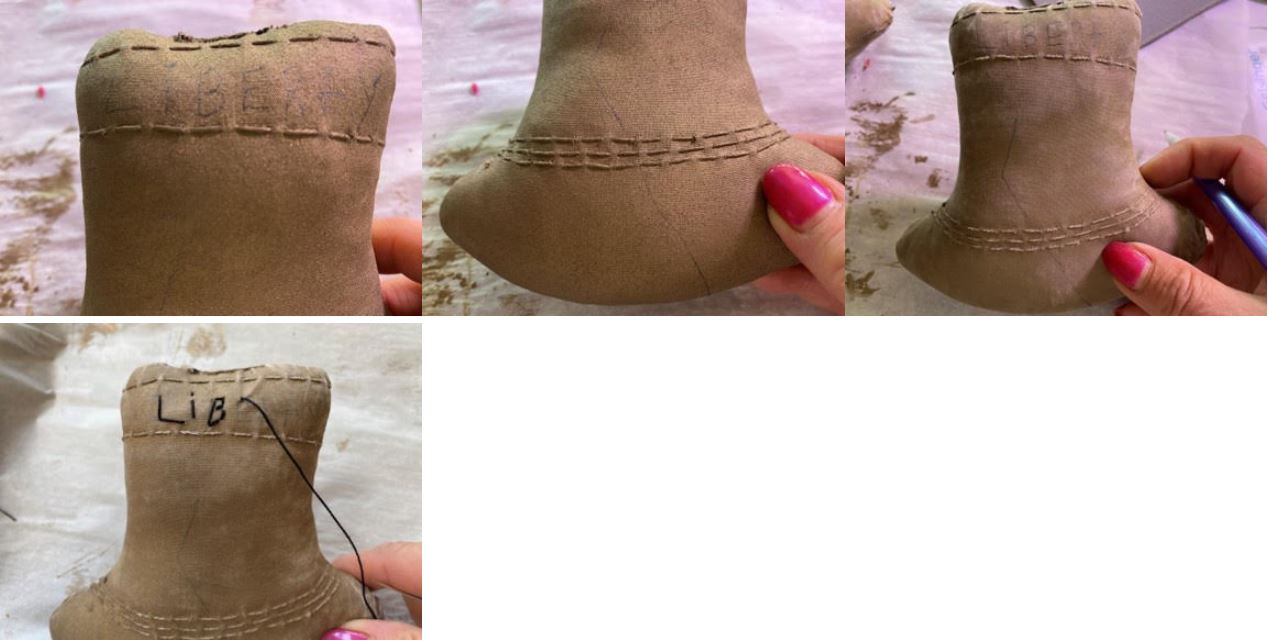
To stitch the crack insert the needle and thread through the back of the bell coming out at the beginning of the crack on the front. Stitch on the crack and knot and tie off at the bottom of the bell.
Coffee Staining
If you would like my coffee staining mixture recipe you can find it under sherry’s shortcuts. Using a sponge brush coat the entire bell with the coffee stain mixture. Let dry. You can dry the bell the same way you did when you painted it.
Adding The Bell and Twig
Using the black quilters thread sew on the rusty bell to the bottom of the bell in the center. Cut a 4” piece of twig from your yard or you can use a cinnamon stick if you don’t have any twigs. Place the twig at the top of the bell centering it. There will be a little hangover at each end. Using black quilters thread and a needle sew on the twig about a ½” from each side of the bell.
You are done with your bell. I hope you enjoyed making the bell and enjoy using it to decorate for Memorial Day and the Fourth of July. If you would like to use the bell as an ornament all you need to do is add a piece of finishing line under the middle of the twig make a loop and tie a knot.
Oops! There’s an extra o in freedom. You probably have heard that several times already 🙂
Love ❤️
I wonder if some steps could be skipped if using the gold colored placemat from dollartree.
You could sure try it or even use gold fabric I just like the look of the paint
I made these with the brown paper from DT , they turned out amazing, I hand stitched them to give an even more prim look and coffestained with a spray bottle
❣️❣️❣️❣️🎧
Did you look at the photo that shows two picks?
Did you look at the photo that shows two picks?