Fall, Halloween, Home Decor, Thanksgiving
DIY Pumpkin Candle Holder
Jul
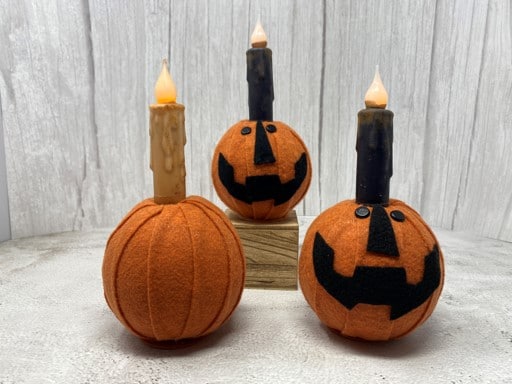
If you love Fall and candles you are going to just love making and decorating with this pumpkin candle holder. If you have been following the Crafty Decorator you know I love to make items I can decorate my home with. I am just in love with how this pumpkin candle holder turned out. You can add the face and use them for Halloween or leave the pumpkin plain so you can leave it all Fall.
Materials You Will Need
- Pumpkin Face Pattern
- 3.8” Styrofoam Ball
- 9”x12” Piece of Orange Felt (I used the color pumpkin spice)
- 9”x12” Piece of Black Felt
- Black Upholstery Nails or what ever you would like to use for the eyes
- 4” Timer Taper
- 2” Wood Circle
- Orange Craft Paint ( I used the color terracotta)
- Paint Brush
- Scissors
- Pencil
- Piece Of White Chalk
- Knife to cut the Styrofoam Ball
- Drill and a 1” Spade Drill Bit
- Hot Glue Gun and Glue Sticks
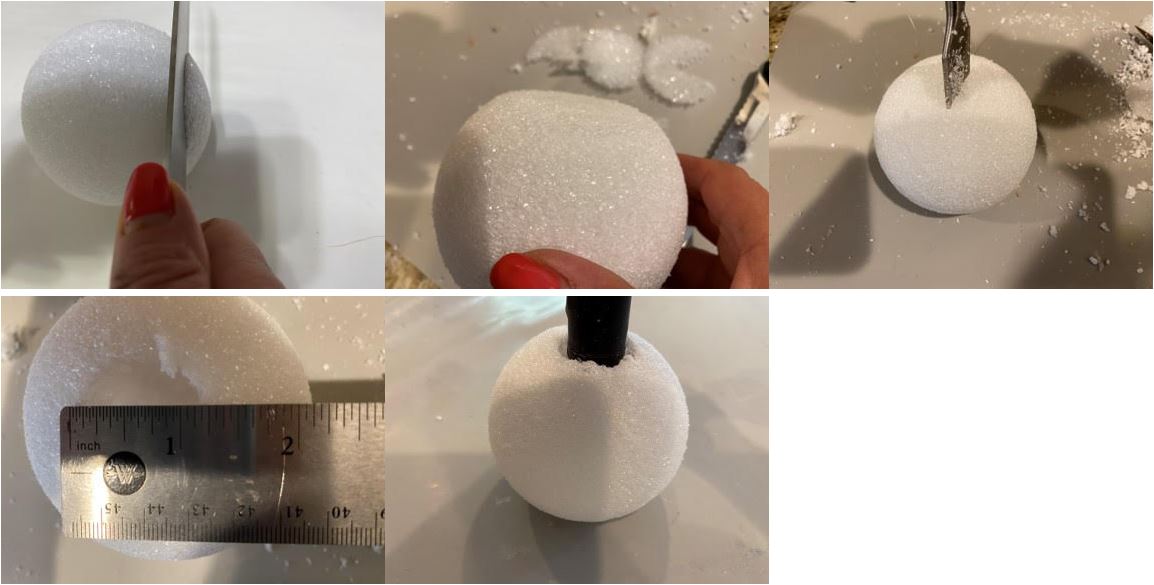
Preparing The Styrofoam Ball
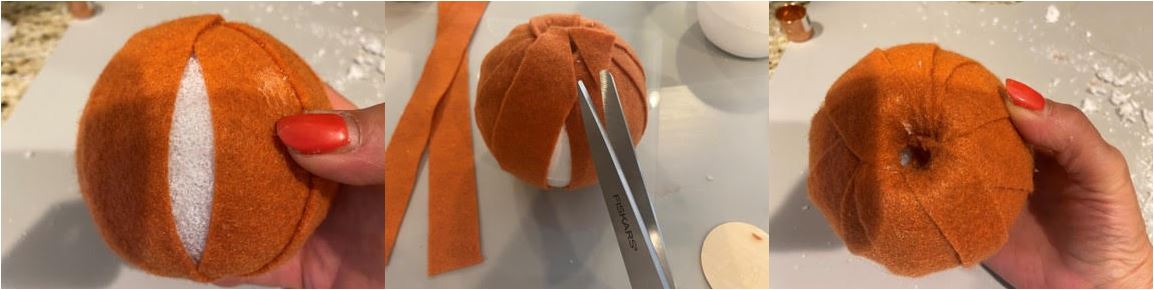
The first thing you will need to do is cut a piece off the Styrofoam ball to make it flat. This will be the bottom of the pumpkin. I just used one of my kitchen knifes to cut a rounded end of the Styrofoam ball. To make sure your cut is even set the Styrofoam ball on a flat surface to make sure it sits even. Next using your drill and the 1” spade drill bit drill a hole in the top middle of the ball. Do not go real deep at first. Place your candle in the hole to see if you need to drill down any deeper. Repeat this step until your hole is deep enough for the candle to sit into. Your opening should be around 1 ¼” in diameter.
Covering the Styrofoam Ball
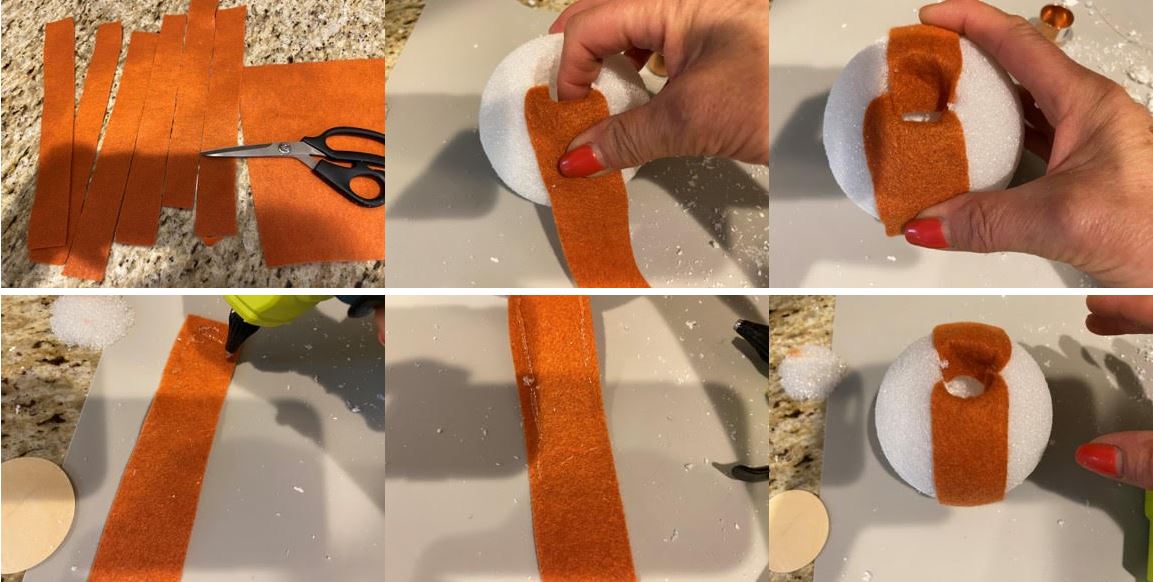
You are now going to cut your strips of felt from you 9”x12” orange piece of felt. With a pencil make a mark across the 9” end of the felt every 1 ¼” inches. Cut your strips using your marks as your guide. You should end up with 7 strips of fabric. You should end up using 6 of the 7 strips to cover your Styrofoam ball. Take one strip place one of the strip in the drilled hole then wrap your strip of felt around the ball coming up on the other side and tucking the end in the hole. I did this before hot gluing the felt to make sure each end would of the felt strip would reach down into the hole. Once you have the strip set remove one end from the hole and hot glue across the top of the end and down each side. Do not add the glue to close to the ends or it will come out from the sides. Glue the strip to the ball. Continue adding hot glue down the sides of the felt strip and gluing to the ball ending up hot gluing the other end into the hole.
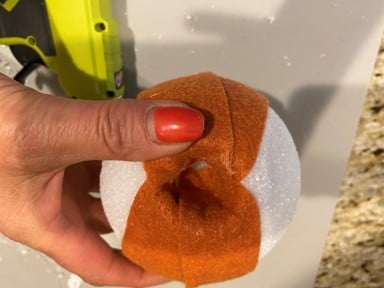
Add the second strip of felt you are going to place one end into the hole making sure your felt is going to over lap the side of the fist strip a little, less then a ¼”. Bring the done and under when you are going to bring the strip back up to the other side you are going bring it up to the opposite side of the first strip. You are going to make an X check the bottom to see if you have made an X. I hope I am explaining this so you can understand. For example if you are starting the second strip on the right side of the first strip you should end up on the left side of the first strip. See photo’s below. Once you have the strip in place you can now hot glue it on just like you did the first strip.
Continue placing and gluing on the remainder 5 strips the same way you did the second strip making sure you are overlapping a little. If you feel that the ends of the strips are starting to overlap to much at the top you can trim the end of the strip at an angle.
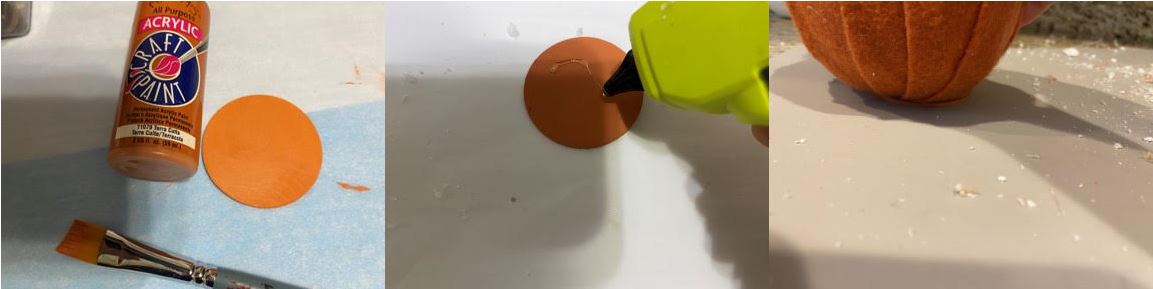
Adding the 2″ Wood Circle
Place your candle into the opening at the top of your pumpkin. If you notice hit will not stand up this is where the 2” wood circle comes in. Give the 2” wood circle two coats of your orange paint. Paint the front, back and sides. Let Dry. After the circles is dry add hot glue to one side of the circle then place your pumpkin on top of the circle making sure the circle is in the center. Let go of the pumpkin and make sure it stands straight if it doesn’t quickly more around the pumpkin on the circle before the glue hardens getting the pumpkin to stand straight.
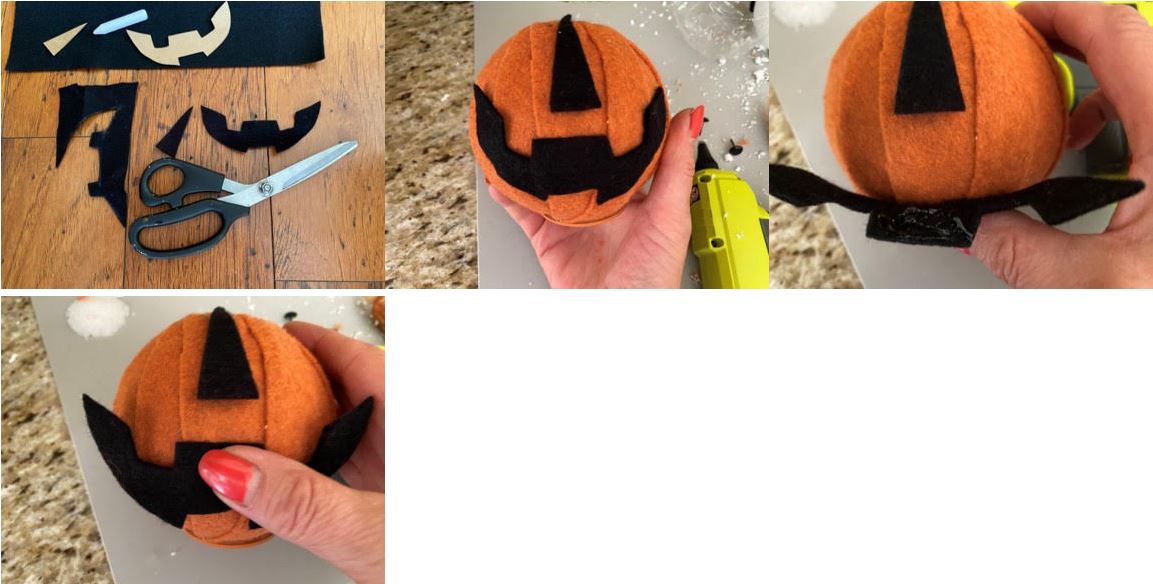
Adding The Face
If you would like to add a face to your pumpkin the first thing you will need to do is print and cut out the pumpkin face pattern. Using a piece of white chalk trace and cut out your two pattern pieces. Next remove the candle then place the nose and mouth pieces onto your pumpkin where you would like them. After you have them placed glue on the nose, then fold back the middle of the mouth add hot glue and glue into place then glue down the two sides of the mouth.
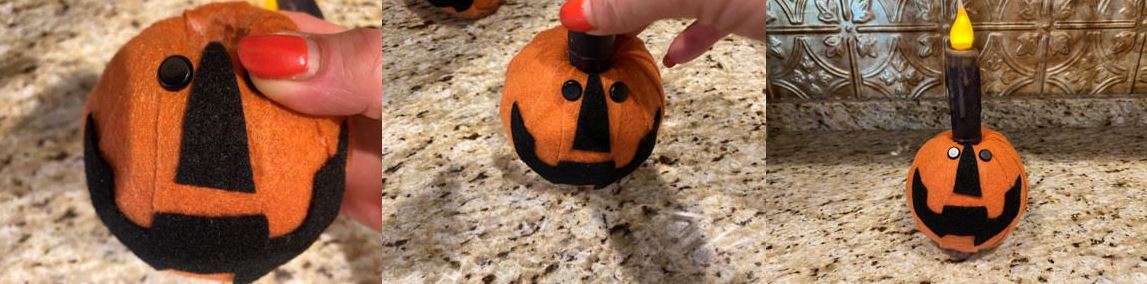
For the eyes I used black upholstery Nails you can use buttons if you would like. Place the eyes where you want them to be. Once you have them set in place just push the nails all the way into the pumpkin head. Place your candle back into the pumpkin you are now finished with your pumpkin candle holder.
I hope you enjoyed making this adorable pumpkin candle holder. The possibilities are endless on what kind of candle holder you can make using a Styrofoam ball and fabric. I am working on a few others. Please check blogs again to see what new candle holders I come up with.
I love working on the crafts you make.
Hi Joy,
Thank you so much. I hope you have a wonderful week.
I tried to find the pumpkin🎃 stems but couldn’t find it. Would you repost a video showing how to make it?
What is your website to buy the candles?
Thank you
Can’t wait to make it!! Need to get the felt.
Looking forward to making this!!
Are you planning on doing a video on making a snowman version of this?