Christmas, Home Decor, Outdoors
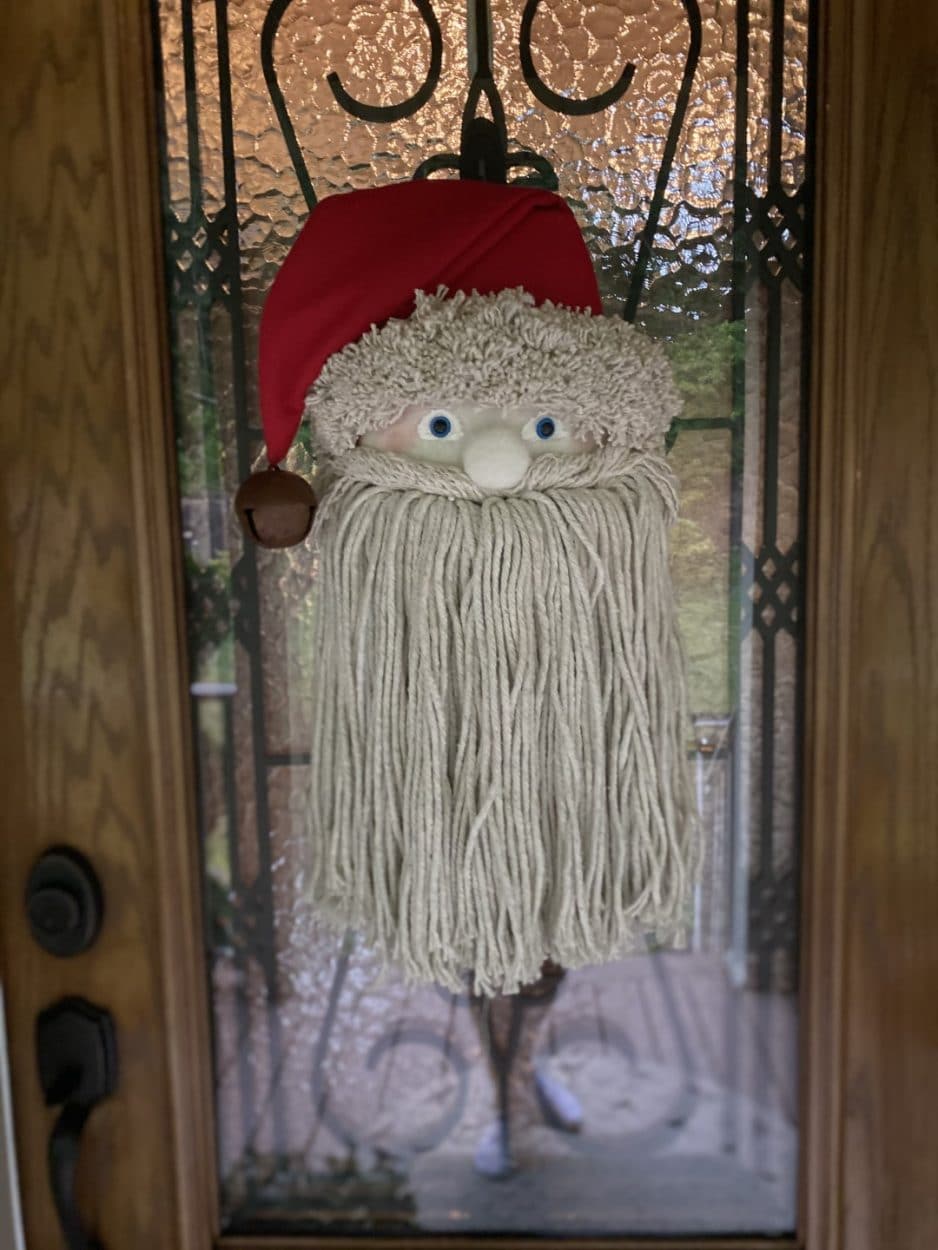
DIY Santa Door Hanger
Jul
I love Christmas and collecting vintage Santa’s.I wanted a Santa door hanger so I decided of course to make one myself I had a few trial and errorswhile I was making him in the below directions is what worked best for me but you can make him your own, you can use fabric’s, mops and eyes of your choice.
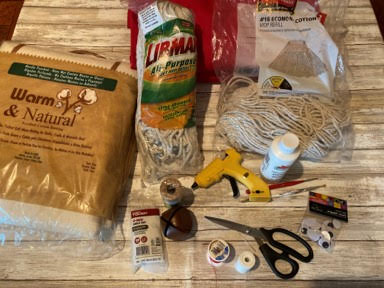
Here is a list of what you will need:
- Santa Pattern
- Warm And Natural (Walmart)
- Red Felt
- Polyester Fiberfill
- Libman Wet Mop Refill #16 (Walmart)
- Rubbermaid Mop Refill #16 (Home Depot)
- Cream and Red Thread
- Needle
- White Craft Paint
- Paintbrush
- Scissors
- Pencil
- White Chalk
- Twine
- Large Rusty Bell
- Blue Animal Eyes (Hobby Lobby)
- Hot Glue Gun and Glue Sticks
- 4” Zip Ties
- X-acto Knife
Printing The Santa Pattern
The first step you will need to do is print out the Santa Pattern, you will need to attach pieces A and B of the head pattern together you will also need to attach pieces A and B of the hat pattern together.
Making The Santa Head
Once you have the Santa head pattern ready lay it on top a double layer of the warm & natural, trace and cut out. Using your hot glue gun start gluing the two head pieces together by applying a small line of hot glue at the top of the head just below the edge and glue down the second layer continue to glue the two pieces together leaving about a 3” opening at the bottom of the head. Now that you have the two pieces glued together turn the head right side out then stuff with the fiberfill, once the head is stuffed turn the ends of the opening in slightly add a small line of hot glue and glue closed continue to glue the two pieces until the opening is totally closed.
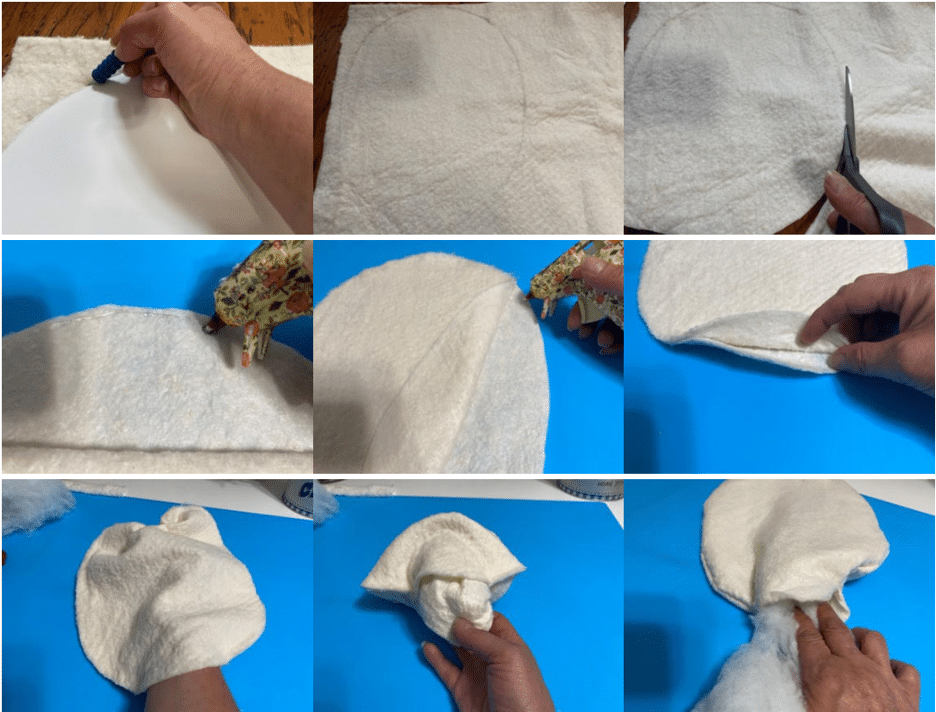

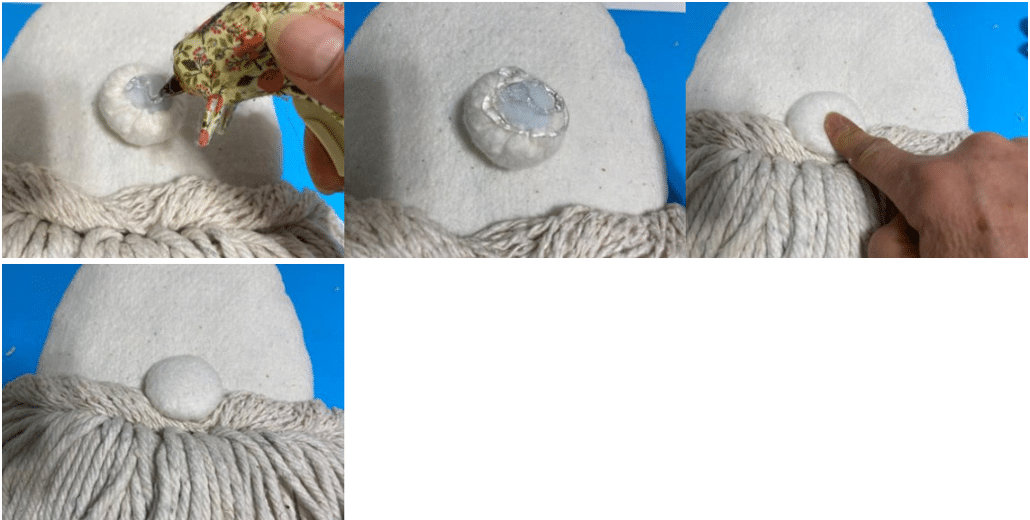
Next trace and cut out the nose on a single layer of warm and natural, once you have the nose cut out using your cream thread and needle do a running stitch around the edge of the circle pull your thread just enough so the circle forms a cup then add fiberfill in the center pull the thread tight to close the nose then knot and cut your thread.

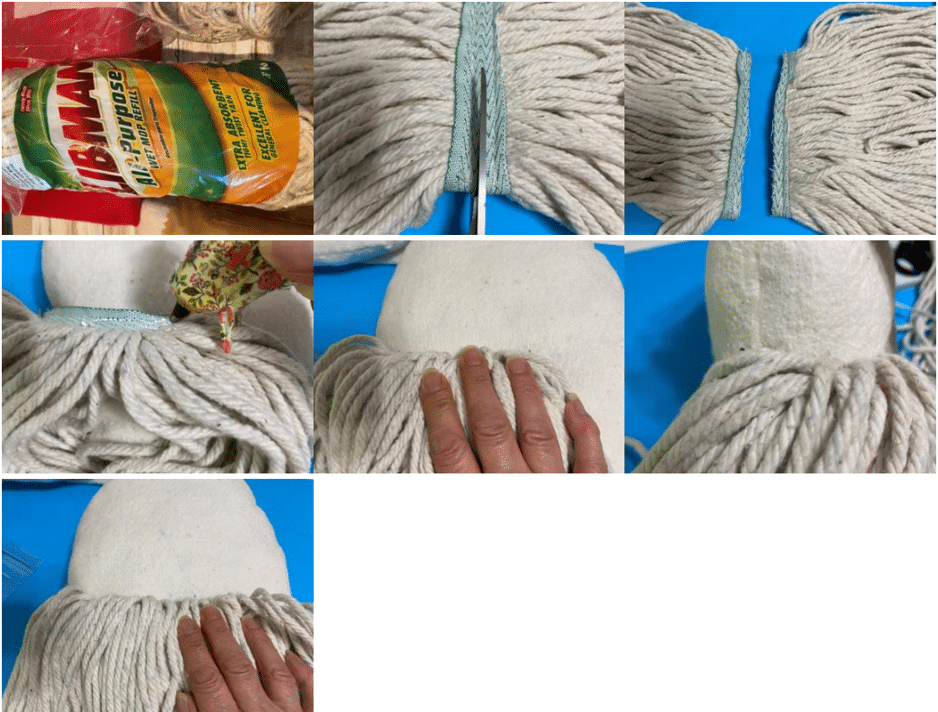
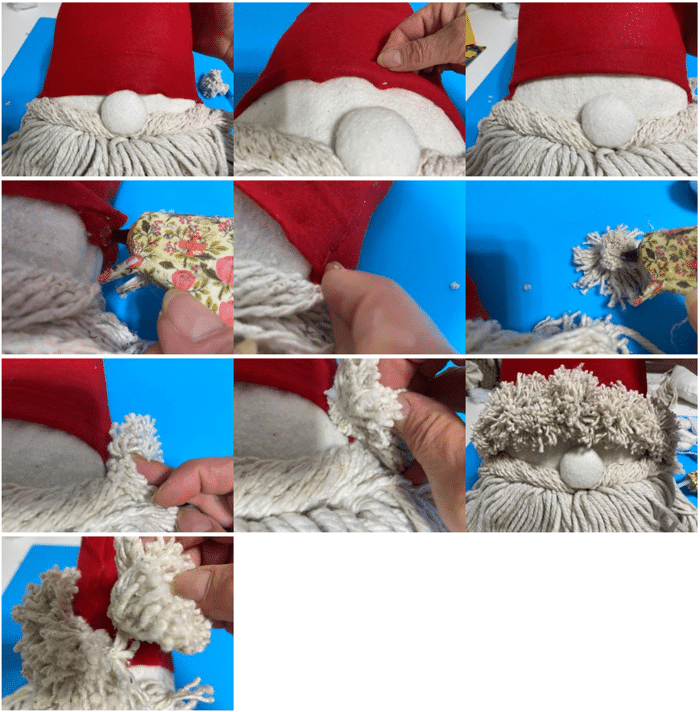
Adding The Beard
For the bead you are going to use the mop head by Libman, open up the mop you will see a green fabric strip in the middle you are going to cut down the middle of the green strip you will end up with two mops. Next starting at the right end of one of the mops add hot glue to the top green strip fold over and glue in the middle of the of the face a little below half way down from the top of the head continue to add hot glue and glue down when you get to the end add the hot glue but this time glue the end of the mop a little higher up the side of the head, add the second mop the same way but start by gluing the left side of the mop to the middle.
Adding The Mustache
To make the mustache you are going to use the Rubbermaid mop, start my removing 7 full strands from the mop next separate each strand into two pieces of two strands, lay all the strands evenly together then fold them in half then fold them in half again, next lay the mustache on the Santa face at the top of the beard find the middle of the mustache pick it up and twist the middle of the mustache tight then add hot glue to the Santa face just above the beard (you want the mustache very close to the beard) where the middle of the mustache is going to be then glue down the middle of the mustache. After you have glued the middle of the mustache down lightly twist one side of the mustache add hot glue to the face just above the beard then glue the mustache down continue gluing down the mustache until you reach the side of the head, just let the end of the mustache hang down onto the side of the beard, repeat this step to the other side of the mustache.
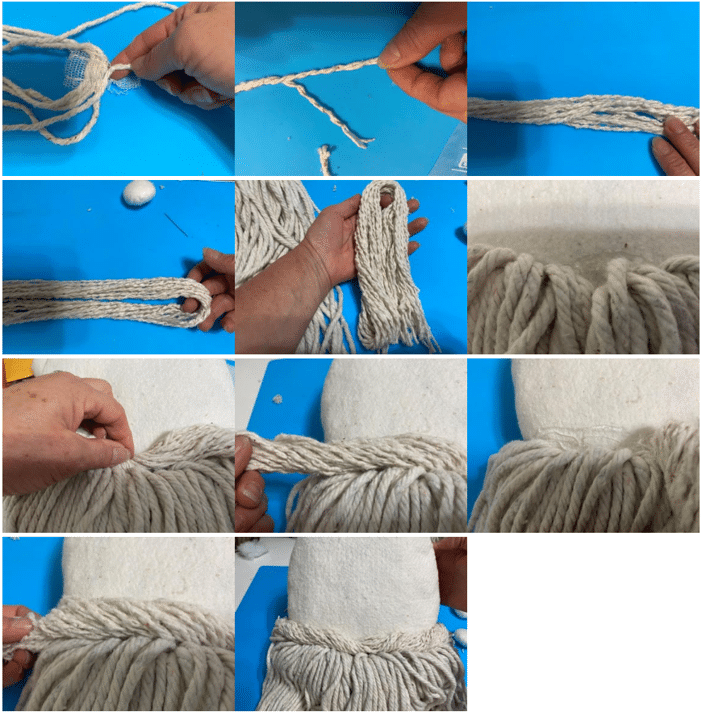
Now that you have added the mustache it is time to add the nose, add hot glue to the bottom of the nose and glue at the center of the mustache placing the nose a little over the middle of the mustache.
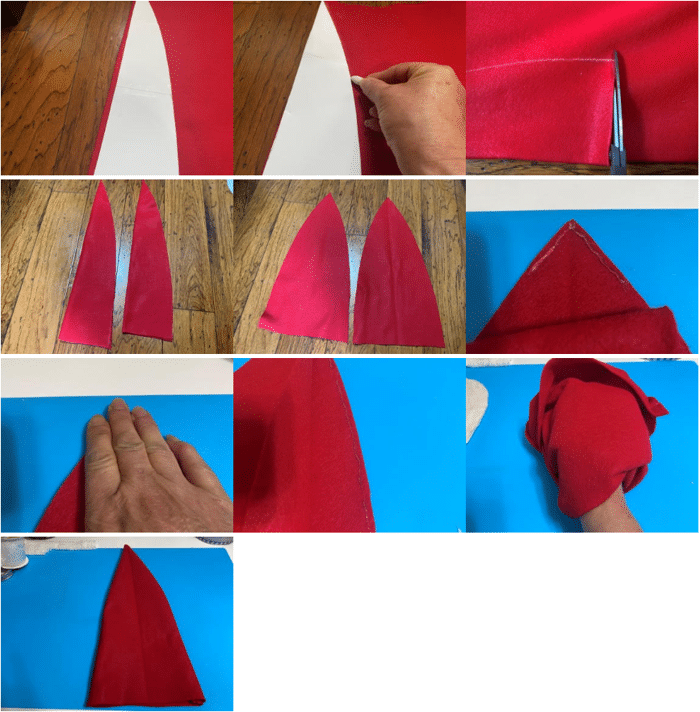
Making The Hat
Once you have printed out and connected your hat pattern pieces fold a piece of red felt in half lay down your pattern piece with the flat end on the fold of the felt now trace with the chalk and cut out you will need to trace and cut out two hat pieces. Now it is time to glue your two hat pieces together open up the two hat pieces, starting at the top of one of your hat pieces add a line of hot glue just below the edge then place the second piece on top and glue together continue adding the hot glue and gluing both sides of the hat down to the bottom do not glue across the bottom of the hat. Turn the hat right side out.
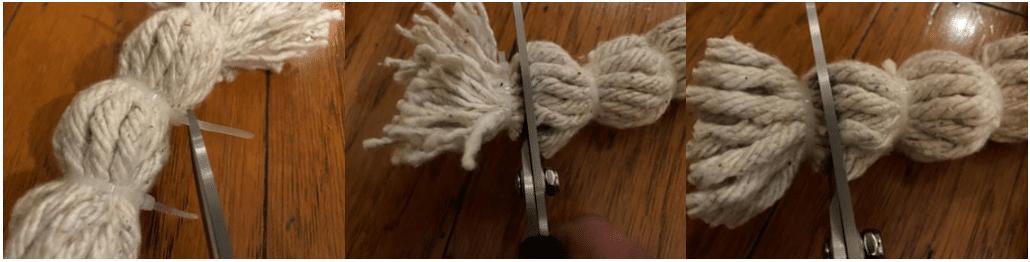
Making And Adding The Hat Trim
Using the Rubbermaid mop gather 24 strands of the mop head then zip tie them together about a 1 ½” from the bottom add another zip tie about 1 ½” above the first zip tie continue this until you reach the top of the mop then trim off the excess from each zip tie now you are going to cut the strands, start at the first zip tie you added cut the strands right after the zip tie this will give you a tassel continue cutting after each zip tie you are going to need around 20 tassels. If you rub the strands of the tassel against the palm of your hand it will separate the strands and make it fluffy.
Before we add the tassels to the hat you need to place the hat onto the Santa head.Place the hat onto the Santa head pull the hat down so the sides of the hat are just about touching the sides of the beard, to make sure you are going to show enough of the face for adding the eyes fold under some of the hat in the middle of the face until you think you will have enough room for the eyes add a small amount of hot glue and glue into place.To add the tassels take your first tassel add hot glue to the bottom then glue to the side of the hat at the rim continue gluing the tassels closely together across the front rim until you reach the other side of the hat I used 10 tassels in the first row, next you want to add the second row of tassels the same way starting just above the first tassel you added in the first row continue working your way across just as you did in the first row I also used 10 tassels in the second row.
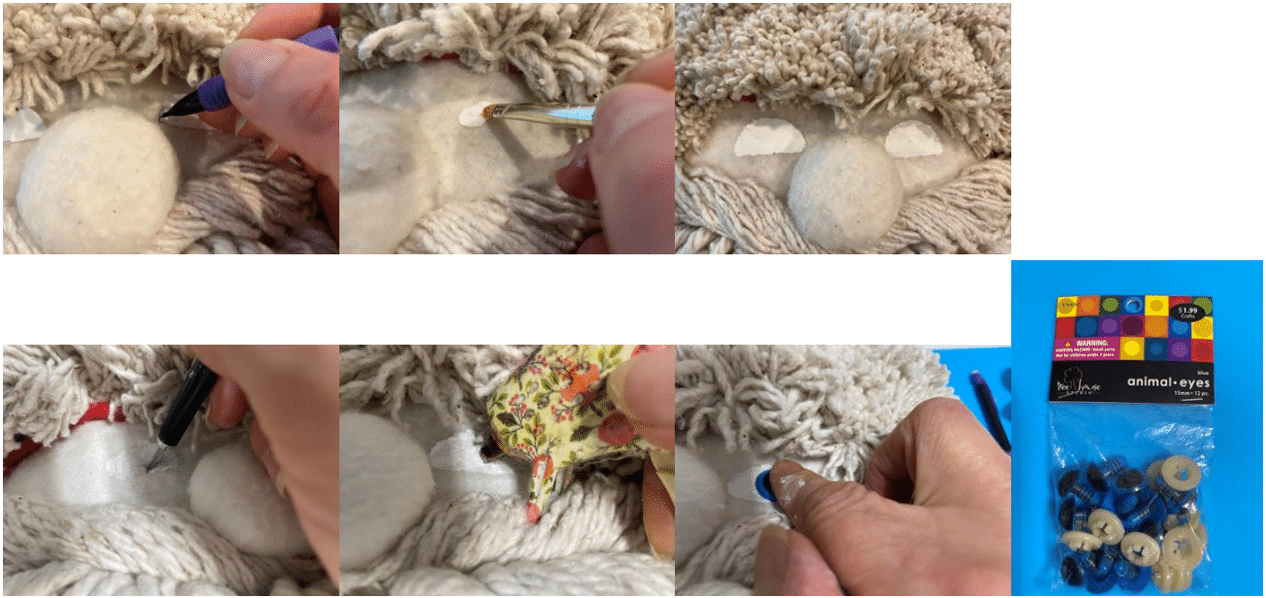
Adding The Eyes
To add the eyes take the eye pattern piece and place on the Santa face where you would like his first eye then using a pencil trace on the eye repeat this step for the other eye next paint the eyes using white craft paint you can either let them dry by themselves or use a hairdryer to dry the paint. Once the eyes have dried take the X-acto knife and make a small hole in the middle of each eye, add a small amount of hot glue in each hole then insert the blue eyes into the holes.
Adding The Finishing Touches
I gave him rose colored cheeks by using a stencil brush and some pink blush. I sewed the rusty bell to the tip of the Santa hat using red thread and a needle. To add the hanger to the back cut a piece of twin about 6 inches thread through a needle then insert at the back top of the head pull through tie a double knot.
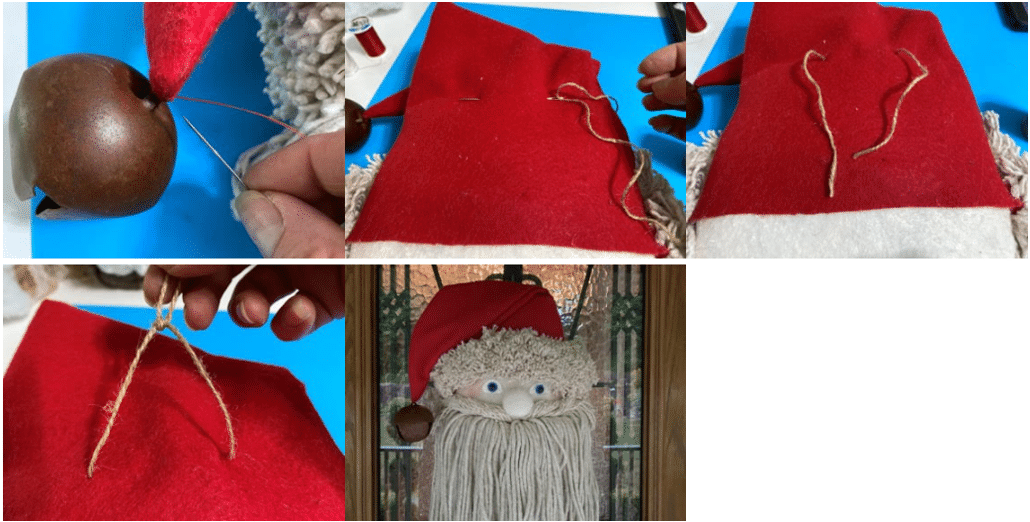
Your Santa is now finished I hoped you enjoyed making him as much as I did.
Cannot wait to make this Santa. Thank you for sharing this and other wonderful craft ideas.
So precious! Pattern please
Love the Santa planning on making it as soon as I get all the materials
I want to make the santa door head hanger I can’t find red felt wide enough to make the hat 🇮🇪
Beautiful!!!
How can I get the Facebook page where you show putting it all together I started watching you and got kicked off and I cold not find itagain I love it, I am new at this so I am trying to learn as I go but I luv your crafts
What is warm and natural
Sherry. This craft is one of your best. I love it! I want to make it for my son’s front door of his house. My granddaughter will love it.
One question; can I use muslin fabric instead of warm and natural?
The direction are great, but are you going to make this live. So I can see just how you did it. If it be would be a long videos, then you could break it down into parts. And post them one after another.