Home Decor, Patriotic, Spring
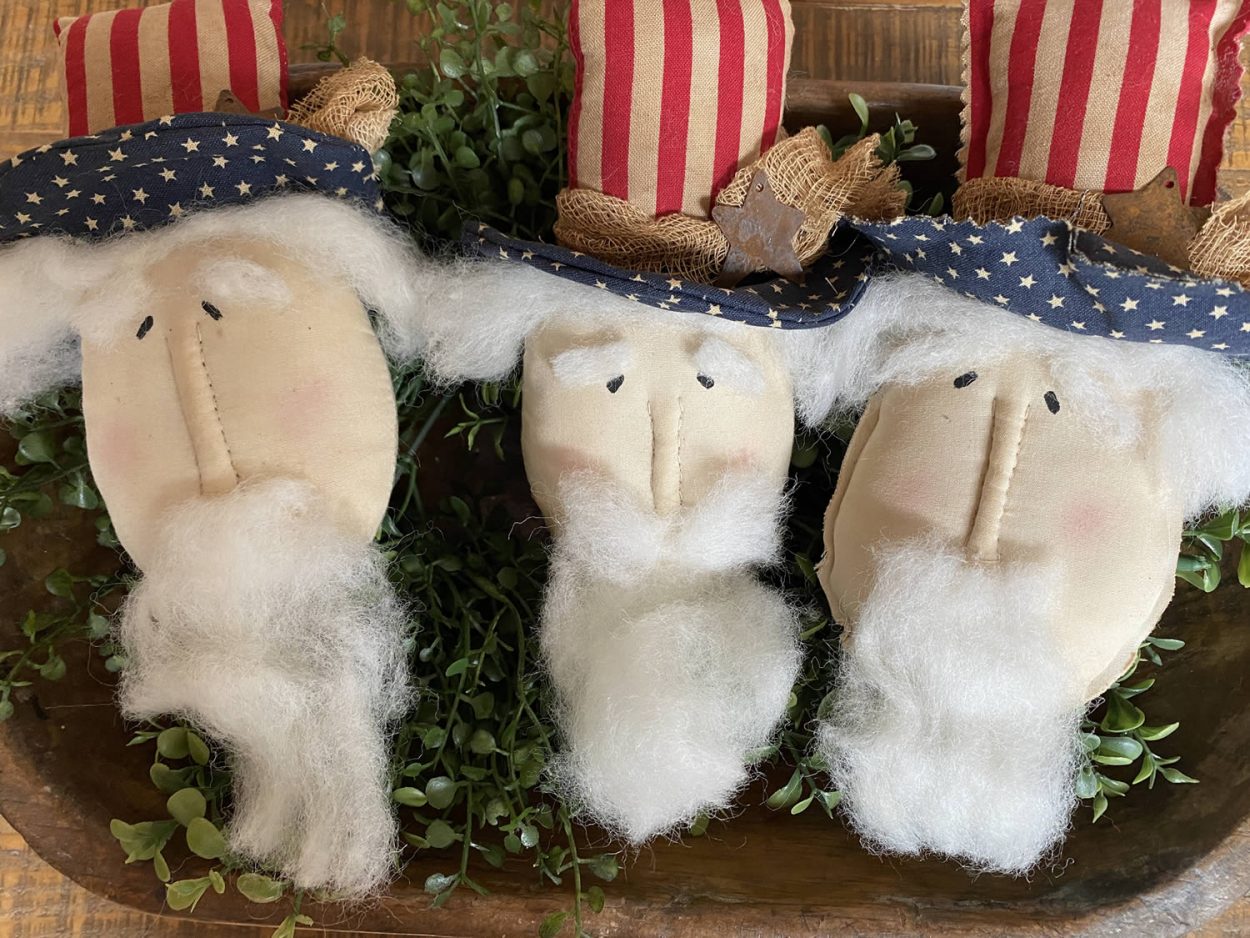
DIY Uncle Sam Head
May
I can’t believe it is May already even though the weather feels like it is Fall. My friends here at The Crafty Decorator wanted me to come up with some Americana crafts so I tried my hand at a Uncle Sam’s head and I have to say I think he came out adorable. He would make a great bowl filler, ornament and would be adorable added to a flag garland for your mantle. If you are not a sewer I am including directions on how you can also hot glue him.
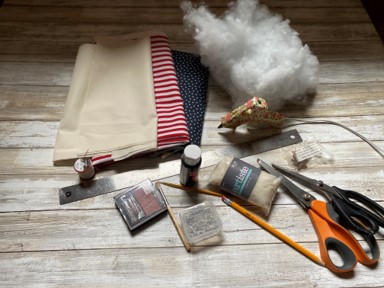
Supplies You Will Need
- Uncle Sam Head Pattern
- Muslin
- Red and White Stripe Fabric
- Blue Star Fabric
- Cheesecloth
- Wool Roving for the Bead and Hair
- Polyester Fiberfill
- Heavy Cream Thread and Needle
- Black Craft Paint and Paintbrush
- Small Rusty Star
- Sponge Brush
- Coffee Stain Mixture
- Blush for the Cheeks
- Scissors
- Pinking Shears
- Ruler
- Pencil
- Hot Glue Gun and Glue Sticks
Making The Head
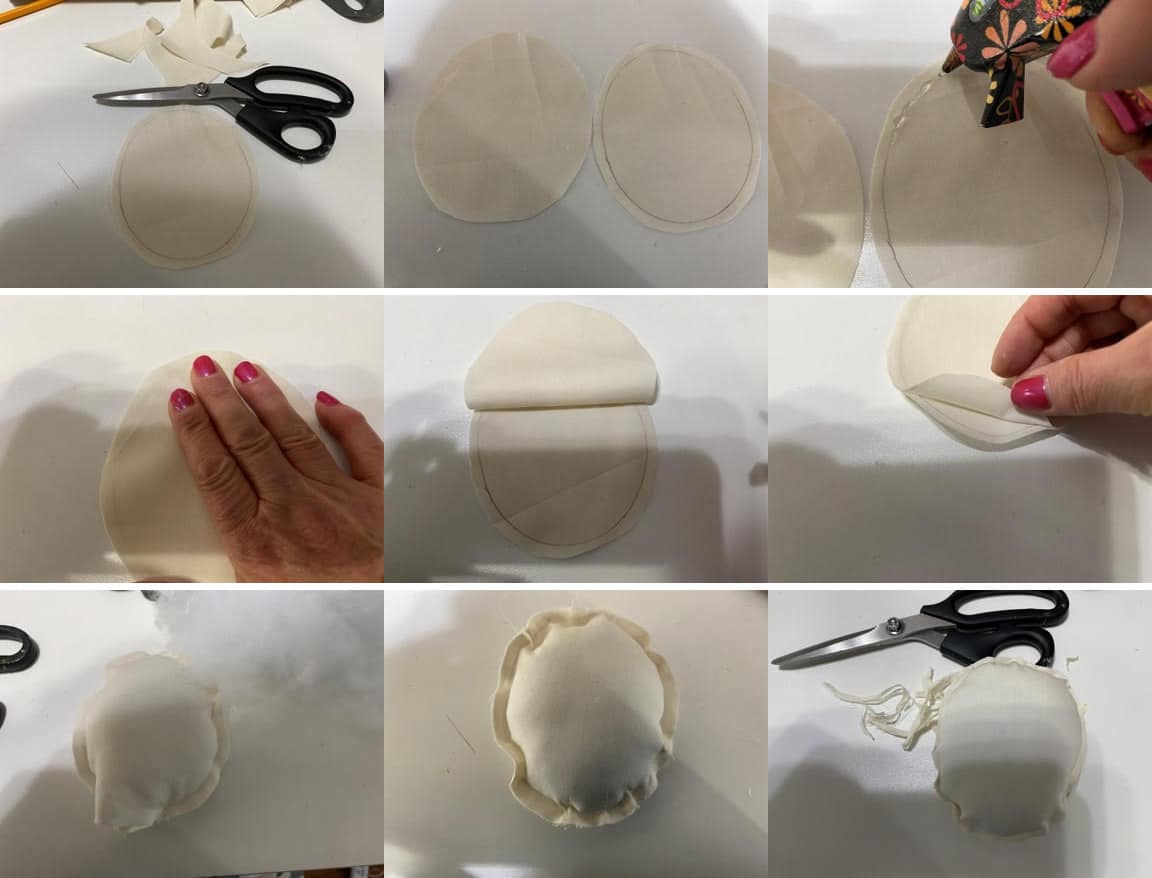
The first step you will need to do is print and cut out your pattern pieces. Trace the head pattern onto a double layer of muslin. Using the trace line as your sew line sew the head on your machine leaving open where indicated on the pattern. Cut out about a ¼” away from your sew line then clip around the head being careful not to cut your stitches. This will help stop the fabric from puckering when you turn right side out. Turn right side out and stuff firmly with polyfill, I like to use the eraser end of the pencil to stuff the head firmly. Using cream thread and a needle sew the opening closed. You don’t have to be perfect the hair will cover the opening.

To glue the head trace the head on a double layer of muslin then cut out about a ¼” away from the trace line. Separate the two pieces. With the trace line facing up add hot glue around the top of the head on the trace line then place your second piece on top gluing down. Fold back the top layer add hot glue to the trace lines on both sides coming around to the bottom making sure you leave an opening for stuffing the head. Glue down the fabric. Gently stuff the head with fiberfill. You want it firm but do not push to hard or you will break the glue seam. Once the head is stuffed add hot glue on the trace line of the opening and glue closed. Using scissors trim off some of the excess fabric around the glue line, do not trim to close.
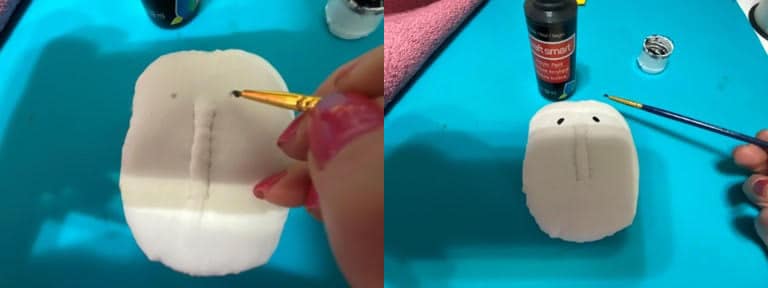
Adding The Face
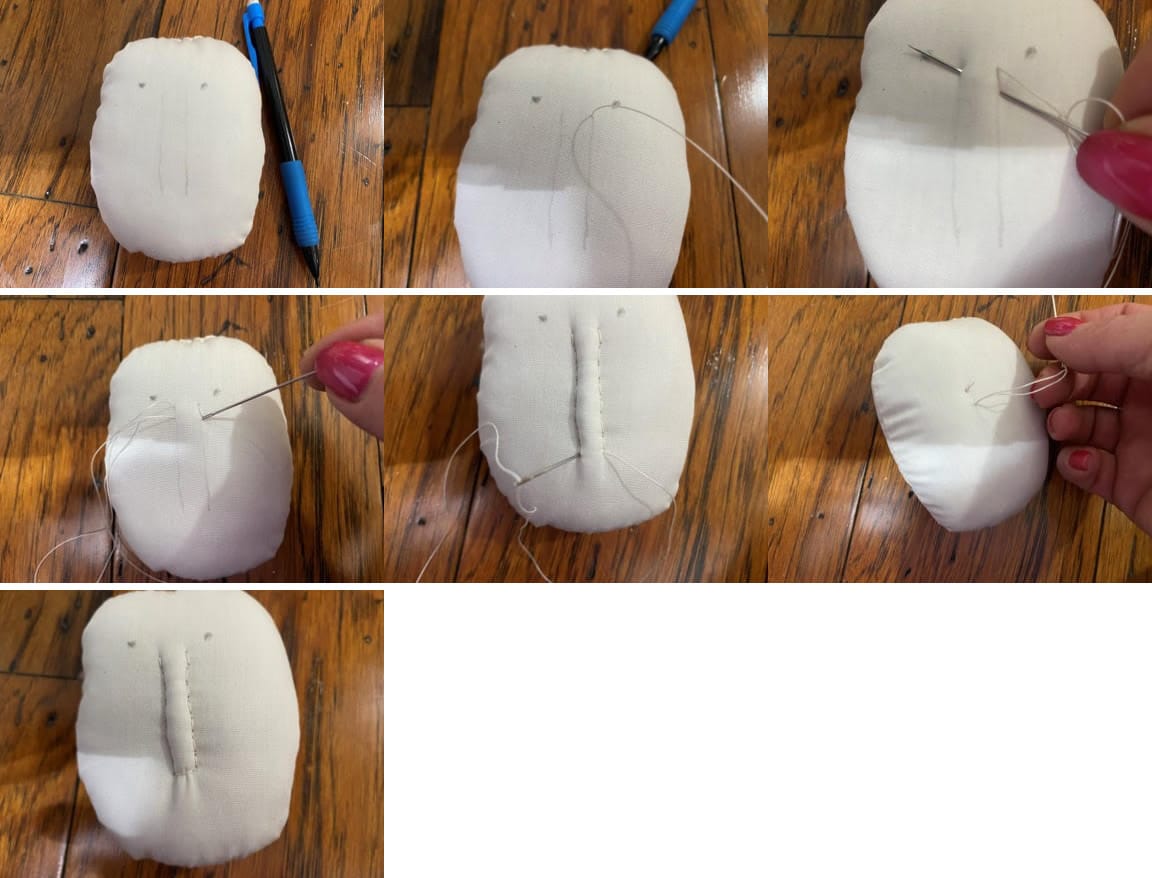
Using a pencil lightly draw the eyes and nose on the head where indicated on the pattern. To sculpt the nose using a heavy cream thread and needle insert the needle in the back of the head coming out at the top of the nose. Make a small stitch down, and come out on the other side of the nose at the top. Go back and forth in the same manner pulling the thread a little tight as you go. At the bottom go across the nose coming out the back of the head and knotting off.
Using black craft paint and a paintbrush paint on the eyes. Set aside to dry while you make the hat.
Making The Hat
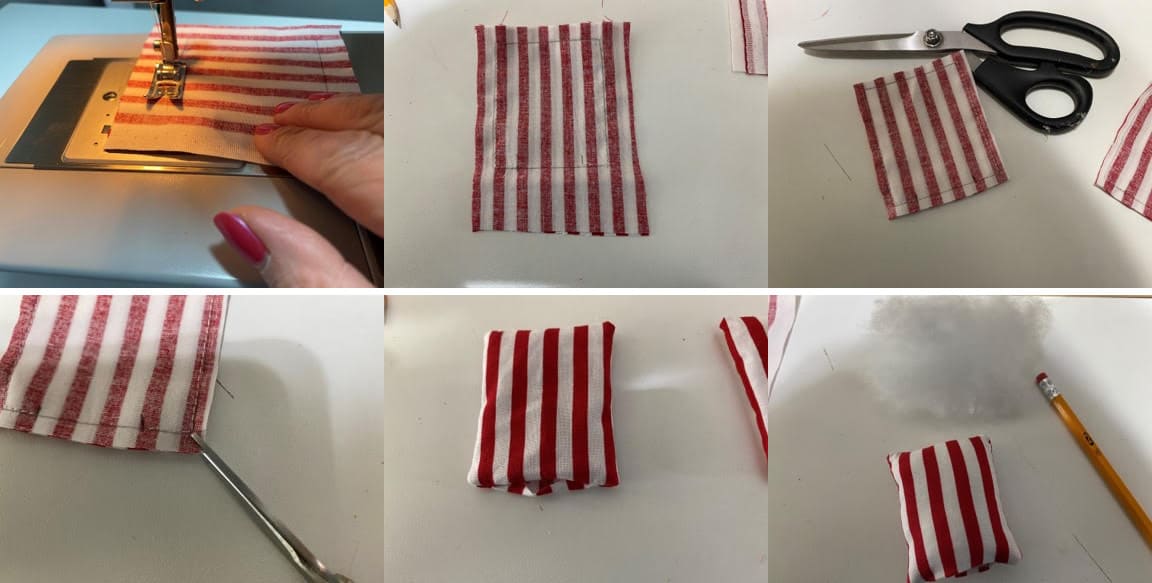
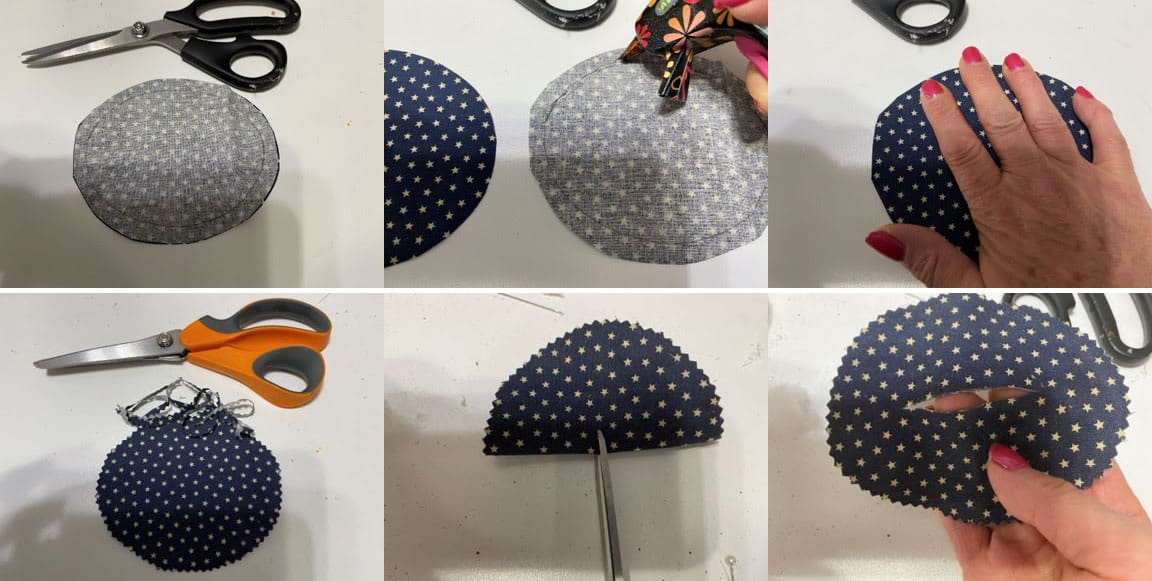
With the right sides of your fabric facing together trace the top part of the hat on the white and red stripe fabric. Sew the three sides together using the trace line as the sew line, leaving open at the bottom where indicated on the pattern. Cup out about a ¼” from the sew line. Clip the corners diagonally close to the stitching. Turn right side out and stuff firmly.
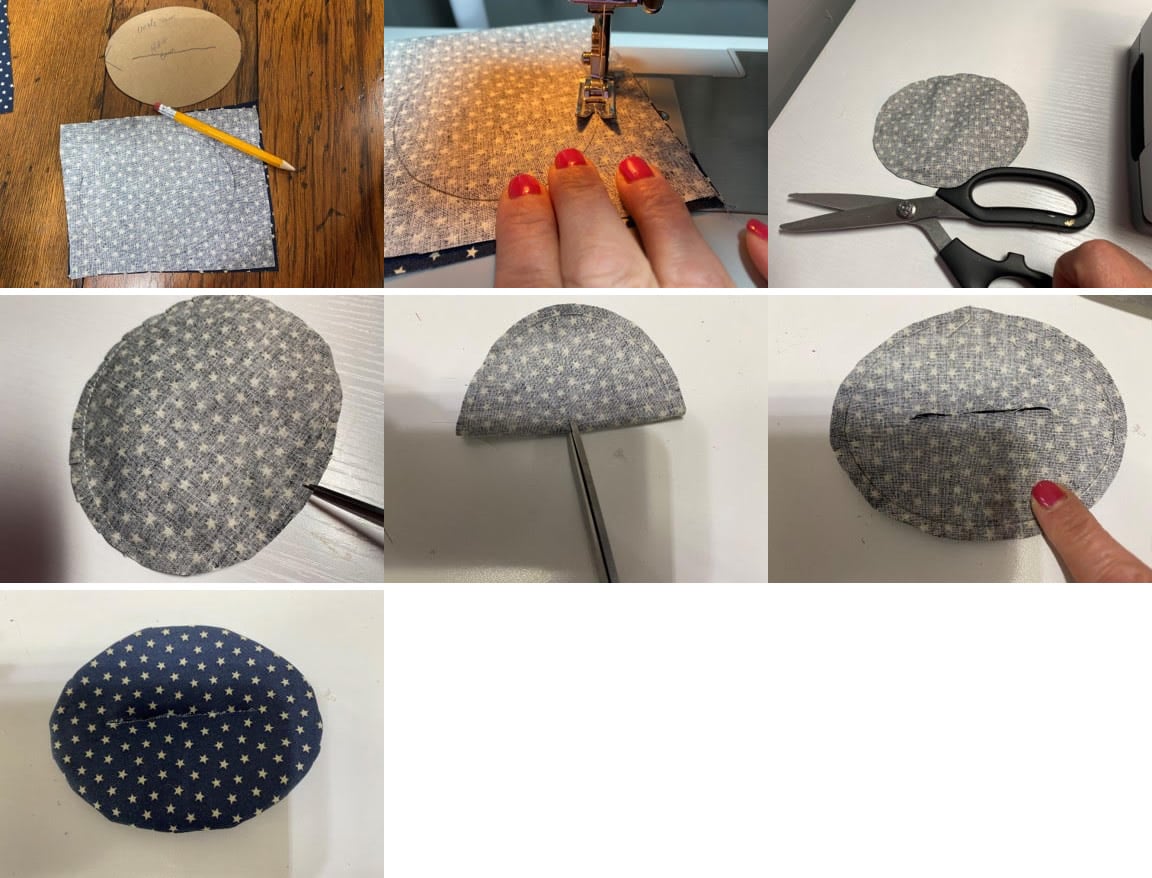
With the right sides of your blue star fabric facing together trace the hat brim. Sew all the way around the brim using the trace line as your sew line. Cut out about a ¼” from the sew line. Clip around the hat brim. Now you will need to cut about a 2” to 2 ¼” slash trough both pieces of fabric, use the pattern as a guide. You want the cut to me slightly smaller then the thickness of the top of the hat so it will fit snug. Turn right side out.
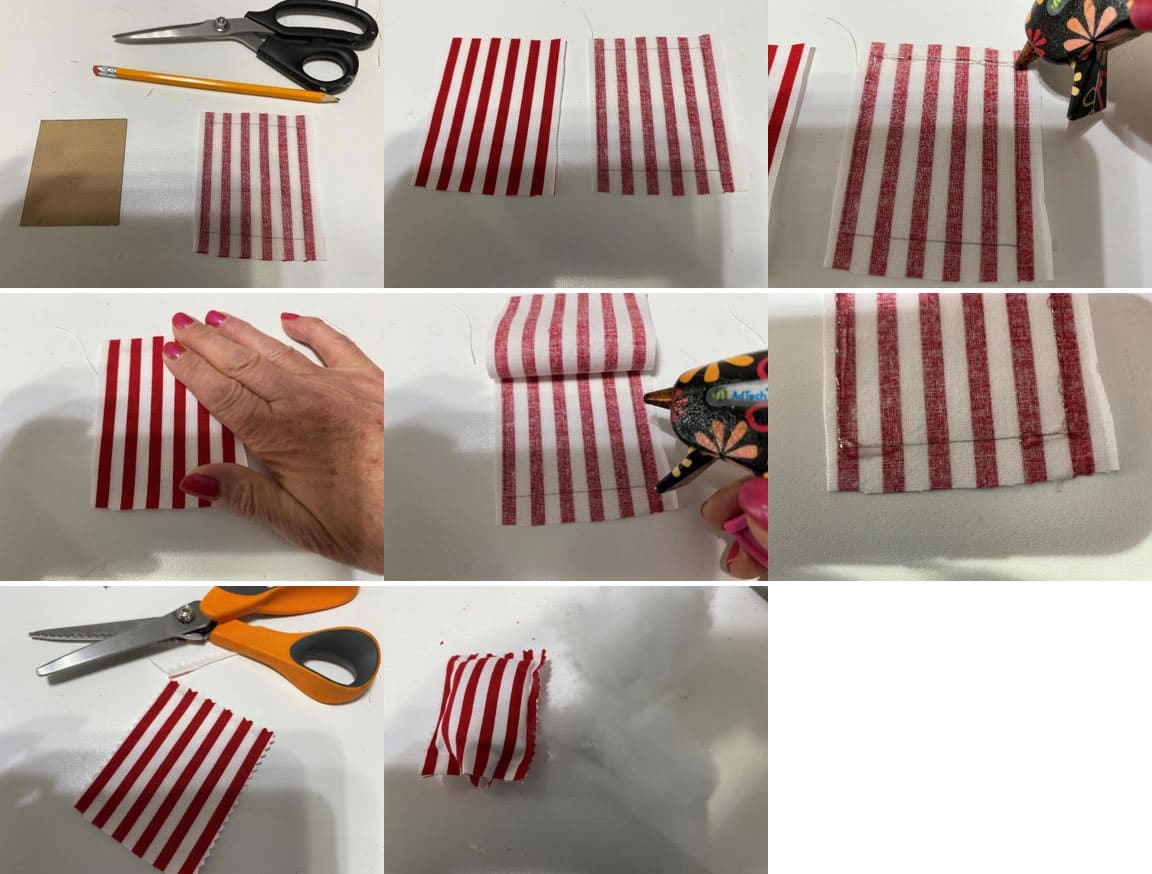
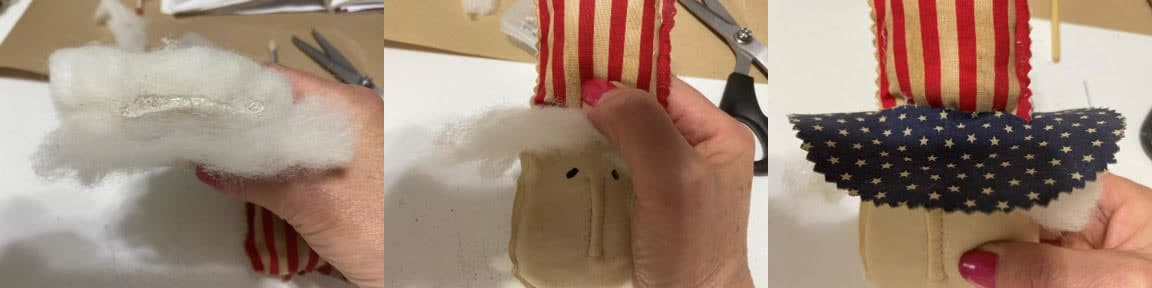
To glue the hat with the right sides of the red and white stripe fabric together trace the top of the hat on a double layer of the fabric. Cut out about a ¼” from the trace line. Separate the two pieces. With the trace line facing up add a line of hot glue around the top of the hat on the trace line. Place the second piece of fabric on top with the right side facing up and glue down. Fold back the bottom of the hat and continue to glue around leaving the opening where indicated on the pattern. Using pinking shears trim around the top hat piece making sure you don’t trim to close to the glue line. Stuff with polyfill.
With the right sides of the star fabric facing each other trace the hat brim on a double layer of star print fabric. Cut out about ¼” from the trace line. Separate the two pieces of fabric. With the trace line facing up add a line of hot glue around part of the hat then place the second piece with the right side facing up on top and glue down. Continue gluing the two pieces together all the way around. Using pinking shears trim around the hat trim close to the glue line. Make a 2” to 2 ½” cut through both layers of fabric as indicated on the pattern. Lightly stuff the hat brim I decided this after I have added the brim to the head so I do not have a photo for this step.
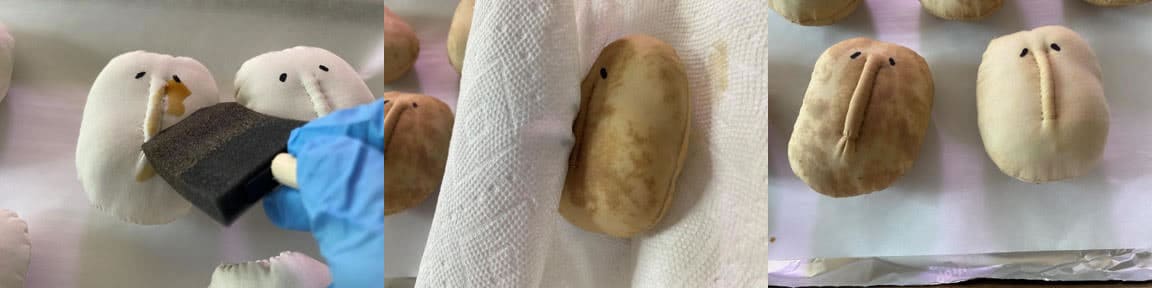
Coffee Staining
Now that you have all your pieces made it is time to coffee stain. If you would like my coffee staining mixture you can find it on my blog called how I coffee stain and color fabric. Place your head on a piece of foil or parchment paper then brush the entire head with the coffee mixture. I do not like the head to dark so I wrap the head in a paper towel and remove the excess coffee until I get the color I want. Next brush the top of the hat with the coffee stain mixture I do not use the paper towel on the hat pieces. Place the whole brim of the hat into the coffee mixture then squeeze out. You can let them dry naturally or your can place them on a foil lined cookie sheet and dry them in a 200 degree oven. Make sure you check them every 5 minutes or so until dry. If you have glued you pieces you will have to let them dry naturally. You can also coffee stain some cheesecloth at this time to wrap around the hat.
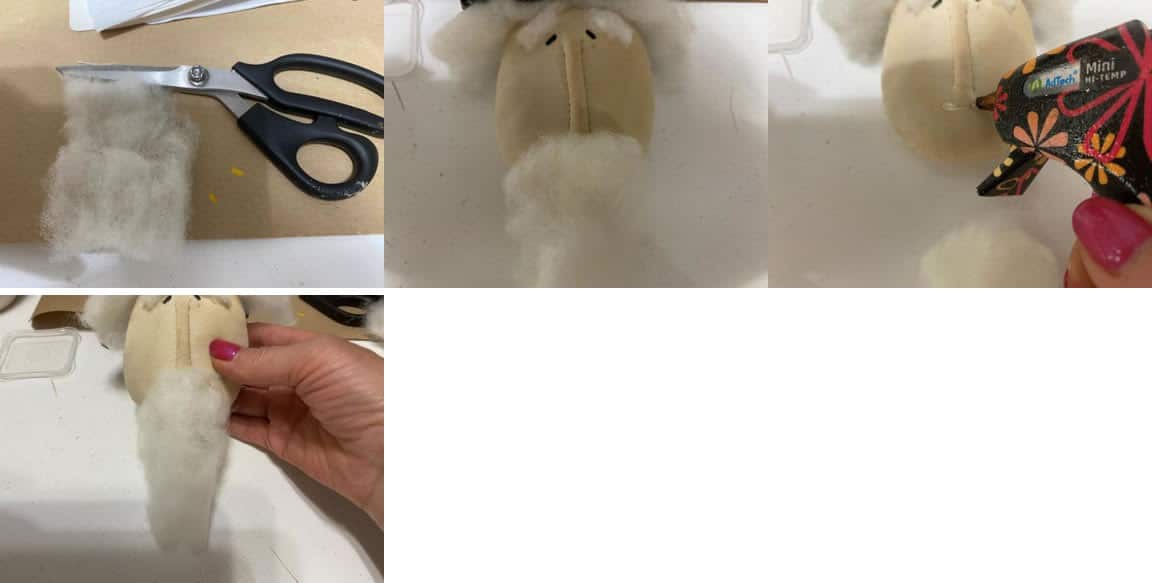
Adding The Hair, Brow’s and Beard
For the hair cut a 5” piece of the wool roving and place across the top of the head. If you would like to sew the hair on use cream thread and a needle and tack the hair in 3 spots across the top of the head. If you would like to glue the hair on add a line of hot glue across the top of the head and glue the hair in place.
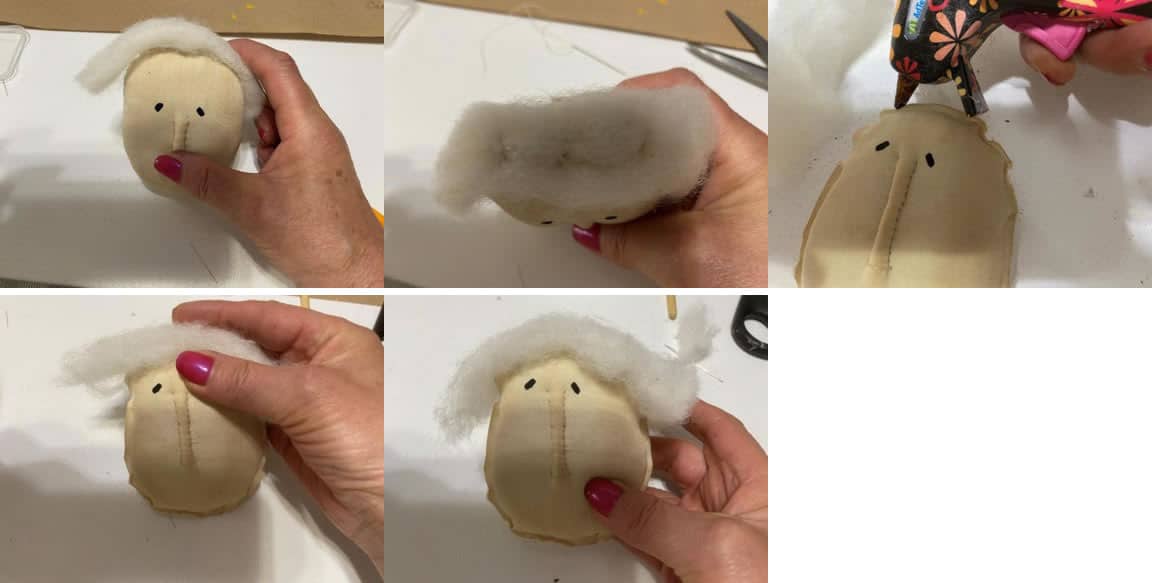
For the eyebrow’s cut a small piece of wool roll in-between you fingers then place above the eye to see where you would like it to be. Add a drop of hot glue above the eye and glue down. You may need to trim the length of the brow after attaching. Repeat this step to the other eyebrow.
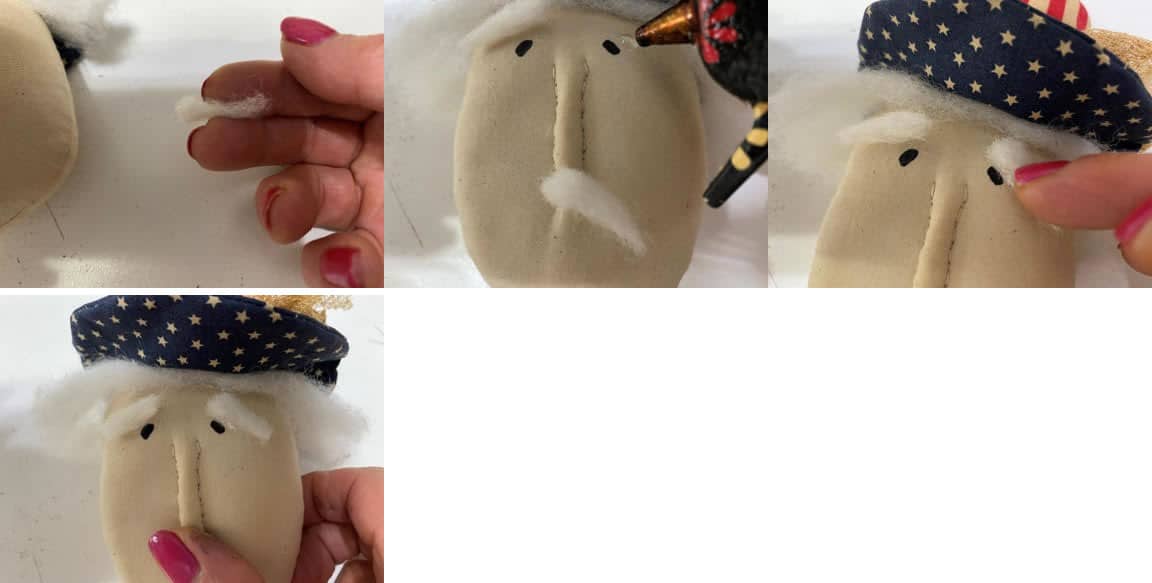
To add the beard cut a 2” wide by 3” long piece of wool. Place on the face under the nose to check the placement. Add a line of hot glue under the nose and glue the beard in place.
If you would like to also add a mustache cut a small piece of wool place under the nose between the nose and beard to check size and placement. Lift the mustache add a drop of hot glue and glue into place.
Attaching The Hat
To sew the top hat piece onto the head place the hat on top of the head in the center then using sewing pins pin in place at the front and back. Using cream thread and a needle sew the hat to the head all the way around and knot off. Next slid the brim of the hat over the top piece and sew the brim to the top piece of the hat. If you feel the brim is tight enough around the top of the hat you can skip sewing the brim to the hat. I chose to sew it just in case.
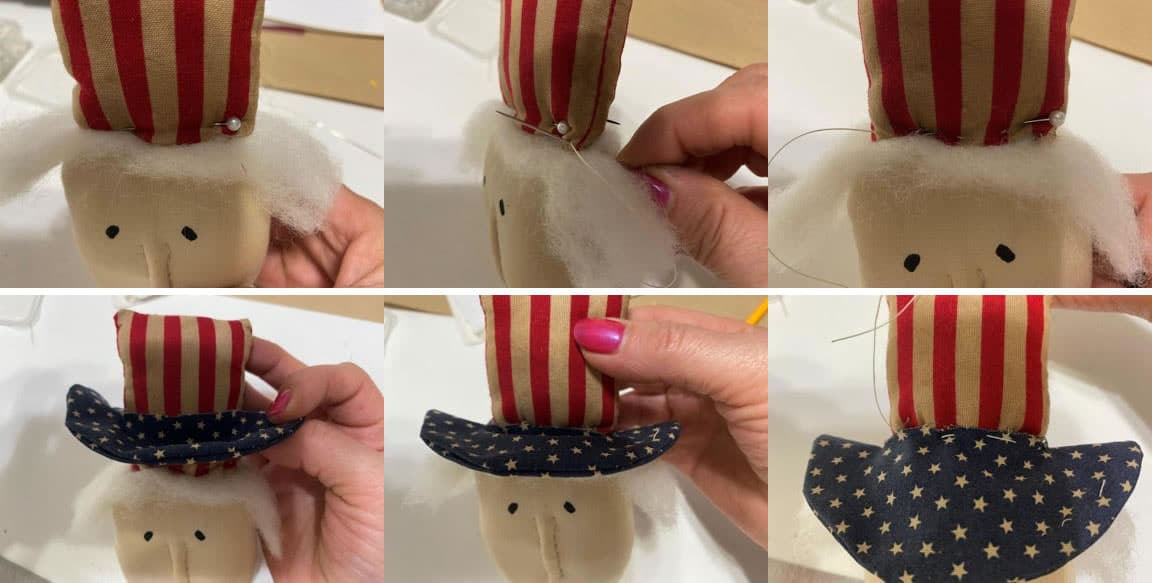
If you want to glue the hat on place the hat on top of the head in the center to check the placement. Remove the hat add a line of hot glue on top of the head and glue the hat top piece in place. Next slide the brim over the top hat it should be snug if you feel it is not secure enough you can add a little hot glue to hold in place.
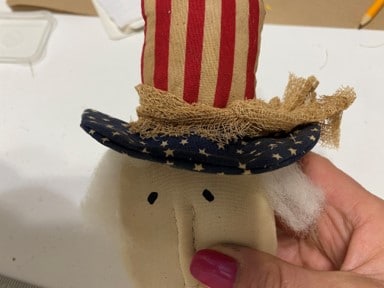
The last thing to do is tie a piece of cheesecloth around the hat to hide where the brim attaches to the top of the hat. After I was done I decided to hot glue a small rusty star on top of the cheesecloth.
Looks great
Very cute turned out great!, cut pattern out this morning getting ready to make😀😀thank you so much for all your crafts!!
Love the uncle Sams sprinkle sprinkle sprinkle decorate decorate decorate the page planting planting planting
Giving him a try I just love 4th of July decor and your instructions are great with pictures! Thanks Sherry
Love the uncle Sam you alway give as the good ideas and tell us make your own I did made it a body dress up with some materials I had even made hem a racker to sit hem on
I finally made 4 of the uncle Sam, Just love them. Thank you. Great Instructions.
Love him!! A must do!!!